Want to build a high-performance WordPress site and achieve maximum load times minus the common website lagging troubles? Well, all you need to do is install WordPress on Ubuntu.
Yes, you read that right. You can create an impactful WordPress website with the power of Ubuntu.
According to the w3techs research reports, of all websites using a content management system, 61.6% use WordPress, which is 43.5% of all websites. Given that managed WordPress hosting powers the largest share of websites on the internet, it only makes sense that millions log into them daily. Its user-friendly nature makes it a preferred choice for virtually everyone—bloggers, businesses, developers, and more. However, hosting a WordPress website requires a stable and secure environment.
This is where the host, Ubuntu hosting, shines. One of the best Linux distributions, Ubuntu has garnered a strong reputation for itself. Given its dependable nature combined with a strong architecture, it serves as the solid backbone of a high-performance WordPress site.
In this detailed guide, you’ll get the simplified way to install WordPress on Ubuntu. Follow this guide to hit the ground running and install WordPress on your server step by step!
Table Of Content
Pre-Installation Checklist
Check the do’s and don’ts: Prior to setting up WordPress on your Ubuntu OS, make sure the measures mentioned below are checked off.
- Ubuntu Server: You possess physical/virtual Ubuntu OS on a machine. ( Version 20.04 or newer is preferred.)
- SSH Access: If you’re away from your machine, SSH allows secure remote access to your server from anywhere.
- Permission to Sudo Class: Ensure you have a user account with sudo privileges to perform installations and configurations.
- Basic Linux command-line knowledge: Basic foundational knowledge of commands such as cd, apt, and nano is useful in this endeavor.
- Domain Name: Not required; however, redirecting your domain’s name to your server’s IP address allows easier access to professional virtual hosting.
Setting Up a LAMP Stack (Linux, Apache, MySQL/MariaDB, PHP)
In order to install WordPress on Ubuntu server, the LAMP stack (Linux, Apache, MySQL/MariaDB, PHP) needs to be set up. Below is an installation guide for each component.
System Update
The first step when installing new software is to make sure that the package repository is updated, as well as upgrading the entire system. This can be done by executing the command provided:
sudo apt update && sudo apt upgrade -yOutput:
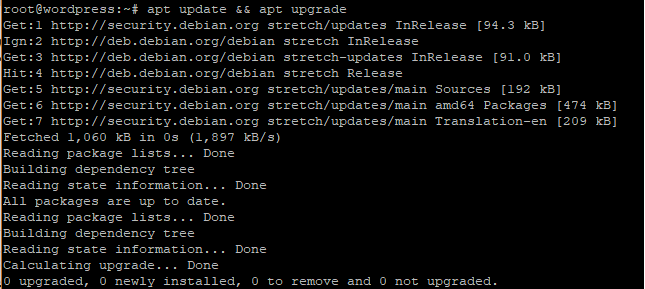
By regularly updating the system, installing new security patches and bug fixes can be done with minimal difficulty, alongside improving overall system compatibility.
Installation of Apache
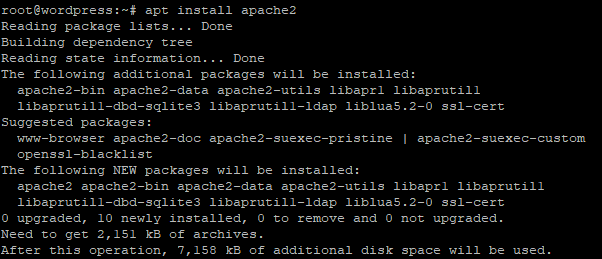
Apache is one of the most recognized open-source web servers that allows users to keep their website available and easily accessible over the internet. To install Apache, run the command provided:
sudo apt install apache2 -yOutput:
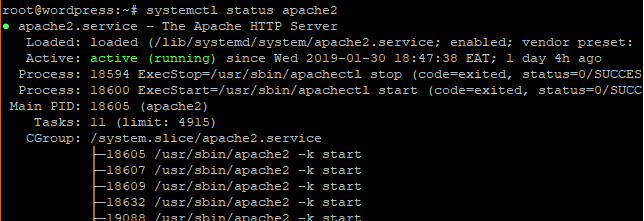
To verify its installation, issue the system command below to see if it is currently running:
sudo systemctl status apache2Output:
For security, allow Apache to accept web traffic through the firewall by running the following command:
sudo ufw allow 'Apache'With this command, the firewall rules for HTTP (port 80) traffic are enabled, making the web server available.
Installing MySQL/MariaDB
The management system used by WordPress relies on a database to manage content data. MySQL is a type of relational database that is managed, which PHP relies on, together with MySQL, MariaDB hosting, which stems from MySQL and serves as an open source that supports better functionality and scalability.
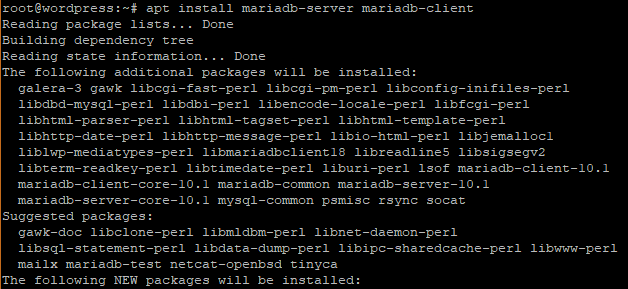
To install MariaDB, run:
sudo apt install mariadb-server -yOutput:
The procedure that follows initiates the securing of the database:
sudo mysql_secure_installation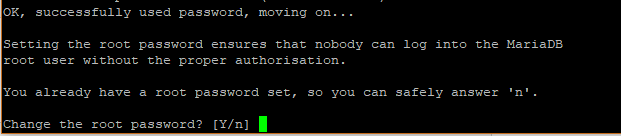
This script:
- Sets an initiation root password that was not previously enabled.
- Strips off unclaimed users for further security.
- Switches off outside root login to shrink unauthorized access.
- Invalidates the principal informatics low wall to contain assertive risks.
- Installs rolls of permissions edil which contain changes whilst granting access instantly.
- Confirm the running of the MariaDB by the issuing of the command:
sudo systemctl status mariadbInstalling Additional Required Modules and PHP
PHP serves as the backbone scripting language for WordPress. Thus, if you are aiming for the best WordPress hosting experience, having PHP modules installed will help. Commands to update PHP and other requirements:
sudo apt install php Output:
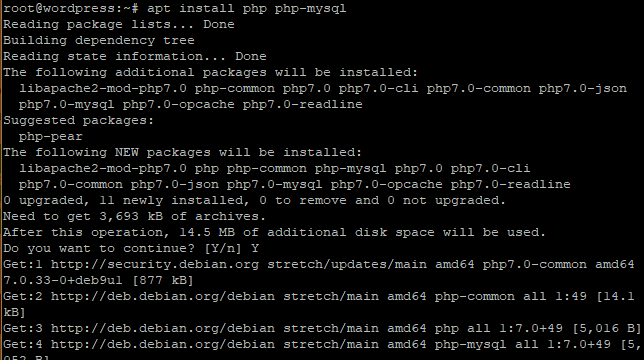
libapache2-mod-php php-mysql php-cli php-curl php-gd php-intl php-mbstring php-soap php-xml php-xmlrpc php-zip -y Explanation of PHP Modules:
- php-mysql: Facilitating connection wire for MySQL/MariaDB.
- php-cli: Issue a command-line interface for a verified authority with PHP.
- php-curl: Wire communication for outward servers using the php language
- php-gd: Image creation support is granted.
- php-intl: The rendered active role helps further for internationalized or localized content.
- php-mbstring: Handles encoding multi-character strings
- php-soap: Enables SOAP web services.
- php-xml & php-xmlrpc: Allow working with XML data.
- Php-zip: Supports ZIP archive handling.
The libapache2-mod-php module allows Apache to process PHP files directly.
To verify PHP installation, run:
php -v\Restart Apache
After installing PHP, restart Apache to apply the changes:
sudo systemctl restart apache2Now, your LAMP stack is fully set up and ready to install and configure WordPress on Ubuntu .
Related Read: Install WordPress on Windows
Creating a MySQL/MariaDB Database and User for WordPress
While setting up WordPress on Ubuntu, a database is needed for WordPress to save posts, pages, user data, and other site information. Follow the following guidelines to set up a database and username on MySQL/MariaDB with WordPress.
Step 1: Begin a session in MySQL/MariaDB
Use the command below to enter the database management system:
sudo mysql -u root -pOutput:
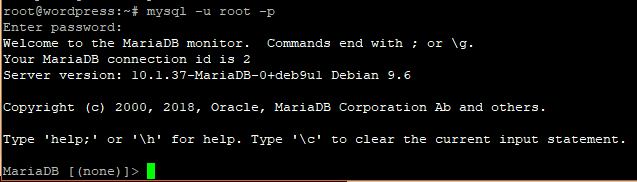
Now type the root password.
Step 2: Set Up a New Database
Set up a database specifically for WordPress:
CREATE DATABASE wordpress-db;Output:

Step 3: Set Up a New User
Set up a new user and set a strong password.
CREATE USER 'wp_user'@'localhost' IDENTIFIED BY 'password';Output:

Tip: Be sure to input a strong password inside the statement. This enhances the overall security of the server when you install and configure WordPress on Ubuntu.
Step 4: Assign Rights
Set up the newly created user with full authority over the WordPress database.
GRANT ALL ON wordpress_db.* TO 'wp_user'@'localhost' IDENTIFIED BY 'password';Output:

Step 5: Implement New Changes and Leave
Exit from MySQL/MariaDB and flush the privileges:
FLUSH PRIVILEGES;EXIT;Final Note: A strong password ensures database security, preventing potential data breaches and website compromise.
Downloading and Configuring WordPress
Once the LAMP stack has been installed and a MySQL hosting database or MariaDB database has been created, the next stage is to download and set up WordPress on the Ubuntu server.
Step 1: Change into the Apache Web Server Root Document Folder
Change into the directory from where Apache serves sites:
cd /var/www/html/Step 2: Fetch The Current WordPress Zip File
Use wget to fetch the new version of WordPress:
sudo wget https://wordpress.org/latest.tar.gzStep 3: Decompress The WordPress Zip File
Decompress the file you have downloaded:
sudo tar -xzvf latest.tar.gzStep 4: Relocate The WordPress Files To The Web Root
Relocate WordPress files to the working directory:
sudo mv wordpress/* .Step 5: Clean Up All Temporary Files
Remove the zip file and remaining WordPress folder:
sudo rm -rf latest.tar.gz wordpressStep 6: Assign The Correct Ownership To The File
In order to improve the functionality of WordPress, set the appropriate user and file permissions:
sudo chown -R www-data:www-data .

sudo find . -type d -exec chmod 755 {} \;

sudo find . -type f -exec chmod 644 {} \;
Importance of File Permissions
Strengthening security through proper file permissions mitigates the risk of unauthorized access:
- chown -R www-data:www-data .: Transfers ownership to Apache (www-data) so it can read and write the files.
- chmod 755 for directories: The owner has read, write, and execute permissions, whereas other users can only read and execute.
- chmod 644 for files: The owner has the ability to read and write the file, while everyone else can only read the file. This file permission stops others from modifying the file.
These permissions allow WordPress to function smoothly while preventing hackers from tampering with files.
Configuring Apache for WordPress
You need to configure an Apache virtual host for the domain to ensure WordPress operates correctly. It makes it easier for Apache to serve your setup and download WordPress for Ubuntu in a streamlined manner.
Step 1: Create a Virtual Host File
With sudo privileges, create a new virtual host configuration file.
sudo nano /etc/apache2/sites-available/WordPress.conf Then, add the respective configurations and remember to replace your_domain.com with your domain.
<VirtualHost *:80>

    ServerName your_domain.com

    ServerAlias www.your_domain.com

    DocumentRoot /var/www/html/

    <Directory /var/www/html/>

        AllowOverride All

    </Directory>

    ErrorLog ${APACHE_LOG_DIR}/error.log

    CustomLog ${APACHE_LOG_DIR}/access.log combined

</VirtualHost>
Press Ctrl + X, then Y, and hit Enter to save the file.
Step 2: Enable the Virtual Host
Enable the newly created configuration:
sudo a2ensite WordPress.confStep 3: Enable the Rewrite Module
The rewrite module allows WordPress to handle permalinks properly:
sudo a2enmod rewriteStep 4: Restart Apache
Apply the changes by restarting Apache:
sudo systemctl restart apache2Your Apache server is now configured to host WordPress with a custom domain, ensuring smooth operation and proper URL handling.
Completing the WordPress Installation on Ubuntu via Web Browser
After configuring Apache, download WordPress for Ubuntu setup through a web browser.
1. Open a Web Browser
Navigate to your domain or server IP address:
http://your_domain.com or
http://your_server_ip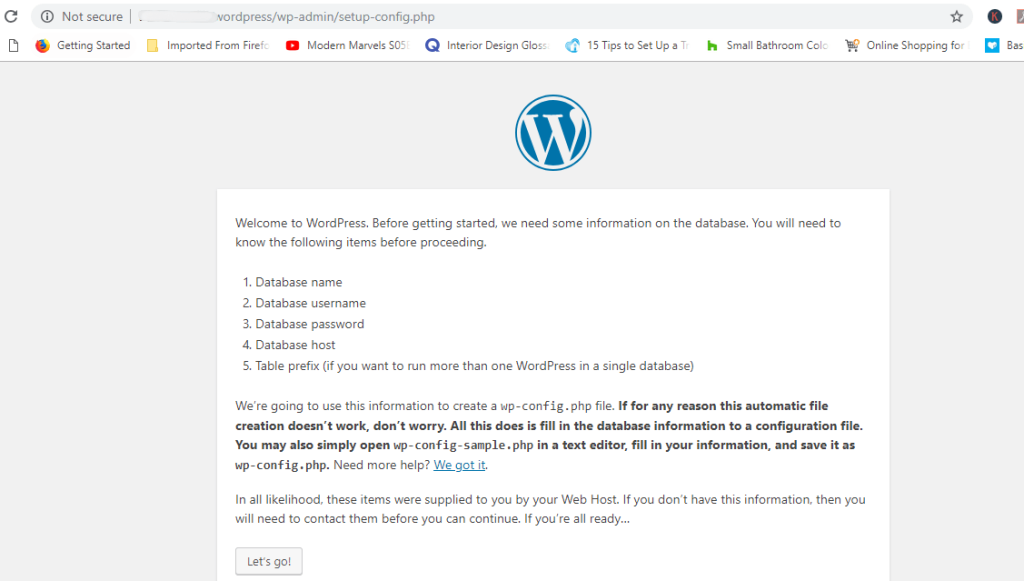
2. Follow the WordPress Installation Wizard
Choose your preferred language.
Click Let’s go! to proceed.
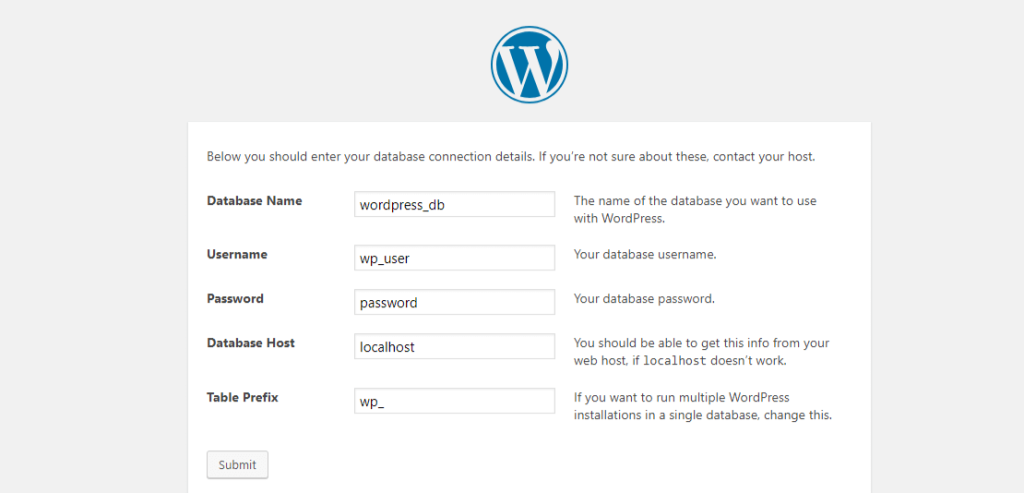
3. Enter Database Details
Database Name: wordpress_db
Username: wp_user
Password: password
Database Host: localhost
4. Configure Your Website
Set your website title. (eg: WordPress Site)
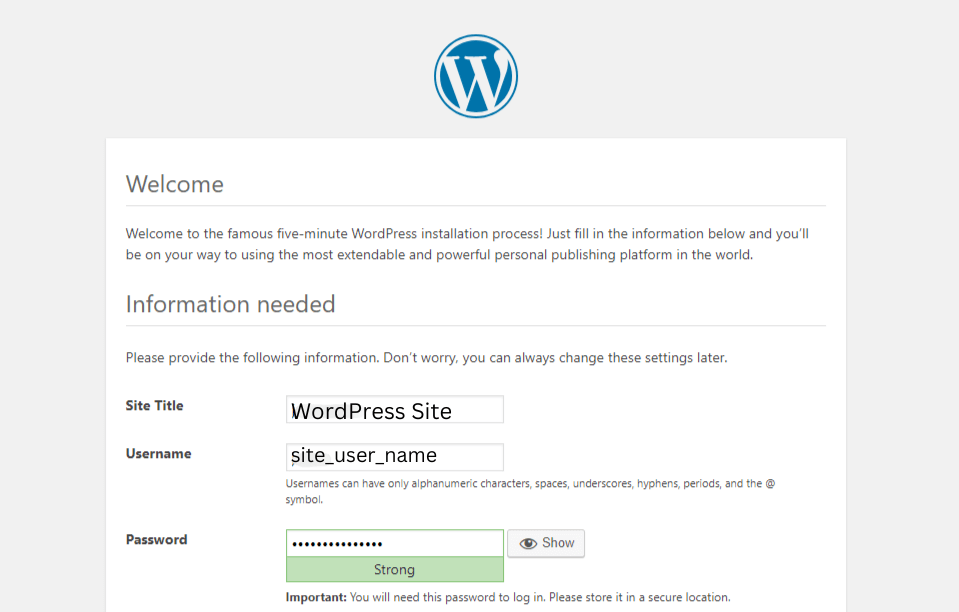
Choose a username and strong password for admin access.
Provide a valid email address for password recovery.
Click Install WordPress, and your site is ready!
Post-Installation Steps
After installing WordPress in Ubuntu, follow these essential steps to enhance security, performance, and usability:
– Install an SSL Certificate
Secure your site with Let’s Encrypt SSL:
sudo apt install certbot python3-certbot-apache -y
sudo certbot --apacheThis enables HTTPS, encrypting data between your site and users.
- Install Essential WordPress Plugins
- Security: Wordfence or Sucuri for protection.
- SEO: Yoast SEO or Rank Math for optimization.
- Caching: WP Super Cache or W3 Total Cache for speed.
Choose a Theme
Select the best WordPress theme that is responsive and lightweight via Appearance > Themes.
- Configure Permalinks
Go to Settings > Permalinks, select “Post name” for better SEO.
- Setup Backups
Use UpdraftPlus or Jetpack Backup to prevent data loss.
Congratulations! You have successfully set up WordPress on Ubuntu. Now your WordPress site is fully optimized and secure!
FAQs
How do I configure the WordPress database connection during installation?
To configure the WordPress database connection during the WordPress installation process, you must provide essential database information to establish a secure and functional connection. Type in the database name, username, and password you made during setting up WordPress on Ubuntu. Keep the database host as localhost and continue. In case of an error, check your information once again and make sure that the database is active.
How do I troubleshoot common WordPress installation errors on Ubuntu?
When you set up WordPress on Ubuntu, it is common to have minor issues the first time. If WordPress does not install, cross-check if the server is running and your internet connection is active. Incorrect permissions on files, lack of required PHP modules, or wrong database information may also result in errors. In such cases, restarting Apache and MySQL usually fixes the problem, or rechecking the database settings helps too.
How to create a backup of a WordPress installation on Ubuntu?
For having an effortless Ubuntu WordPress experience, ensure you have a stable backup of all your data. To back up WordPress, all you need to do is save the website files and the database. You can either manually copy these files or automate the process using a plugin such as UpdraftPlus. Further, when you choose a reliable hosting provider for Ubuntu hosting solutions, you get automated backup solutions. Doing regular backups makes it easy to restore your site when things don’t go as planned.
How to set up a firewall for a WordPress install on Ubuntu?
A secured setup of a firewall for a WordPress install on Ubuntu restricts unwanted users and makes your website safe. With UFW (Uncomplicated Firewall), you can allow only certain types of traffic, such as visits to your website and secure connections. Closing ports that are not required increases security and safeguards your website.