In today’s fast-paced world, people want things in a quick way and it makes them unhappy when they need to wait long for something. When you optimize your website for speed, it takes away the barrier between you and your audience.
Do you remember the last time you encountered a slow-loading website? You surely might have switched to some other website or completely closed the tab for time being.
Now, imagine your website’s visitors which may include small business owners, local homeowners, impatient clickers, etc.
So, if your website audience is the one that fits best in the impatient crowd then these people expect your site to load within the blink of an eye. If it doesn’t load quickly, you may lose them forever.
Of course your clients aren’t bad people. Also, this doesn’t mean that your visitors are over-demanding or are stressed-out. It is a normal behavior.
The prime factor responsible for the success of modern online business is website performance optimization.
Nevertheless, when the website’s performance is mediocre, it might kill your business.
Website Speed Optimization – An Introduction
Page Speed
The page speed is the time at which someone downloads web pages or media content from the web hosting servers and it gets displayed on the requested web browser.
Page Load Time
Page load time is the time length between clicking the link and displaying the complete content from the web page on the requested browser.
You need to understand three core aspects of page speed from the perspective of user experience and website performance:
- The time taken to deliver the requested material along with the associated HTML content to the browser.
- The response of the browser to page load requests.
- The end-users’ view as the requested web page renders on the browser – this is the vitally observed measure of page load speed.
The search engine rankings get affected due to website performance integrating key factors that include page speed, website responsiveness, user experience and other website performance metrics.
Focusing on page speed optimization from the start to enhance the website performance is critical. Factors such as performance optimization plugins, server-side scripts and final tweaks have minimum but noticeable impact on load times and page speed. However, online business owners and web developers ignore page load times while website development and designing strategies are implemented.
Your Website Shouldn’t Be Slow

If your website is slower than the blink of an eye which is around 400 milliseconds, visitors will immediately switch off from your website. As per Google engineers, approximately 0.4 seconds is long enough barely noticeable page load time so that the users search less.
In 1990s, users used to face the issue of waiting for long until the site gets loaded. But after innovations in communication and networking technologies, the way of transmitting digital information across the internet is completely changed. The next gen’s online businesses have all the resources required to deliver content in a fastest possible way. However, for reaping the benefits of these resources, businesses need to have high-speed websites which deliver the best user experience.
Harry Shum, Microsoft speed specialist and computer scientist believes that 0.25 seconds of difference in page load time – faster or slower – helps in prescribing competitive advantages for online businesses.
What Happens When a Website Loads Slowly?
What if someone browses your site and it takes long time to load? Do you think the visitor will wait until your website gets loaded?

It’s a fact that 46% of users won’t revisit a low performance website. So, you as a website owner just have 5 seconds to engage your visitors prior to they leave. Also, if users are browsing the website on mobile, 74% of them would leave, if it takes over 5 seconds to load. For big ecommerce websites such as Amazon, every one-second delay in the page load time can lead to an annual loss of $1.6 billion.
Page load time of less than two seconds is expected by 47% of ecommerce customers prior to they think of leaving the site. 40% of the visitors can possibly leave the site at the third second of waiting prior to a performance tool tracks their presence on the site. Peak load time on an average is just 2 seconds – faster than millions of websites.
Speed Examples Related to Real Life
 Rise of Airplanes: Earlier, there were no cycles available for people to travel from one place to another. Humans made use of horses to take them from one place to another and this took a long time to reach a particular place.
Later on when the technology enhanced, vehicles such as cars, buses, autos and railways were introduced to make traveling faster. Still when people felt the need of a higher speed, airplanes were introduced which take very less time to reach a particular destination as compared to vehicles.
 Introducing UberEats: Just a few years before, individual restaurants had their own food delivery services. But it required the customers to select the restaurant that is nearest to their place and needed to wait for hours to get the delivery. Then Uber started its own food delivery service called as UberEats which not only offers customers to select their favorite restaurant but also gets the food delivered in just 10-20 minutes by their appointed delivery guys.
 Amazon Prime: Online shopping is just booming since Amazon introduced its ecommerce shopping. No doubt they used to deliver the products at the doorstep of their customers earlier too but it took at least 3-7 days. Then Amazon thought of starting a fastest delivery service with Amazon Prime which not only makes customers’ days special but also helps customers to get the products on time in case of urgency.
The above examples showcase how using different techniques helped to improve the customer engagement as well as business growth. Similarly, you can implement some techniques to improve your website loading speed which will help in customer engagement as well as business growth.
The Effect of Your Website Performance on Business Success
Basically, website performance is the time taken for your website’s pages to download and display to your users.
Users browse your site from several devices and web browsers, so you should ensure that your site runs smoothly for all. In case your website doesn’t perform well, the consequences can be long-lasting or may cause permanent damage to your business.
You website’s performance and your business’s success go hand in hand in several ways and you should remember them while developing your website for optimal speed and results.
 UX – User experience indicates the fulfillment of visitors that visit your site. The main goal of website performance is retaining users so, you should think about their experience on your site. In case they need to wait for long for the pages to load, or get redirected or error messages or some pages are inaccessible, they will consider it as a poor experience and move on to other sites. For every second that your pages take to load, the user experience declines. Each second that gets added to the wait time is an opportunity for your users to close your site. Even mobile users are much impatient similar to desktop users and give only three seconds to load a page on the mobile device. This is expected as millions of websites are able to meet the users’ standards and if yours is one of them, then your business is going to be successful.
Related: What Does It Take To Ensure A Good User Experience On Your Website?
 Credibility – When visitors form their impressions, they place a heavy weight on your website’s performance. In terms of new visitors, these are first impressions that help to decide whether they will return to your site or not. Many times even loyal customers can abandon your site and switch elsewhere for faster performance and quick access to the information they are finding. A business website that loads slowly is considered as low quality and less credible. Also, if your website isn’t able to meet the users’ expectations, your reputation will be affected forever.
 Competitive Advantage – If your website performs up to the mark then the visit results in conversion, may it be people that sign up for your programs, contact your company for more information, download your app or choose to visit your brick and mortar location. Lastly, conversions is the reason for which you have setup your website. Any business has a tough competition and the competitors are always finding ways to distract your customers. If your website is poorly performing then for sure your visitors are going to say you goodbye forever. Your competitors take the advantage of this to detain your target market’s attention and business. When a user is asked to select between two businesses – one with a slow-loading site and one with high performance, it becomes easy for the user to decide which company to spend money on.
 Sales – Website performance means the power of page speed that translates into attractive online shopping experience which increases sales figures and finally, verifies online business success. Google began to consider page speed as a ranking factor since it experienced the forceful impact of low website performance on sales. It once experienced 20% fall in traffic due to half-a-second delay in page load times.
Since the quality of service and product has a major effect on the business sales, to convert website visitors into buyers in the cyber world mainly depends on creating a positive customer impression. And this is where the ecommerce website performance parameters such as ultra-fast page speed and rapid check-out processes come into spotlight by giving customers a positive psychological impression improving sales and customer loyalty.
Google was quick in solving this issue which affected its market share to minimum extent but this isn’t the case with online businesses that haven’t yet established their presence in the competitive online marketplace.
Forrester, a consulting firm, conducted a study on the state of consumer online shopping expectations and studied the way underperforming websites kill business bottom line while high performing websites rapidly boost sales.
As per the study, 88% of the internet users selected online retailers that deliver high-performance and user-friendly website experience and nearly 50% leave the website that didn’t load within 3 seconds.
 Conversions – A site or service is offered for a reason, and when a user signs up for a trial, purchases your service or product, subscribes to your mailing list, or consumes your content (with the ads), you make a conversion that improves your major business metrics. Website speed plays a key role in improving your conversion rates and enhancing consumer satisfaction. As per the Aberdeen’s study for every second beyond the two second mark, there’s a drop in conversion rate by 7% and page views drop by 11%.
- If e-commerce sites experience a 7% drop in conversions, it means they have lost sales. If a site that generates $10,000.00 per day experiences a drop by 7%, this means a loss of over $2.5 million a year for a page that takes three seconds to load instead of two.
- In terms of content sites, if there is an 11% drop in page views, there is a serious impact on ad revenue. For example, if a news site gets 60 million unique viewers per month, with an average of 4 pages viewed per visitor, and if there is an 11% drop in page views, it means 26,400,000 fewer pages viewed in a single month. If your site makes $1.00 per 1000 page views, you lose $31,680.00 per year due to a one second delay in page load time.
To bring the potential customers to the doorstep of brick-and-mortar retail stores, you need to thoroughly plan for the marketing and advertisement campaign. Also, you need to ensure that once customers enter the shop, they don’t leave without a purchase.
Just a few efforts are required to bring online customers to visit an online retail store. You can follow the trick of search engine optimization and social media adverts to bring customers to your store.
Additionally, it is convenient for the visitors to leave the site, if they don’t get the required information within few seconds whereas for the unimpressed visitors, it takes just a few wayward clicks.
 User Engagement – User engagement statistics in website analytics help in developing the best strategies for online sales optimization. Online businesses that are well-established in the competitive market know the importance of website performance and tools that analyze and identify the next-best strategies related to page speed and revenue.
Improved user engagement information with fast-loading and responsive websites is often an alternative for the success of online business. User engagement highly depends upon human limitations in storing short term memory after a few seconds and the desire to have control over the machine under all situations.
In terms of underperforming websites, page load times are much higher than expected by the visitors. So, when a website isn’t able to follow the user request, a negative impression is created which leads to waiving off your website.
Whereas high-performing websites affect three parameters that find user engagement: user feelings, user mental states, and user interactions. With these three aspects an emotional, cognitive and behavioral connection is created between human visitors and the website.
Having this connection in place, online businesses can affect user engagement characters such as motivation, focused attention and trust in converting visitors into customers, repeat customers and even brand ambassadors, which helps in generating leads across the social media and outside of the internet world.
 Revenue – Have you ever put yourself in the shoes of your customers? If not, here’s the output:
“People Hate Waiting”
And yes slow speed kills conversions. Want to check how? Here’s an example:
In 2012, Walmart was facing the issue of decrease in conversion rates due to slow site speed. Then Walmart increased their site speed and found an increase in their conversion rates as well as revenue. While analyzing at first, they found that the visitors that got converted received pages that load 2X faster as compared to the visitors that didn’t convert.
For boosting conversion rates, it is important to check if your site loads quickly and cleanly. It might be that you need to eliminate fancy coding or special effects. But basically, a clean website that loads instantly will help to bring in more conversions than flashy design.
 Usability – Website that is hard-to-use won’t help your visitors. When users land on your site they want to know the way to navigate. They need to take a look at every element on your page so that they find what they are looking for.
Also, websites that are easy to navigate achieve highest conversions.
It might be that some elements on the page will load slower as compared to others. For instance, if you have uploaded a large background image, it might get displayed on the screen gradually. This is specifically true on mobile devices since they have less processing power.
You can’t forget that you want to keep people engaged on your site. When visitors land on your website, check out a page and leave immediately, your website’s bounce rate also increases. Such visitors check your site in detail.
Suppose a consumer clicks on a link that takes him to your website and the page takes long time to load, he might assume that even other pages will take that much time. Though the consumer won’t think the same way but he might hesitate to click other pages to avoid the frustrating experience.
Ensure Your Website is Optimized for Speed
Things You Need to Know for Website Speed Optimization
You get a page speed score with Google’s Page Speed Insights along with detailed suggestions on improving your mobile site’s performance. It generates a detailed report with complex instructions on improving your site’s speed.
Because network speed and performance differ widely based on the geographic location and other factors, Page Speed Insights considers only factors that are network independent. Below are some aspects offered by Page Speed Insights:
- Server Configuration.
- HTML structure of the page.
- Use of Java and CSS.
Every suggestion by Page Speed Insights is given ratings as per priority indicator to display its significance.
When you check the speed for Facebook in the Page Speed Insights tool, it displays a score as 81/ 100 which indicates how much improvement the site requires.

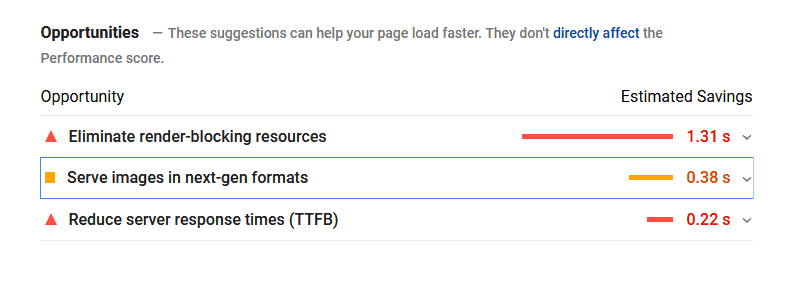
For example, the ‘Yellow Exclamation Point’ suggests changes such as:
- Eliminate render-blocking resources
- Serve images in next-gen formats
- Reduce server response times (TTFB)
This indicates that these elements need to be fixed for better performance of the page. Below every suggestion, there is a solution given to fix the issue so that you can optimize your site’s load time.
Below are the tips to optimize your website for speed:
Decrease Your HTTP Requests
As per Yahoo, 80% of a web page’s load time includes downloading the different parts of the page, such as stylesheets, images, and scripts.
For each one of these elements to get loaded, an HTTP request is made. So the more on-page components, the longer it takes for the page to render.
The first step to minimize your requests is finding out the number of requests your site currently makes, to set it as a benchmark.
In case you use Google Chrome, check the browser’s Developer Tools to see the number of HTTP requests made by your site.
On the page, right-click for doing the analysis, and click “Inspect” and then click the “Network” tab. (In case the “Network” tab isn’t visible, expand the Developer Tools sidebar by dragging the left border to the left.)
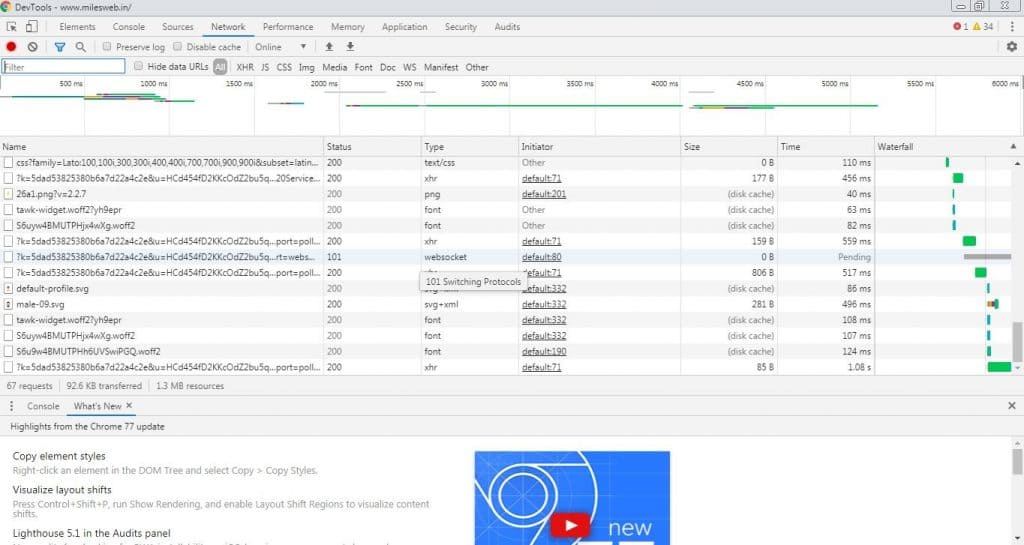
The “Name” column displays all the files on the page, the “Size” column displays each file’s size and the “Time” column displays the time taken for each file to load.
The bottom left corner showcases the number of total requests made by the site.
When the number of requests is reduced, it will speed up your site, check your files and see if any are unnecessary.
The change won’t be noticeable immediately.
Minify and Combine Files
Since you have the number of requests made by your site, you can start working on reducing that number. You can start with your HTML, CSS, and JavaScript files since these are highly important files because they decide your site’s appearance.
Additionally, they get added into your site’s requests each time a user browses it.
This number can be reduced by minifying and combining your files. With this, the size of each file gets reduced along with the total number of files.
If you use a templated website builder, it becomes important to do. This makes building a website easy but sometimes messy code gets created that leads to slowing down of your site.
When you minify a file, it includes removal of unnecessary whitespace, formatting and code.
Each unnecessary part of the code increases your page’s size and therefore, you should remove the line breaks, extra spaced and indention in it. This makes the pages much lighter than before.
This is similar to combining files. If there are multiple CSS and JavaScript files run by your site, combining them into one would be better.
You can minify and combine files in different ways and in case your site runs on WordPress using plugins such as WP Rocket will make it simpler.
If this plugin is installed, go to the “Static Files” tab and check the files that need to be minified and combined.
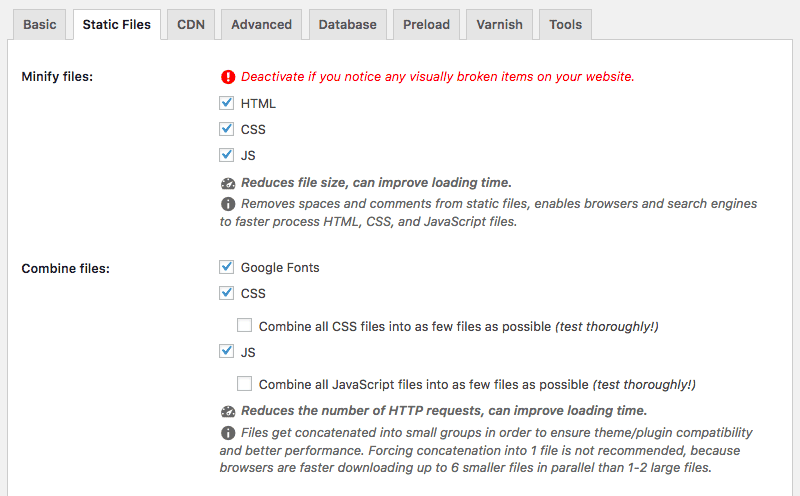
This can comprise of CSS, HTML, and JavaScript files, along with Google Fonts.
Then, click on “Save Changes” to complete the process. Reload your page and check the Developer Tools again to analyze the impact that your changes made.
In terms of your website, lighter is better. Since the page will contain fewer elements, the fewer HTTP requests will be needed to make by browser to render the page — and this will result into faster loading of the page.
Minimize the Time to First Byte (TTFB)
TTFB is the time required by the browsers to collect data from the server. In simple words, it is the time taken by the page to start loading.
Your TTFB comprises of three elements:
- HTTP request time
- Process request time
- Response time
Check below a visual representation of how the time to first byte works:
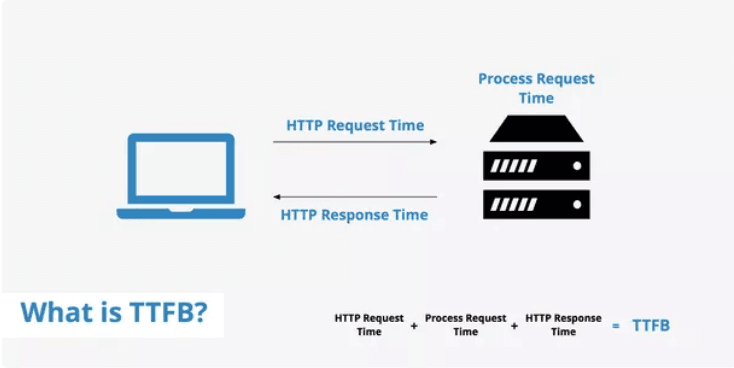
If your website’s TTFB is fast then requests get delivered faster to the browser. Due to this, your content for visitors gets loaded faster. Make sure your TTFB is less than 200ms.
You can calculate it using WebPageTest as a resource to find your time to first byte.

In the above image see the “first byte” column to check where you stand. For the websites that have TTFB of more than 200ms, you’ll need to think upon the strategies to improve that number. Below are some common issues associated with slow TTFB:
- Server configuration
- Network issues
- Content creation
- Website traffic
Your TTFB can be reduced by enabling browser caching which is one of the best ways.
Enable Your Browser Caching
If someone visits your website for the first time, all of the elements need to be loaded. These elements get stored in a cache, a temporary storage on their hard drive. The next time the visitor browses your website, his browser loads that page without sending an additional HTTP request to the server.
If you have enabled caching then your website speed will be faster for returning visitors.
Plugins such as W3 Total Cache help in enabling cache easily.
After installing it, go to “Page Cache” under “General Settings” and check the box next to “Enable”.
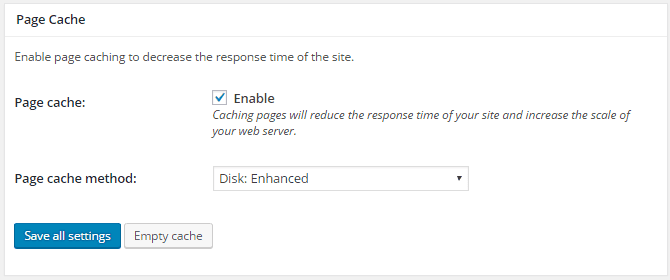
With this simple step, you will boost your site performance — but you can do more to improve your results with the plugin.
When browser caching is enabled it allows you to store a cached version of your site in a visitor’s browser. This indicates that when a user returns to your site, it will load faster.
This option can be enabled by navigating to General Settings > Browser Cache and checking the box next to “Enable.”
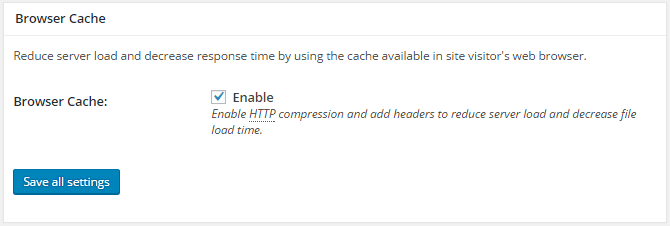
In case you have hosted your website on a VPS or a dedicated server, it is possible to enable object caching to speed up dynamic elements on your site.
You will find this feature under your General Settings too.
In terms of shared server, leaving this option disabled is the best. Object caching is the process that leads to resource-intensiveness and end ups slowing down the site. The exact opposite of what you want to accomplish with the plugin.
After configuring your settings, you will notice improvements in your load times immediately. As per W3 Total Cache users, there have been 10x improvements in Google PageSpeed results, and up to 80% in bandwidth savings after complete configuration of the plugin.
In case of a static HTML site, caching can be enabled in your .htaccess file.
Lines of code can be added to the top of your .htaccess file that help browsers to decide what to cache and the time to store it, as below:
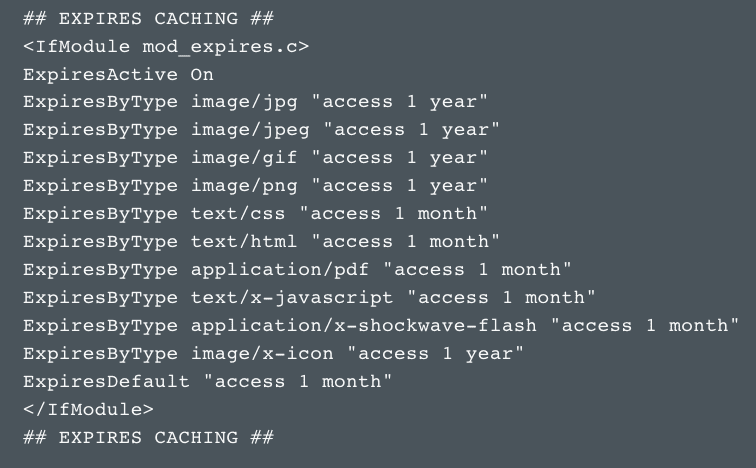
This lets you set the amount of time you want each type of file to be stored in a visitor’s cache.
Generally, the cache lifetime of static resources should be of minimum a week. Also, the cache lifetime of the third-party resources like ads or widgets should be of at least one day.
Set the caching for all cacheable resources like JavaScript and CSS files, media files, image files, and PDFs, between a minimum of one week and one year.
Make Use Asynchronous Loading for CSS and JavaScript Files
After minifying and combining some of your files, they can be optimized in the way they get loaded on your pages.
There are two different ways in which the scripts such as CSS and JavaScript get loaded: Synchronously or Asynchronously.
In synchronous loading of your scripts, they get loaded at once, in the order they get displayed on the page. In asynchronous loading of your scripts, some of the scripts will load in simultaneous manner.
When files load asynchronously, it helps in speeding up of your pages because when a page gets loaded by the browser, it moves from top to bottom.
If a CSS or JavaScript file isn’t asynchronous it would stop loading until it completely loads that particular file. If the same file is asynchronous, the browser will continue to load other elements on the page at the same time.
Using the WP Rocket plugin, under the “Static Files” tab, check the options next to “Render-blocking CSS/JS.”
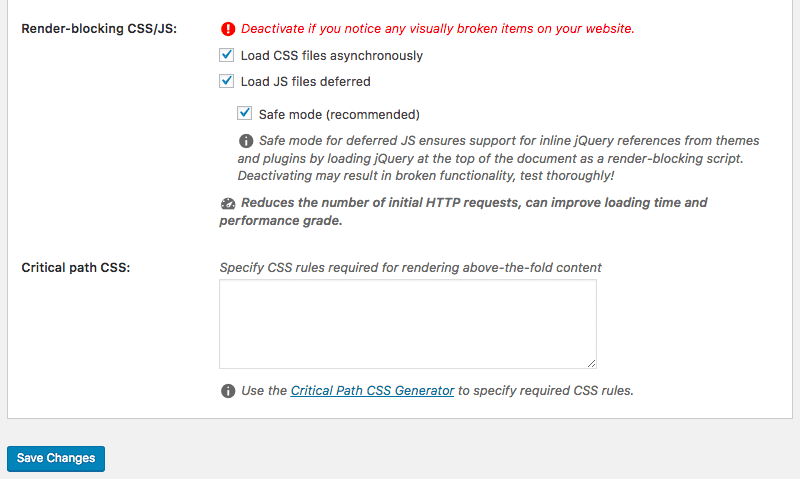
Click on “Save Changes,” then test your site to ensure that all elements load correctly.
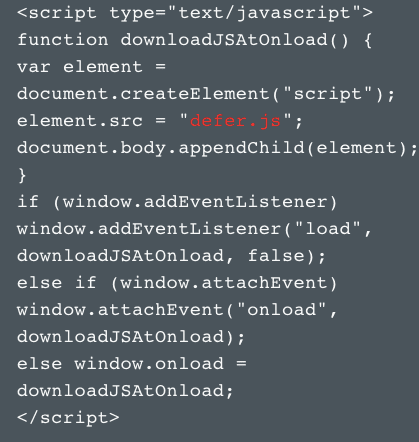
Defer JavaScript Files Loading
Deferring a file involves postponing the file’s loading until other elements on the page get loaded. When a large file is postponed, it helps to make sure that other files get loaded faster without any issues.
Since JavaScript files are large, they can be deferred.
In case of WordPress website, you can easily defer the files in just one click by using WP Rocket plugin.
The other way is to insert some code into the tag for JS files. It will appear as below:
Enhance DNS Lookups
DNS stands for “domain name system.” This is a server with a database of IP addresses along with names of different hosts.
When a user enters a URL into his browser, the DNS server translates the URL into an IP address, specifying its online location.
Just typing the website URL into your browser doesn’t end the task. The URL needs to be translated to find the site that you are looking for. Below is the visual presentation of working of DNS lookup:
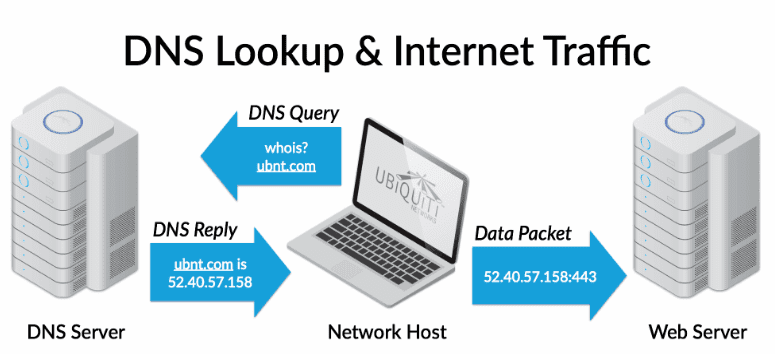
Your DNS provider will get an IP address like 52.40.57.158.443, which tells it where to find the site that you are finding.
DNS lookup helps people to get the site they are looking for without memorizing long strings of number combinations. But, sometimes it requires a lot of time.
In case your DNS lookup time is too slow, you should find a new DNS provider that will offer you faster service.
Select the Right Hosting Option for Your Needs
There are many site owners that select the cheapest hosting option. Though this is often enough at the start, you need to upgrade when you start gaining more traffic. Don’t keep your web host selection on hold; instead get one that you can trust.
When you think about hosting, you can select from three different options:
- Shared hosting
- VPS hosting
- Dedicated server
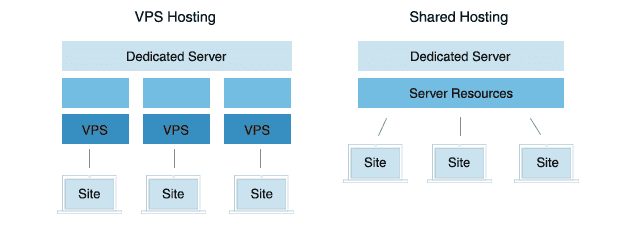
Shared hosting is the easy and most affordable option for beginners. Though good for low-traffic sites, it becomes difficult to keep up with traffic spikes and high-volume sites. Also, it is possible that your site gets affected due to the traffic spikes from other sites using the same server as you.
Shared hosting allows you to share certain resources like disk space, CPU, and RAM with other sites hosted on the same server.
In VPS hosting, you share a server with other sites, but you have your own dedicated portions of the server’s resources. This is the best in-between option. Your site when hosted on VPS server remains secure from other sites on the server without spending for dedicated hosting environment.
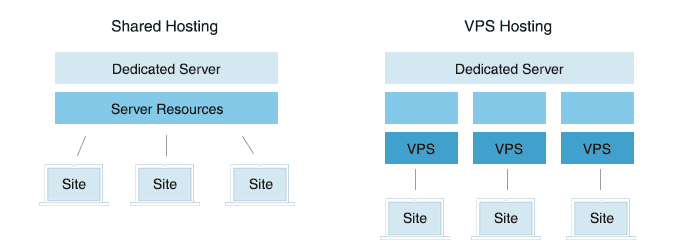
Shared and VPS hosting can be explained with the analogy of living in an apartment vs. living in a condo.
In an apartment, you share certain facilities like laundry rooms and parking lots and get an access to the building’s maintenance team. Same is the case with shared hosting where you share the disk space and other resources.
In a condo, you don’t use common spaces, and are responsible for certain repairs and maintenance. Also, the building comprises of fewer residents. Similarly in VPS hosting, you have independent disk space, bandwidth and you are the whole and sole responsible for managing the updates and software installations.
Dedicated hosting can be thought of as owning a home. Here, you don’t share resources with anyone, and you’re the only one responsible for all maintenance.
You get more space as compared to shared and VPS in dedicated hosting but you have to do more work which includes configuration and technical setup.
So, dedicated server would be the best for those who require tons of space and need complete control over your hosting.
Yes of course, it’s the most expensive option.
In case the shared server can’t handle high traffic levels, it’s time to switch from shared hosting to a VPS, or from a VPS to a dedicated server.
Related: Learn How to Choose the Right Web Hosting Plan for Your Website
Run Compression Audits
For your website to load at a fastest speed, all your files should be as small as they can possibly be. But make sure that their quality isn’t getting disturbed.
It’s very simple that small files load faster and this will ultimately lower your overall website load time.
If your website pages contain lots of images and other content, it can increase the page size. Therefore, they become bulky and take time to download.
Download times can be increased by compressing these pages.
You can run a compression audit with a tool like GIDNetwork for getting a better idea of how compressed files can increase your website speed.
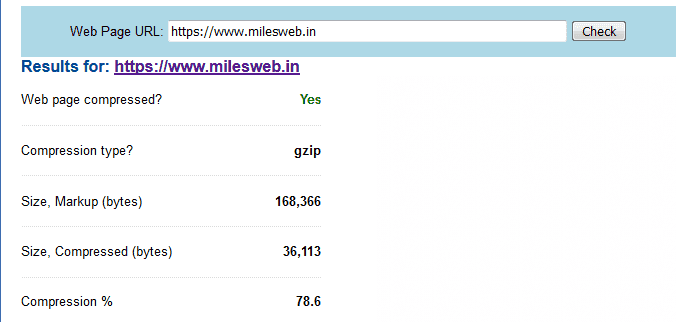
With this, you get to know the size of your page before compression, which can be used later as a benchmark to measure the compression results.
Below that, you can analyze the page’s size that can be potentially reduced in terms of both size and percentage using a tool like Gzip.
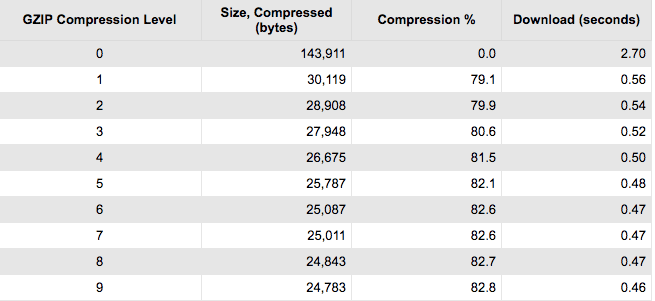
In this compression, the HTML, CSS, JavaScript, plain text, and XML files will get reduced in size.
Enable Compression
It’s a fact that smallest files load at the fastest speed. You can easily compress the files for reducing the load times and enabling Gzip compression is the standard practice today.
A file format and software application, Gzip finds strings of similar code in your text files and then replaces them for making the files smaller.
This works in a better way with HTML and CSS since these files typically have whitespace and repeated code.
Maximum web servers can compress files in Gzip format prior to sending them for download. This is possible either by calling a third-party module or using built-in routines. As per Yahoo, this can decrease the download time by about 70%.
Today, 90% of the Internet traffic travels through web browsers that support Gzip and so it’s a great tool for increasing your website speed.
In case you don’t know if your site has enabled Gzip compression, use the GiftOfSpeed’s Gzip test to check.
You just need to enter your site’s URL and in case the Gzip is enabled you will get the below result:
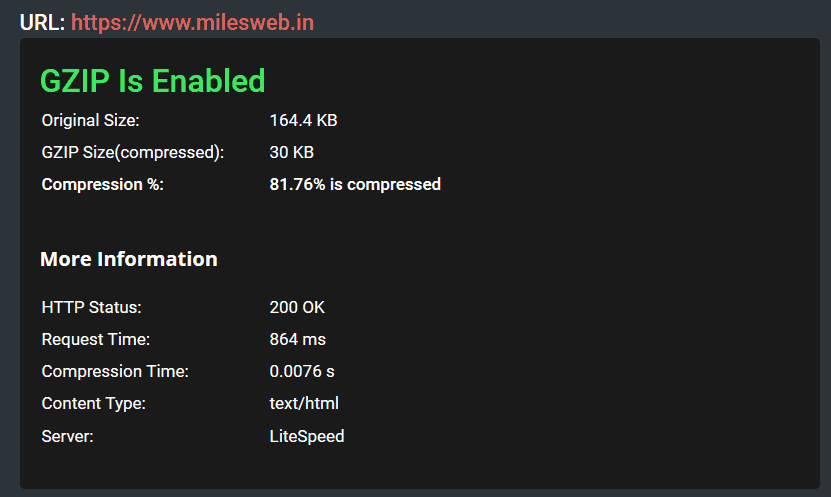
In case, you haven’t enabled Gzip, you will need to fix this immediately.
If you have a WordPress site, both W3 Total Cache and WP Rocket plugins support enabling Gzip compression.
In W3 Total Cache, you just need to check the box next to “Enable HTTP (gzip) compression.”

In terms of a static HTML site, you can enable Gzip from your .htaccess file. The exact code that you need is based on your server but in case your site runs on Apache, it appears as below:
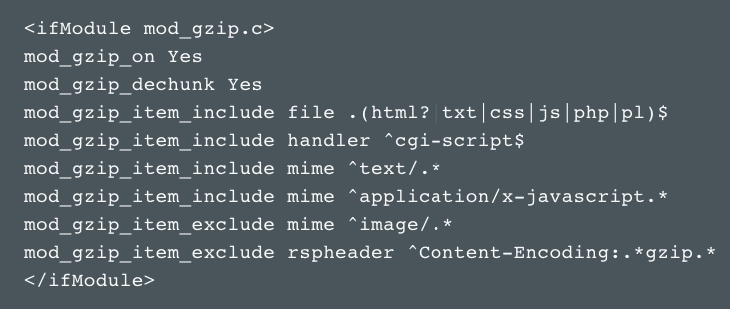
You will also get a similar version of the necessary code for NGINX servers.
Reduce Image Sizes
Images also play a key role in your website speed. If the images’ size is large, it can slow down a page’s load time.
But this doesn’t mean that you should remove them completely.
Do you know that the average eCommerce website conversions float around 1-3%?
But this number can increase until 5% for some sites, like NatoMounts — which sees an average conversion rate around five percent, with roughly 85% of those conversions on mobile.
For getting your conversion rate upto this level, you will need to include several helpful product images. In a survey, 66% of consumers said they wanted to see at least three product photos prior to making a purchase.
With this, it means that for running a successful eCommerce site, images are absolutely necessary.
This also means that image compression is vital whether or not your site includes an eCommerce store.
Using the Pingdom tool, you can see the impact of images made on any of your pages.
Run a page speed test and then look at the “Requests by content type.”
In the below example, you will note that images make up over 40% of the content on the page.

When you reduce the size of images, it has a big impact on the time taken by a page to load.
As per a study, when images of 22MB were resized to 300KB, it resulted into 70% reduction in time to interact or the amount of time a user needs to wait prior to his interaction with the site.
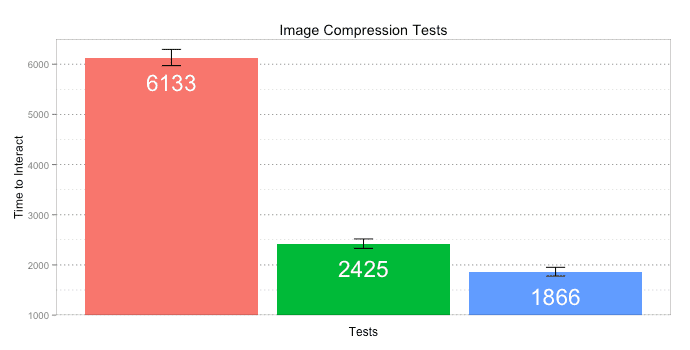
Cropping the images also reduces the file size. For instance, if you want to make an image appear as 570px wide, you can resize the image to that width.
Make sure you don’t just upload an image that is 2000px wide and set the width as per your requirement. This will take a long time for your page to load the full image and adjust it to the appropriate size.
In case you are modifying the width to make the images appear smaller on your site, keep resizing those images as your first priority. This is an easy way to reduce the total size of each page and can improve your website speed to a great extent.
Compressing your image files with a few different tools will also work.
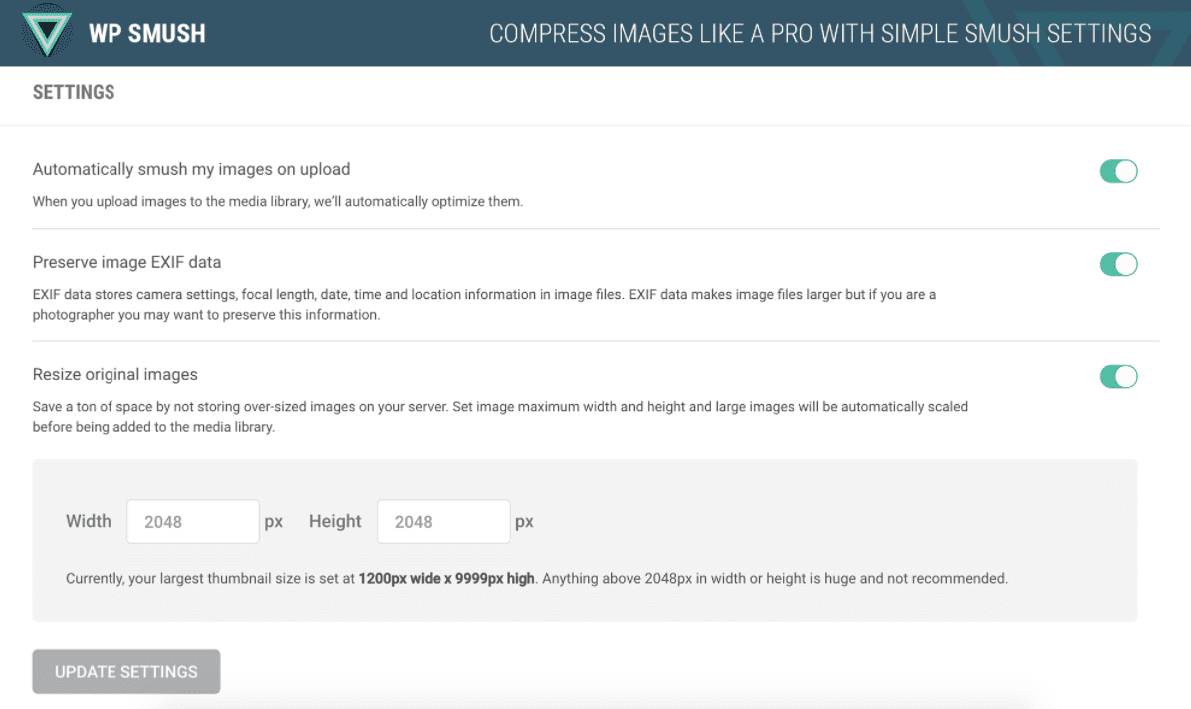
If your site is based on WordPress, WP Smush is also a great option.
Just check the box next to “Automatically smush my images on upload,” and all your new images will be compressed without an extra second of work.
This plugin can also be used for automatically resizing all new files that are uploaded. You will need to set a maximum width and height and if any image exceeds this size, it will be “smushed.”
In case you aren’t running a WordPress website, a non-WordPress tool like Compressor.io will help you to reduce the image file size.
Prior to adding an image to your site, simply upload it in this tool and select if you want lossy or lossless compression.
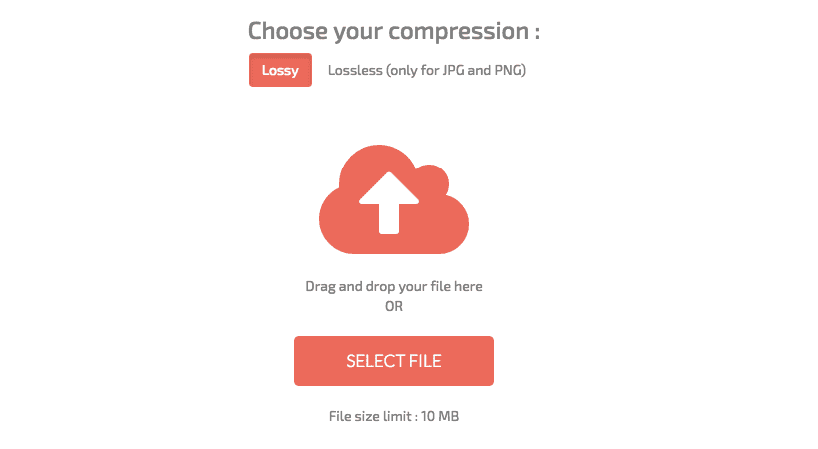
After this, you will see the information about how much the file was reduced, and will be able to download the new, smaller file.

After saving the new image file, you can upload it to your site.
Then, you’ll also need to ensure you’re using the appropriate file types for each image. Though this seems to be a minor concern, but the file types you use can have a major effect on each file’s size.
There are different options and the most common ones are JPG, PNG, and GIF.

JPG is generally used for photos. Lossy compression is used by JPG, which means that some data of an image is lost when saved in this format.
This data loss is not detectable to viewers in photos, but results in a smaller file size as compared to most image file types.
In case you are uploading pages with lots of photos, ensure that they’re all JPGs as they can significantly decrease load times, without affecting their appearance at all.
PNGs use lossless compression. It means when you save an image as a PNG, there isn’t any data loss, and the resulting file size is larger than a JPG.
For clear lines and crisp detail, PNG is the best way to go. PNG format is the best for logos, screenshots, line art and other detailed graphics.
Lastly, the use of GIFs should be done only for small or simple graphics of less than 10×10 pixels, a color palette of 3 or fewer colors, and for animated images.
Once you have learnt the image sizes and formats, you can ensure that the code you use to implement them is right, too. Particularly, check that there is no empty image source code.
In HTML, the code for an image includes this:
<img src=””>
If there is no source code mentioned in the quotation marks, a request to the directory of page or to the actual page itself will be made by the browser. Due to this, unnecessary traffic will be driven to your servers and also corrupt the user data.
Thankfully, there is an easy fix for this. You can add the file path of the image that you want to include or remove the extra tags completely.
Install a Content Delivery Network (CDN)
Apart from the server on which your site is hosted, you can also use other networks of servers for reducing the load times for your visitors.
Each user who visits your site sends requests to the same server on which it is hosted.
So, when your site receives high traffic, it takes a long time to process each request further reducing the download time for all.
When there is a high-traffic on your website, you may consider it as speedy growth but the reality is somewhat different.
Also, users that are physically at a long distance from your server need to wait for long time to load the website even if you don’t receive high traffic.
This is where a CDN, or Content Delivery Network, can help you.
CDN helps to cache your site on a global network of servers. When user’s browser requests files from your site that request is sent to the closest server.
For instance, if your original server is in Albama, but hosts files globally with the help of a CDN, your network may look as below:

Suppose a user from Australia visits your site, their browser can download files from a nearby server.
The content that a user receives is same as the original site, but the only thing is it can load much faster than it would if his browser makes requests to a server that is located far away. Due to this, loading lags and latency issues sometimes experienced by the users located far from hosting servers, get resolved.
A study shows that VentureHarbor found decrease in load time ranging from 20-51% — for 20 minutes of work.
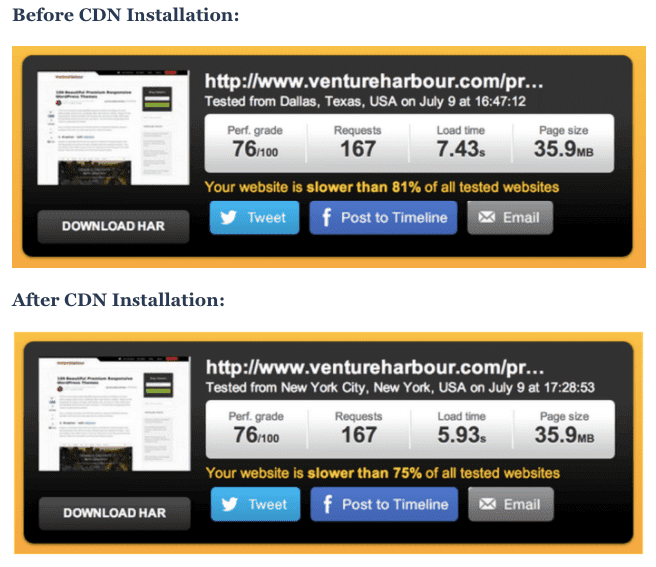
The exact improvements differ between a page and the pages containing several large images receive the highest benefit from a CDN.
Cloudflare, is the best option to start with a CDN as it combines CDN service with security and optimization features.
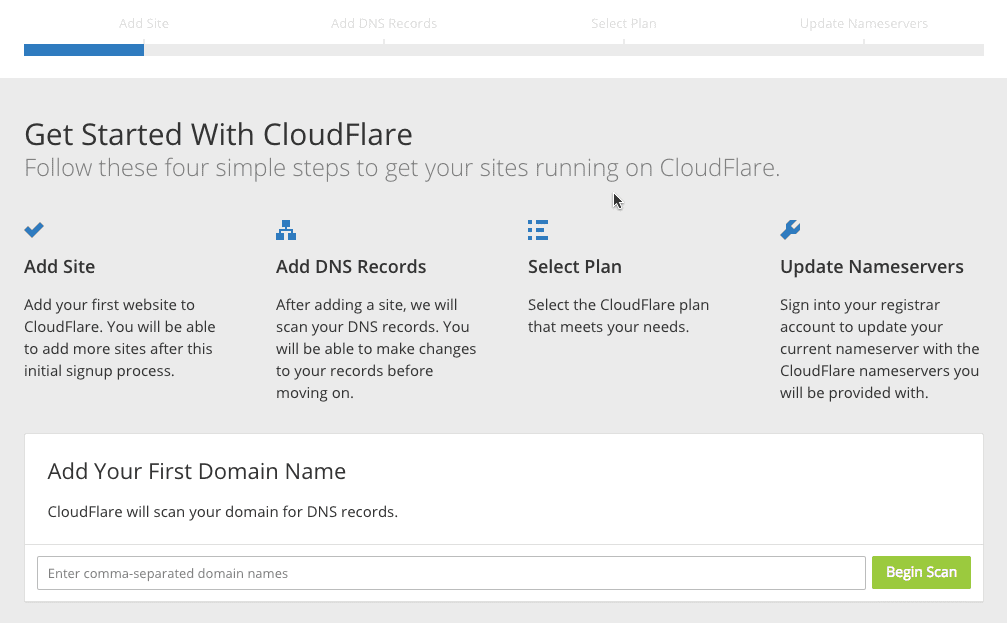
For Cloudflare, just click the “Sign Up” button on their homepage and then create an account. Enter the domain name and click on “Begin Scan”.
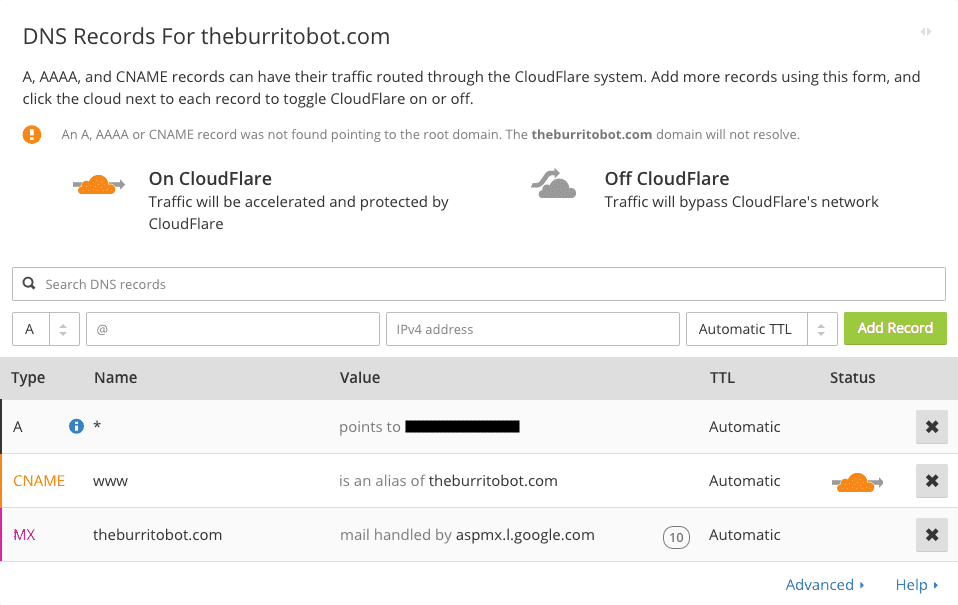
Wait for a minute, and it will display all of your DNS records, including any subdomains. You can decide which ones you want to enable.
Choose the plan and click “Process and continue.”
After this, the Cloudflare nameservers for your domain will get displayed. Then, update the nameservers for your domain.
This can be done via your domain registrar. Log into your registrar and go to your nameserver records.
Remember, this is different for each registrar. For MilesWeb, you can find it by going to “Domain Manager,” then clicking the “Nameservers” tab.
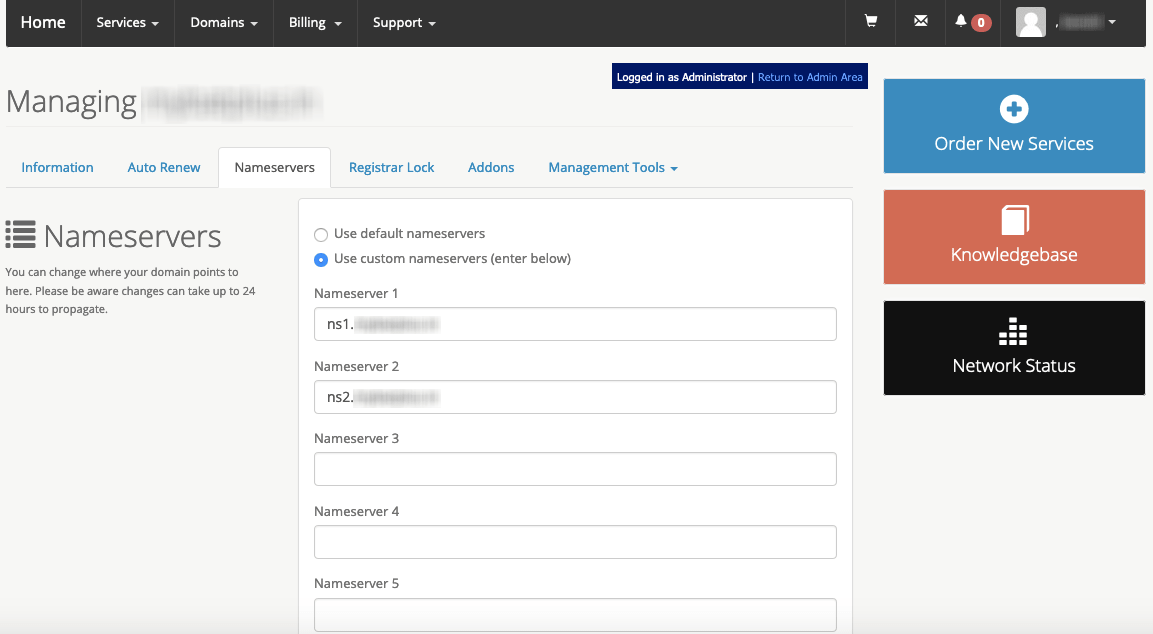
Then, change your preferences to “Use Custom Nameservers” and copy and paste the nameserver that Cloudflare provided.
Save changes and go to the Cloudflare dashboard to verify that your CDN installation is done correctly. Click the “Overview” tab, and if your CDN is running, an “Active” status code will be seen.
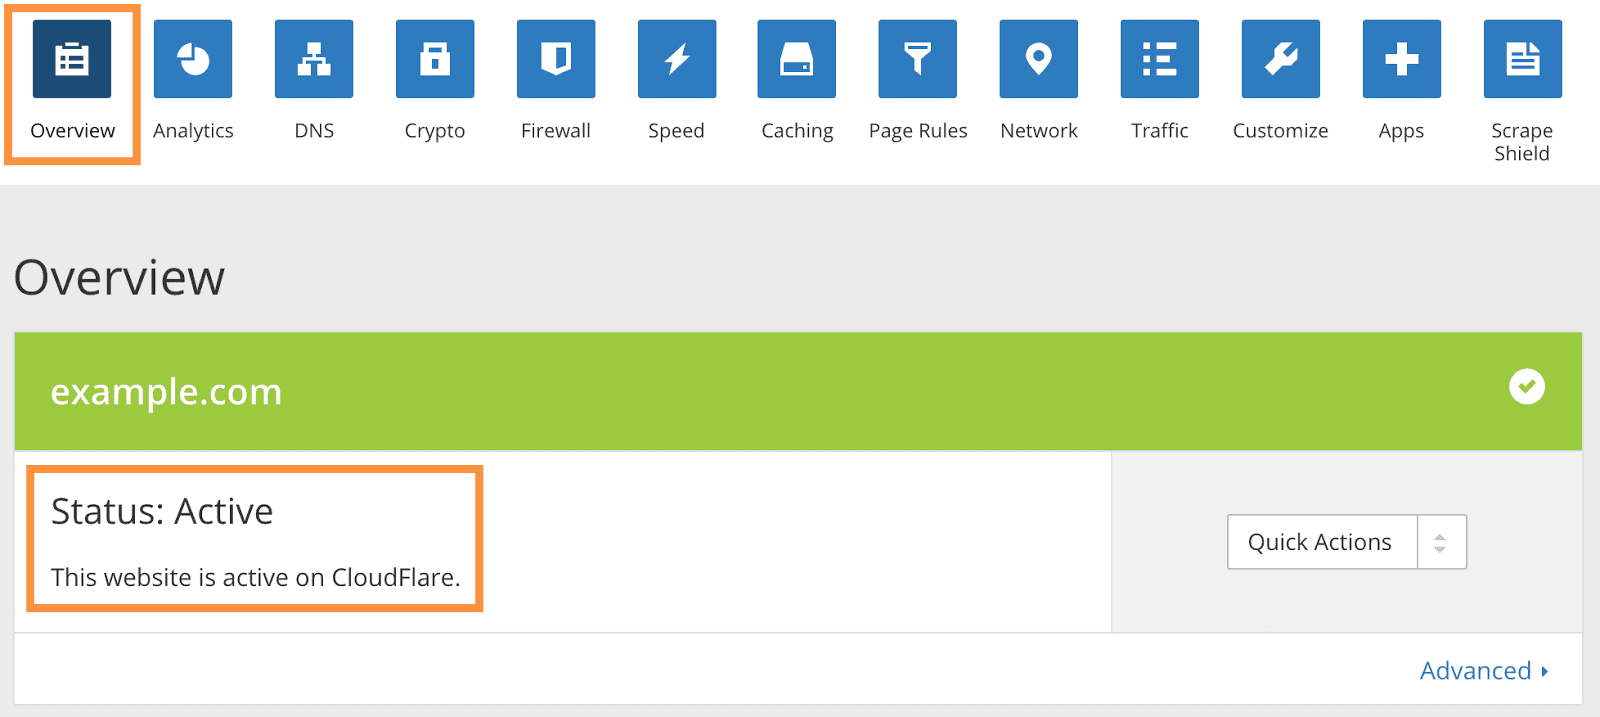
This indicates that your CDN is up and running.
The last step is to verify that your SSL records are properly placed. Go to the “Crypto” tab to verify that the SSL records are in place. Here you will see one SSL record for your root domain, and one wildcard subdomain record.
In case, you don’t see these records, wait for 24 hours for them to appear.
But once they appear, your CDN will serve the secure version of your site — exactly like your origin server.
Related: Using CDN is the most logical choice
Use External Hosting Platforms
Along with hosting your site’s files on a CDN, use of external hosting platforms for some of your larger files is also allowed.
This is particularly good for videos.
For example, if you want to add a video tutorial to your site, just create, edit, and export the video file.
Now you might be thinking of uploading the video directly to your site via the FTP or WordPress user. But don’t do this.
This is because when you host videos on your own server, a ton of space gets used up. Video files can easily use over 100MB space.
In terms of a shared server, there is a limited amount of space available and when you upload videos, the limit can get quickly exceeded.
Also, in some cases large video files might violate the terms of Acceptable Use and lead to shutting down of your hosting account.
Even if you can upload large videos to your server, it will result into a poor user experience.
In case there are multiple users watching a video on your site at the same time, the server will need to send that huge file to all. If you have limited bandwidth, it can result into lags and pauses in the playback.
You might have had a frustrating experience while watching a video that took a pause after few seconds.
Avoid this with your visitors.
Alternately, you can host your video on their-party platforms such as YouTube, Vimeo, or Wistia.
Then, the video can be embedded on your site.
This is quite simple to do, and can help you save the space and get faster load times.
It is quite difficult to select which one you want to use.
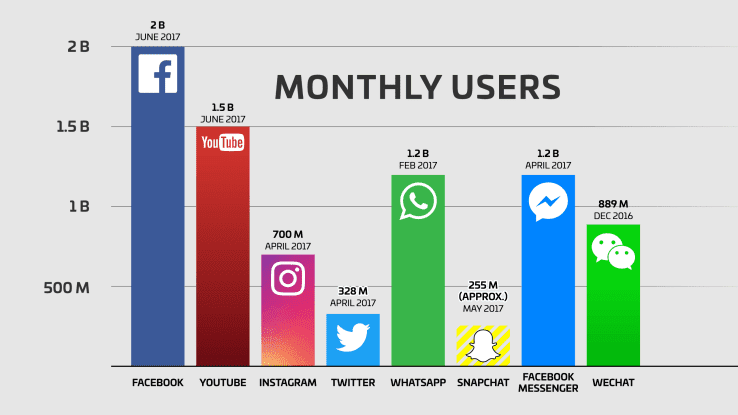
YouTube is the most popular platform when it comes to online video with a user base of more than 1.5 million that watch around 5 billion videos each day.
This shows that it has more monthly users as compared to every major social media platform but Facebook.
YouTube is a free to use platform.
It can help you to reach a larger audience and this is its biggest advantage. In case you want to use video to improve your brand awareness and get traffic to your website, this is a great option.
The only downside of YouTube is that it allows uploading videos which are just up to 15-minutes. In case, you want to upload lengthier videos, you will need to request them to increase your limit.
Vimeo is the next-largest video hosting platform after YouTube and has 715 million views per month.
Though it has the potential to display your videos to new audience, your potential audience smaller than it would be on YouTube.
Its standard video player seems to be more appealing than YouTube’s.

You can upload limited content on Vimeo.
Wistia stands different from YouTube and Vimeo and is designed with marketing in mind.
So, if you are focused on using video as a marketing tool instead of content, it could be the best option for you.
With this platform, you get comprehensive analytics which includes the location of your visitors, the area where they click and the moment at which they stop watching the video.
Additionally, you can also include calls to action directly in your videos and ask users to sign up for the email list prior to watching.
Plus, you can customize Wistia’s video player to give a professional look by changing the play button and other controls to your brand’s colors.

Also, your autoplay settings, load settings, captions, and share options can be customized, so that users can skip to certain points in the video by adding chapters.
The only disadvantage of Wistia is that its free plan allows uploading just three videos.
After selecting your video platform and uploading a video, adding it to your site is easy.
Select “Embed,” and copy the HTML code that your platform provides and paste it into the page where you want it to get displayed.
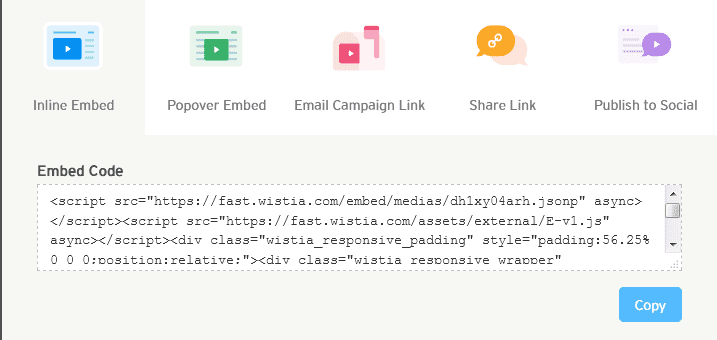
In terms of HTML sites, just add the code in the location where you want it to be displayed.
For WordPress, go to the text editor and add the code as per your preference.
Optimize CSS Delivery
CSS comprises of the style requirements for your page. Generally, this information is accessible in one of two ways:
In an external file, which loads before your page renders, or inline, means it is in the HTML document itself.
You will find the external CSS in the head of your HTML with code that looks something as below:
<!—Your styles –>
Inline CSS is located in your page’s HTML and appears as below:

Don’t include CSS in HTML code (like in divs or your headings) like in the inline CSS shown above. The code will be clean, if you include all of your CSS in your external stylesheet.
This helps in reducing the size of your code and creating fewer code duplications.
While setting up your styles, it is best to use only one external CSS stylesheet, as HTTP requests increase with additional stylesheets.
In case, you aren’t sure about your current CSS set up, you can also use CSS delivery tool such as Varvy to check.
Here you just need to enter your URL and you will get a report with all the external CSS files.
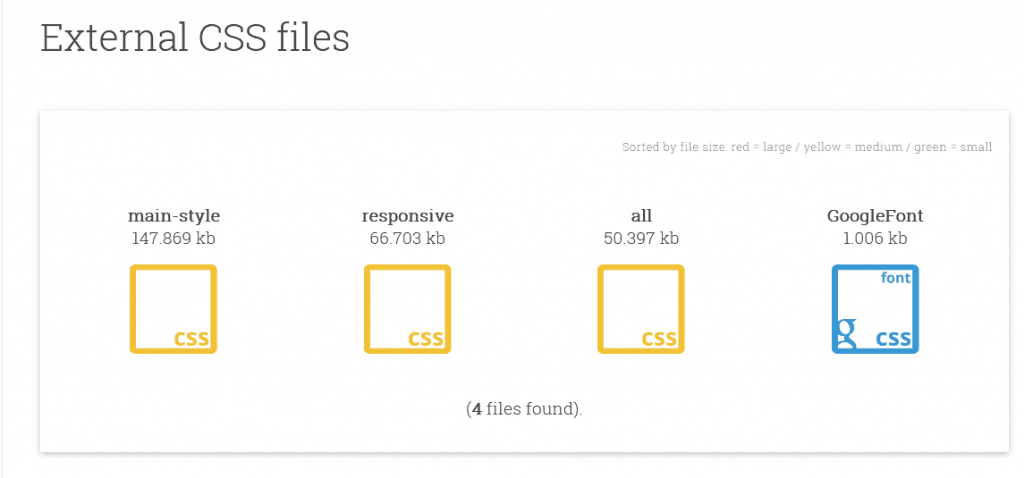
When you scroll down, you’ll also see the location of that external file, any inline CSS on the page and the total size of your CSS files.

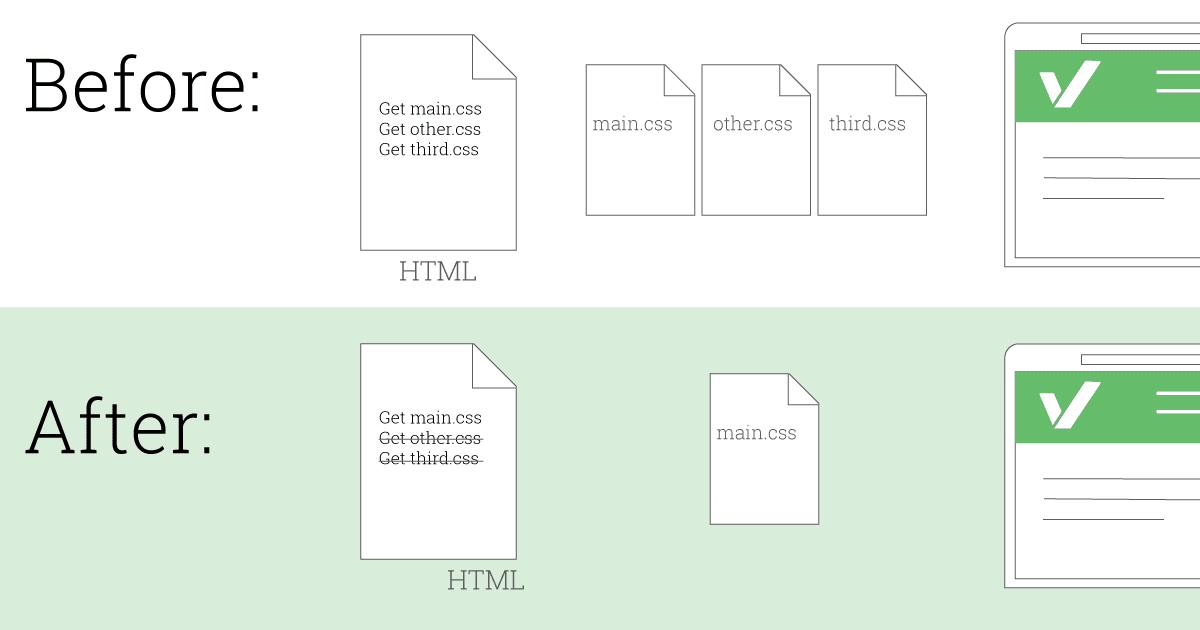
If there are more than one external CSS files, each of it increases your page load time. You can’t avoid this in some cases — but in most, it’s best to combine them.
Thankfully, this process is simple and one that can usually be accomplished with just copy and paste.
Just copy the contents of each CSS file you have, and paste it into one main CSS file.
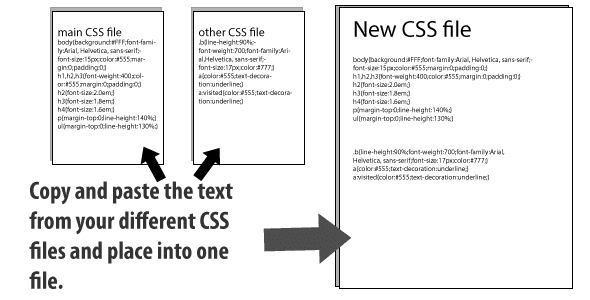
After that, update your HTML to reference this new file, and remove all references for the old files.
With this your visitors’ browsers will need to download just one CSS file instead of multiple and this decreases the overall number of requests and also the page load time.
Now, you can use PageSpeed Insights to ensure that there are no issues with render-blocking CSS.
To check the blocking script resources, go to “Optimization Suggestions.”
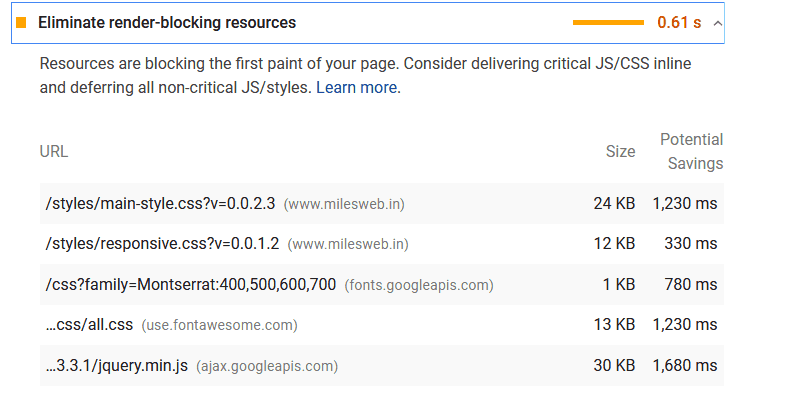
For those using a plugin like WP Rocket or W3 Total Cache, there shouldn’t be any issue. In case the render-blocking issues still persist, double-check your plugin settings or follow Google’s recommendations for optimizing CSS delivery.
Prioritize Above-the-Fold Content (Lazy Loading)
User experience can also be improved by helping your above the fold (top of the page) section load faster, though the rest of the page takes more time to load.
This is known as lazy loading and is helpful for pages that contain more content below the fold.
For instance, if you write a blog post that consists of 20 photos. A user’s browser will need to download all those images prior to displaying anything on the page.
Lazy loading helps to load the content within view first and then loads all those photos after.
This saves the user’s time to access the page and images get loaded as they come into view.
Additionally, this also reduces the load times on posts with tons of images.
If you have a WordPress site, enabling lazy loading is very simple as installing a plugin. There are several options that can be used to start using lazy loading on your site.
A very simple plugin, Lazy Load uses jQuery.sonar to only load images when they are seen in a user’s browser.
Simply install and activate it and then it will automatically detect when an image is visible for a user, and load it.
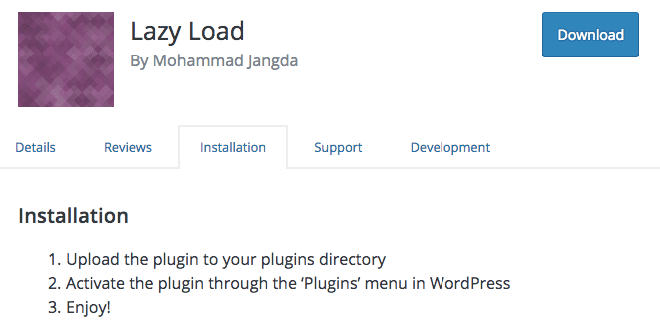
Since there are no settings or customization options, you won’t be messing up things.
So, if you’re finding a fast, simple solution, this is it.
BJ Lazy Load is the next simple plugin, but offers some more options for customization.
To start with, determine which content on your site you want to lazy load. This can include content, gravatars, thumbnails, images, and iframes.

A standard placeholder image can be set for content that hasn’t yet loaded, and images with certain classes can be skipped.
So, for example, in case you don’t want a specific image to lazy load, use the below code:
<img src=”image.jpg” class=”no-lazy”>
This will help the plugin to know that the image needs to be loaded normally.
A threshold can be set for how close to a viewer’s screen an element should be prior to loading. With this, you get more control over the speed and function of how your page loads.
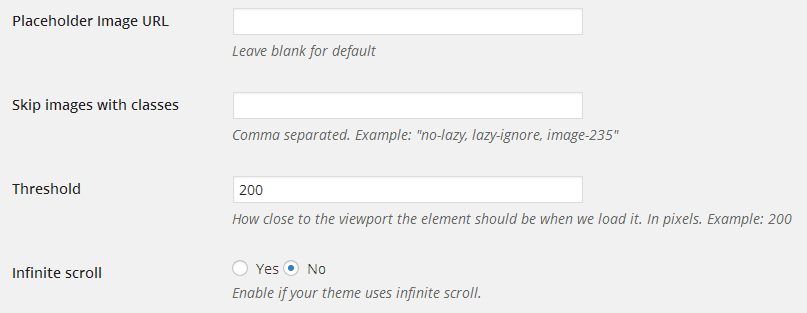
The plugin also supports infinite scroll.
If you want a plugin that’s easy to use, but offers more control than Lazy Load, this is a great option.
If you already have WP Rocket installed, you can also use the plugin to enable lazy loading.
Open WP Rocket settings and click the “Basic” tab. Go to the LazyLoad section and tick the box besides “Enable for images.”
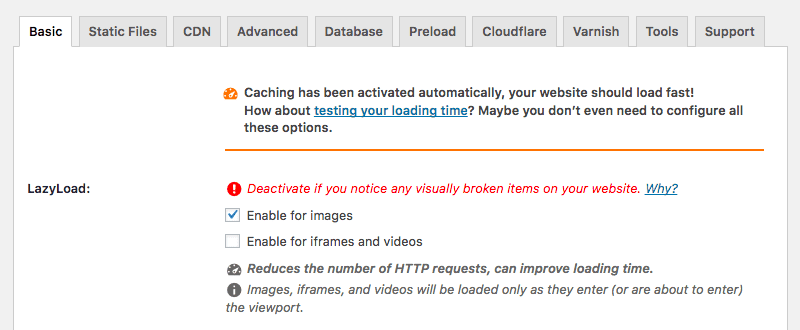
After enabling this feature, you can use a few customization options.
Suppose you don’t want to use lazy loading on a specific post or page, just disable it for that page.
Simply open the page, scroll down to the “Cache Options” box in the right sidebar. Then, uncheck the box next to “LazyLoad for Images,” and save the changes.
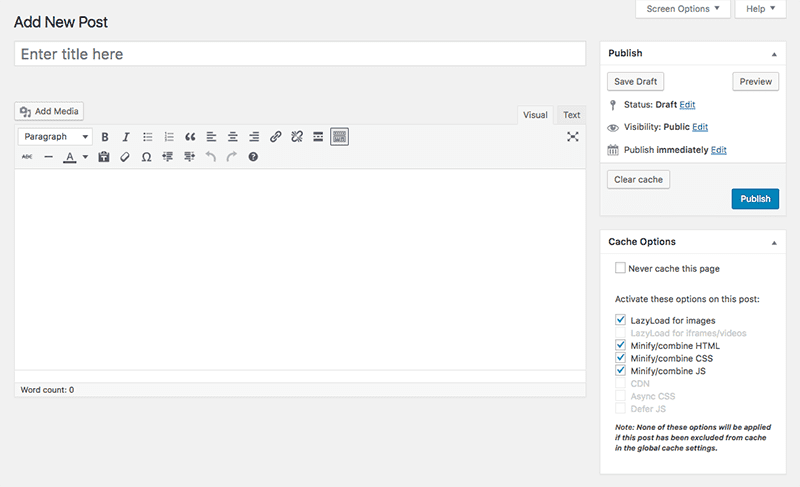
Using snippets of code also helps to disable lazy loading for specific types of pages, like the home page or blog page.
For example, disabling lazy load for your home page will appear as below:

To disable lazy load for specific images, use the “data-no-lazy” attribute.
Simply add it into your image’s code, and that image will load normally.

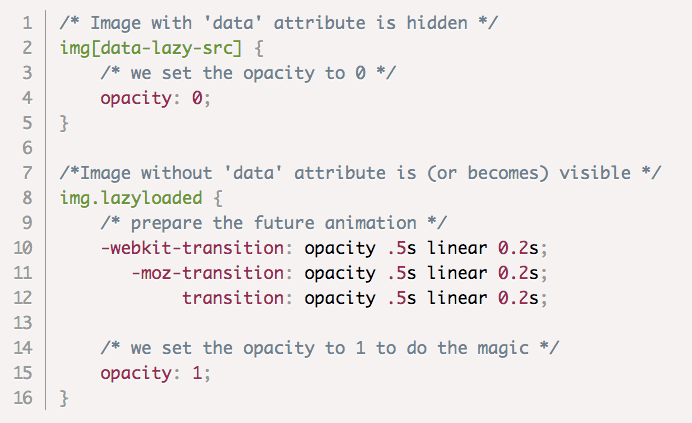
At last, enabling a fade in effect also helps to load your images smoothly.
When all images appear at once, they can offer bad experience for visitors. Images can appear gradually, by adding a snippet to your CSS file.
Diminish the Number of Plugins Usage on Your Site
Plugins can help you to improve your WordPress site. They can be use to add custom functionality, clean up your code, improve user experience, and more.
Additionally, they also eliminate the mess of countless code, which offers an extremely user-friendly experience while working on your site.
Also, they are easy to install.
Therefore, you keep on adding and installing plugins, without thinking about the potential downside.
But the use of too many plugins can cause some issues such as slow website loading, security issues, crashes and other technical difficulties.
Also, to keep up with maintenance and updates can be tedious when there are many plugins.
Though you don’t have a ton of plugins, evaluating the ones you have installed on a regular basis is the best. Plugins that are outdated, inefficient, or incorrectly configured can negatively affect your site speed.
Unnecessary plugins can be deactivated and deleted to improve your overall speed and make maintenance easier in the long run.
Plugins on your site can be evaluated with different ways and those that slow your site speed can be deleted.
Test Your Plugins
If you want to improve site speed, you can determine which plugins are impacting it in two different ways.
In the first one, you can selectively disable plugins then measure your site’s performance. If there are many plugins, this can be a tedious process, but will show you the difference each one makes.
For this, run a speed test by keeping all the plugins enabled.

Check this by deactivating your plugins one by one and re-testing your site speed.
Note your page load times after each test, and the plugins you deactivated to achieve faster speeds.
If there are a lot of plugins, this process can take time.
Don’t worry, there’s an alternative: Installing another plugin.
Surprised?
But yes, the Plugin Performance Profiler is an option to identify plugins that are leading to issues on your site.
Additionally, it’s quite faster and easier than the manual process of deactivating plugins individually and running site speed tests.
After installing the plugin, go to your settings page and run a site scan.
This will require a few minutes, then you will get a report with a detailed breakdown of the performance of each plugin on your site.
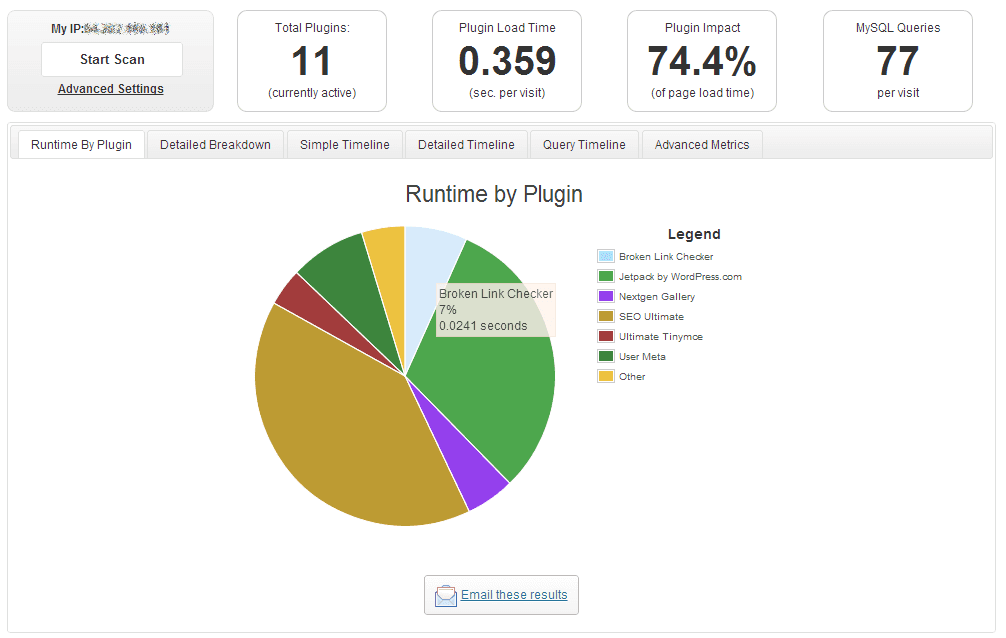
The plugin load time indicates the cumulative load time for all of the plugins on your site, along with the percentage of your total load time they take.
The detailed timeline comprises information about every plugin, your theme, and the core for each page. With this, you can identify the exact issue on slow-loading pages.
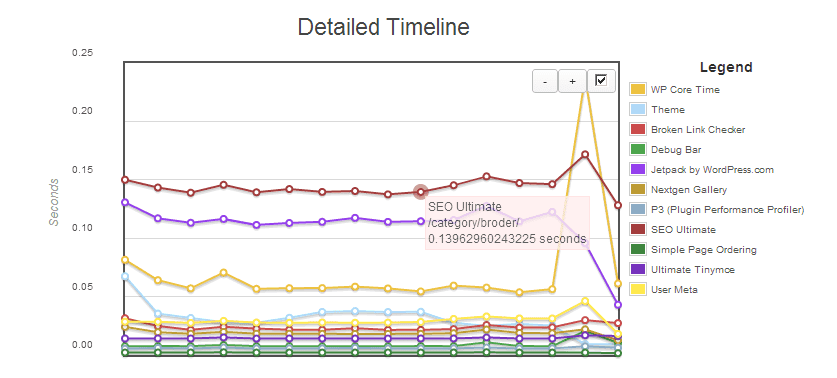
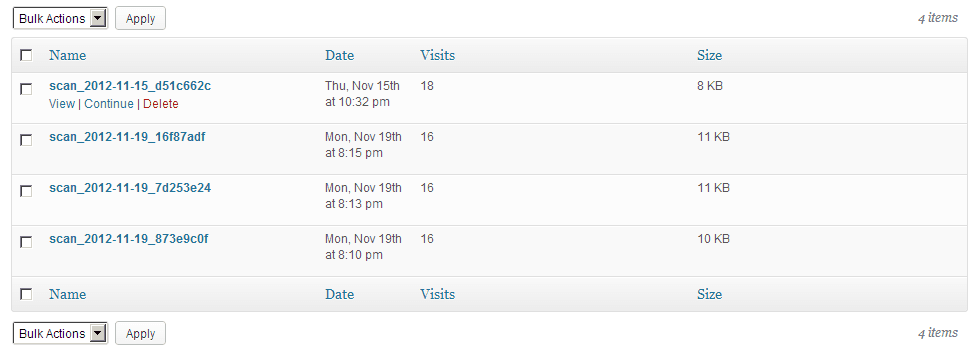
At last, you can save a history of the performance scan directly in the plugin. This way, if you face any issues in the future, there will be a benchmark and good starting point for recognizing the issues.
If you get any plugins that slow down your site and aren’t essential, just deactivate and delete them.
Many site owners also install a contact form plugin as they don’t know the other way to add a form to their site. But even themes come with built-in contact form functionality.
In case, you find that the contact form plugin is slowing down your site, check if this feature is available with your theme. If it is, just update your form and delete the plugins.
Identify overlaps in functionality
Most of the plugins installed on your site serve a clear purpose. So, deleting them won’t be an option if they are slowing down your site.
Fortunately, there are many plugins that can offer more than one feature, and finding them can help you delete the plugins that only serve one purpose.
For example, the WP Rocket and WP Total Cache plugins on this page are extremely useful for improving site speed and they’re both great options.
But since they offer similar features, you won’t be needing both. In case you have installed both of them, you can check the features you use on each and see if one of them can serve your purpose.
Enabling all of those features in the plugin you select to stick with and deactivating the other will help.
This is also possible for other plugins that serve the same purpose.
Eliminate Plugins for Tasks You can do Manually
Based on your experience level, you can limit the number of plugins by performing some tasks manually.
For example, many website owners use a plugin for adding Google Analytics tracking code to the header. Though this makes their work extremely easy, it’s not necessary.
You can copy your Google Analytics code from your admin dashboard and paste it in the Insert Headers and Footers plugin (or a similar one) installed to edit other parts of your header tag. Save the changes and your tracking code gets installed.
If you don’t have a plugin to edit the headers and footers installed, manually add it to your header through your site’s FTP.
This an advanced option and a good idea if you can do the basic code edits. After you paste your code and re-upload the file, you’re all set to use Google Analytics — without the use of plugin.
Font plugin is the next basic plugin you may have installed. This plugins helps to change your site’s fonts — but you can delete it with a few lines of code.
Then go to Google Fonts and select the font you want to use on your site. You will find the HTML and CSS codes for that font under “Embed”.
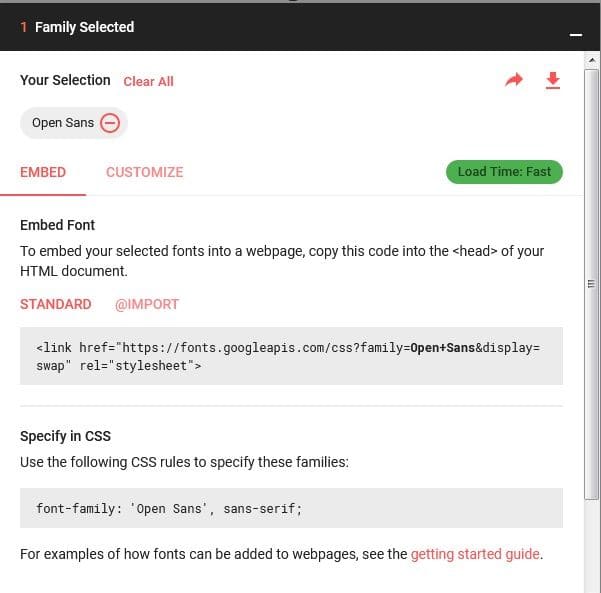
In your header, add the HTML code and the CSS to your site’s CSS stylesheet wherever you want to use your selected font.
This can be done with several fonts you want. So, you can completely customize the way text appears on your site without using a plugin.
Reduce Redirects
Redirects are essential when you move and delete pages, and also help in eliminating the issues with broken links.
But if you set too many of them, it can create additional HTTP requests. This further can negatively impact speed, particularly on mobile devices.
This means you should also keep them to a minimum. As per Google, ideally, site owners would eliminate them entirely.
Sadly, this doesn’t make sense for most site owners who’ve never eliminated or restructured their content.
But there’s room for improvement in several cases.
Screaming Frog can help you to quickly identify all of the redirects currently on your site.
Simply scan your site and then sort by the “Status Code” column to check all of the 301 redirects on your site.
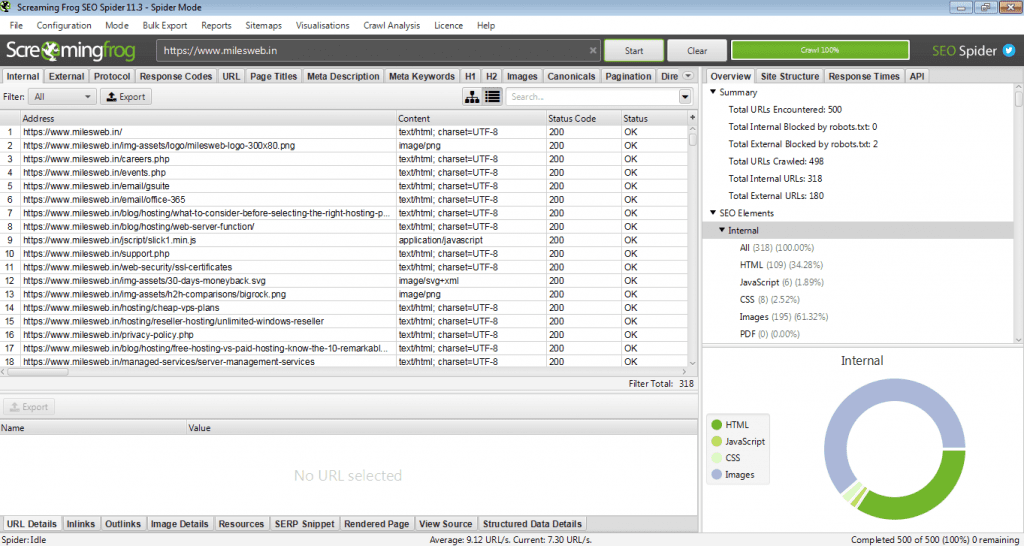
You can check these redirects for seeing what they’re achieving, and ensure that they serve a necessary purpose.
With this, you can also identify redirects chains, or redirects that point to other redirected pages. Due to this, unnecessary extra requests get created, which can slow down your load times.
In case you find any redirect chains, edit your .htaccess file to point all of your redirected pages directly to the most recent versions of that page.
Reduce External Scripts
The fewer requests made by your site to your server, the faster a page will load.
Though CSS and JavaScript files are often the cause of extra external scripts, they aren’t just the ones — and removing any others too can affect your site speed.
Your site may be running many common third-party integrations that you don’t really think about.
To detect all of the external scripts that are adding requests, just reopen the Network tab under Sources in Chrome’s Developer Tools.
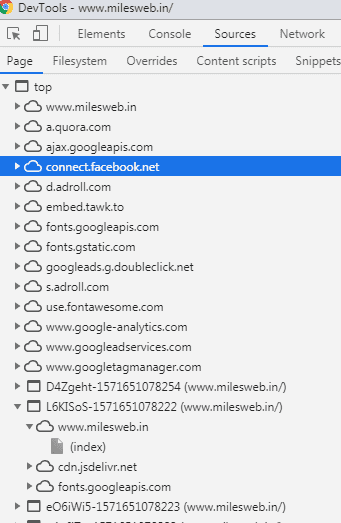
For example, if Gravatar is being used for blog comments, you might see that loading user images significantly increases your load time.
Or, if your site is integrated with Twitter for easy sharing of posts, there might be an increase in the number of HTTP requests your site makes.
No doubt, some of these extra features are worth the milliseconds, they increase your load times. In such a case, you can leave them as they are.
In case they aren’t worth, you can uninstall or remove them if they are slowing down your speed.
Once you know the features that increase your load time, it will help you to understand your site’s speed in a better way. Additionally, it can help you make more informed decisions about the features you select to add to your site in the future.
Monitor Your Speed Over Time
While focusing on improving your site speed, it’s a good idea to monitor how it changes over time. You should do this, even if you’ve achieved an acceptable page load time.
If you monitor the load times on a regular basis, it can help you identify any issues early and also keep your site in good condition.
How To Do A Website Speed Test?
You will get many tools for doing a website speed test.
Pingdom’s Website Speed Test is one of the best tools for monitoring the complete website performance.
In this tool, you just need to enter your site URL and select the region from where you want to test your site. If you don’t have an idea about the location preference, leave this as it is but if you are worried about the users who are based far away from your servers, you can test your site from various locations.

After this, a summary of your page’s load time and performance gets displayed, including the page size, number of requests, and the way it stacks up against other tested sites.
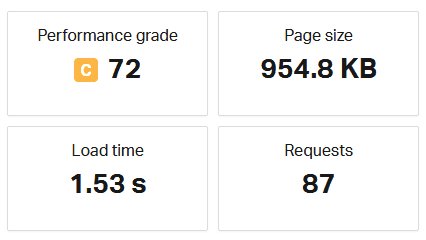
With this information, you get a quick look at your site speed’s health, and continuously tracking it is an easy way to monitor improvements or the fall in performance.
Next, you’ll see a list of suggestions to improve your site’s performance. If you aren’t satisfied with your load time, this will help you identify the issues that are responsible for it.
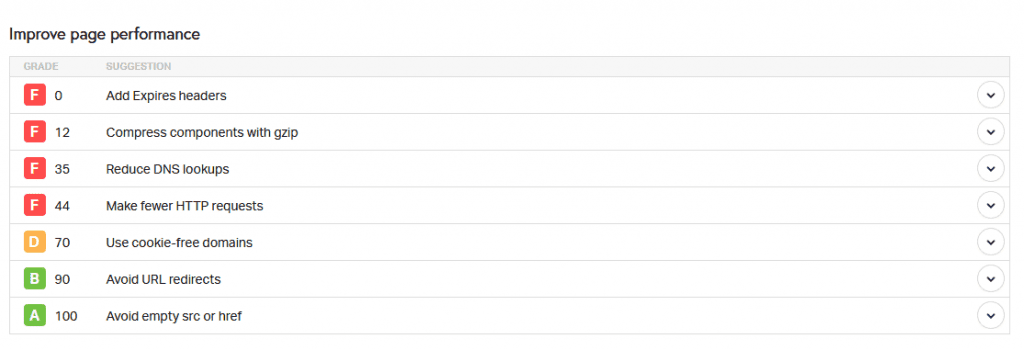
All this information is included in the free version of the tool.
In the paid version, you get the page speed reports that display your site’s speed over time. You can identify trends, and the precise time your site starts having issues. This makes it easy to get to the root of any problems.

In the paid version, you get alerts and uptime monitoring, which monitors your site and automatically alerts you of issues.
It includes a mobile app that notifies you of server errors, downtime, and other critical problems. With these features, it becomes easy to detect issues as they happen and make sure your site is always loading quickly and functioning well.
Monitor Mobile Page Speed
Along with monitoring your load times on desktop, it is also important to pay particular attention to how well your site loads on mobile devices.
As said above, mobile user experience now affects all of your site’s rankings.
Even you want to offer a fast, user-friendly site to mobile users.
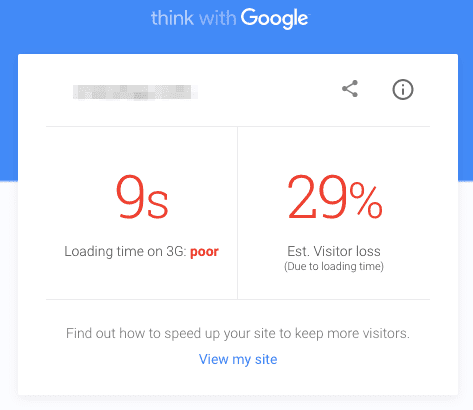
Use the Google’s Test My Site tool to audit your own page speed. To start with, just enter your URL.
At first, your results will display your site’s average load time on 3G network and the recommended the best practices to improve the speed if it is low.
Additionally, it displays the number of estimated visitors lost due to load times. If your website has slow load time, this number can be surprising.
Google provides an industry comparison to display where you rank against other sites in your industry.
Many of these sites might be your competitors and so you’ll need to work towards being a top performer within your industry.
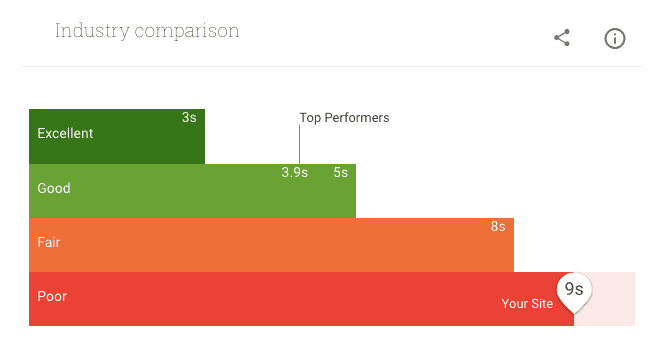
In case your site’s speed isn’t at least close to your estimated number, you can find it hard to achieve. But the way you make the changes listed in this post, you can keep testing your site and improve your ranking.
Top 20 Free Website Speed Test Tools
Check the list of website speed test tools that might suit your needs:
GTmetrix
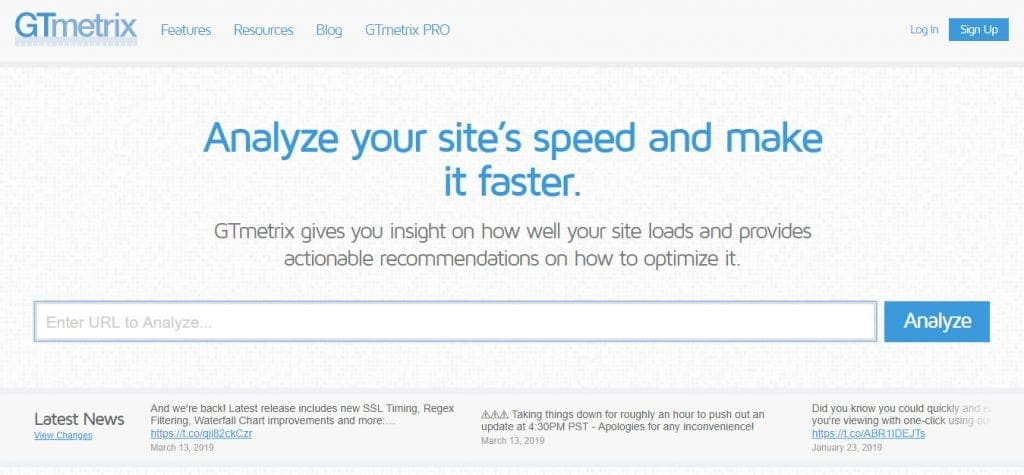
GTmetrix is used for detecting the website speed and performance optimization. Basically, this tool is suitable for most web performance monitoring.
It gives you a summary of key performance indicators, website monitoring, and the ability to test your website from different regions across the world and that too for free.
It is also possible to conduct a connection throttling test to check how well your website performs on various connection speeds.
WebPagetest
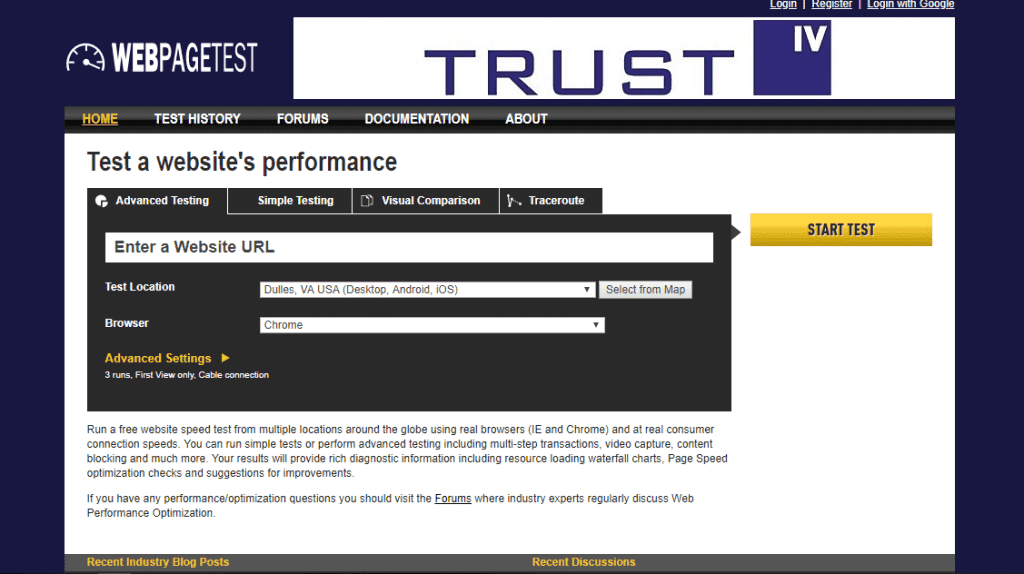
With the WebPageTest speed test tool, you can conduct a speed test from several locations across the globe using Internet Explorer and Chrome for free.
It mainly offers multi-step transactions testing, video capture, and content blocking.
At the end of the test, you’ll get resource loading waterfall charts, page speed optimization checks, and ideas for improvements.
Google PageSpeed Insights
This tool is owned by Google and therefore, the user experience metrics are based on the website’s performance on the Chrome UX Report, both on mobile as well as desktop devices.
With this test, you will get the lab and field data. The lab data related to the performance issues and field data comprises of real-time performance data that your visitors experience.
This tool is popular among small to middle-scale businesses and independent website owners that find an easy and straightforward way for maintaining their web performance.
Site Speed (Google Analytics)

Being a part of Google Analytics, Site Speed detects your web performance based on three aspects: execution speed, page-load time, and duration of the parse.
In the test report, you get a detailed analysis of individual pages and resource performances as well as customized optimization tips.
Google Test My Site
Use of mobile phones is increasing these days and therefore, mobile sites need to offer equal performance as the desktop ones.
With Test My Site you get to know the website’s mobile speed, target against competitors, and a custom report including suggestions on improving your pages’ performance.
YSlow
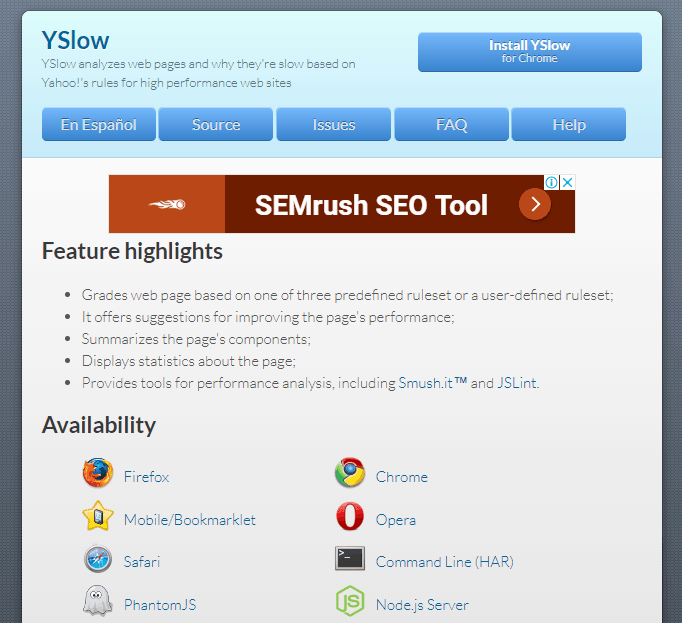
Free open-source project and speed test tool, YSlow analyzes a site’s performance depending on Yahoo!’s 23 of 34 rules for high-performance websites. It is available in the form of plugins for web browsers and command line scripts for Node.js server and PhantomJS.
YSlow was originally implemented on Firefox and therefore, it allows complete access to page components information via Firebug Net Panel.
Pingdom

Pingdom conducts a complete web performance monitoring as well as monitors the downtime too.
Over 70 global polling locations are used to test the web pages. When the test ends, you also get performance insights and the blocks that affect your page speed.
For a deep monitoring, you can buy their paid plans and get other services such as page speed monitoring, uptime monitoring, transaction monitoring, visitor insights, and server monitoring. If there’s an issue, the alerting feature will alert you about it right away.
KeyCDN offers an option to run a speed test from 14 different locations and also performs check-ups online for testing the speed.
Apart from checking the geolocation and full-page speed test, you can also perform an SSL FREAK attack test to check the security of your website’s SSL/TLS.
Dotcom-Monitor
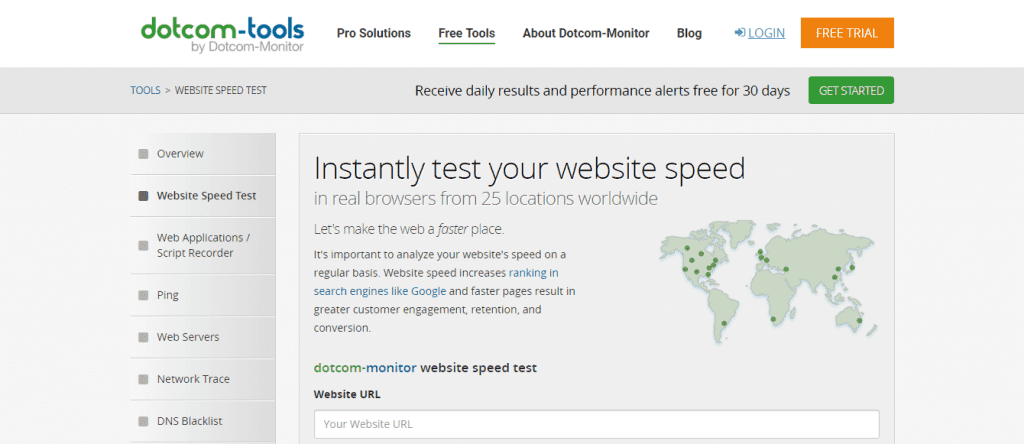
The free tools of Dotcom allow you to run browser-based load time testing via different desktop and mobile web browsers, from 20 test locations across the globe.
One of the advantages of Dotcom tools is you can conduct all geographical tests at the same time. At the end, an individual performance report and waterfall report from each location is displayed to you.
Dareboost
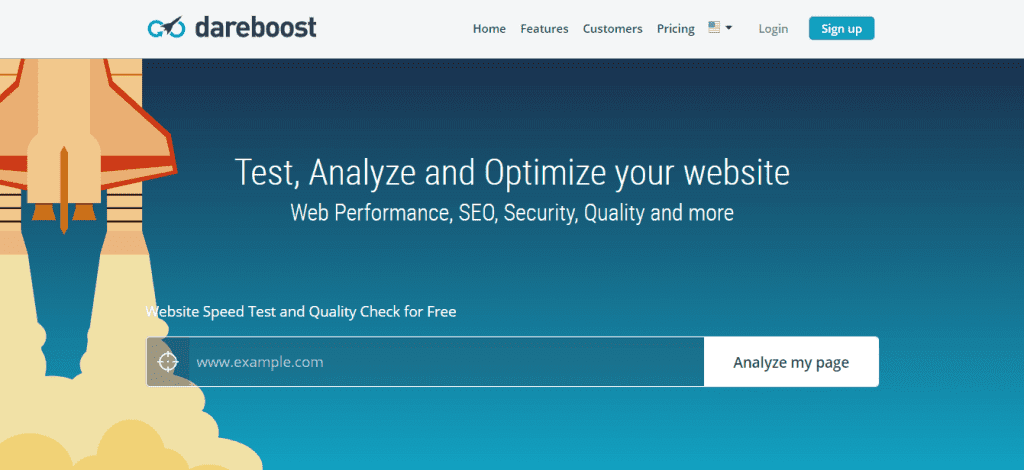
With the Dareboost’s speed test tool you can conduct the performance monitoring from 13 test locations and seven devices. The devices include various types of mobile devices.
The key features of this tool are the ability to simulate a speed test with and without adblocking and block specific domains to discover the cause of poor web performance.
A thorough report is produced along with suggestions divided into several categories. With the clusters, it becomes easier to prioritize the needed improvements.

With Geek Flare, you get standard performance monitoring which any other speed test tools don’t offer. You get a change to test your website’s load speed on desktop or mobile device from various locations across the world.
The testing metrics comprise of page size, screenshots, request counts by type, and Time to First Byte.

New Relic is a software analytics company which knows the ins and outs of the application performance sector.
With the free synthetics online test, you can test your web performance from nine different regions.
For in-depth testing, you will need to sign up for their paid plans that allow you to monitor your dynamically changing systems, analyze the business impact of your web performance and simulate the behavior to isolate the problem.

With this cloud-based load testing tool, you can identify the performance problems in web, app and API. With the k6 open-source, command-line-driven load testing tool, you can detect issues easily within the software development life cycle.
The page speed test is available for free, but you need to buy their plan to make use of those tools.
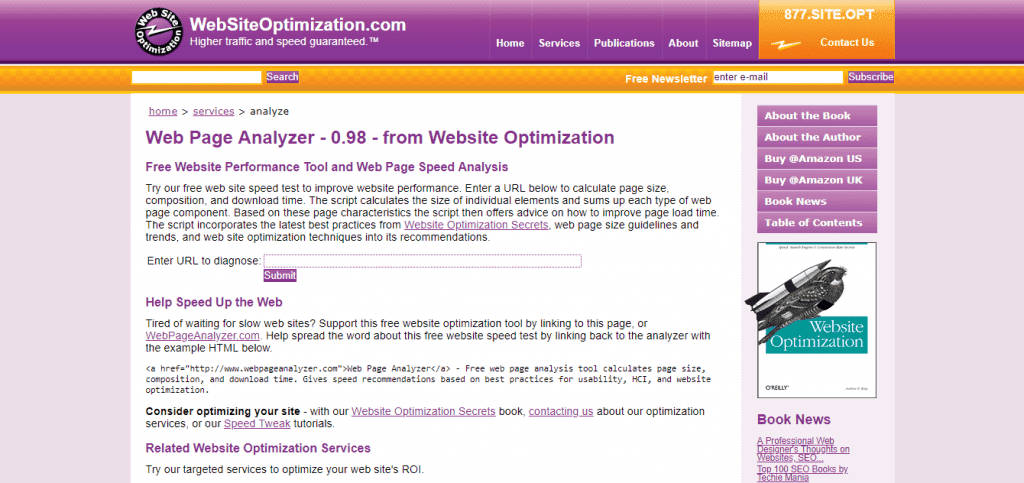
This tool is free and gives you the calculation of page size, download time, composition, and the size of individual components of your website.
Based on this data, custom recommendations are made which include web page size guidelines as well as trends, and web optimization methods.
Image Analysis Tool (Cloudinary)
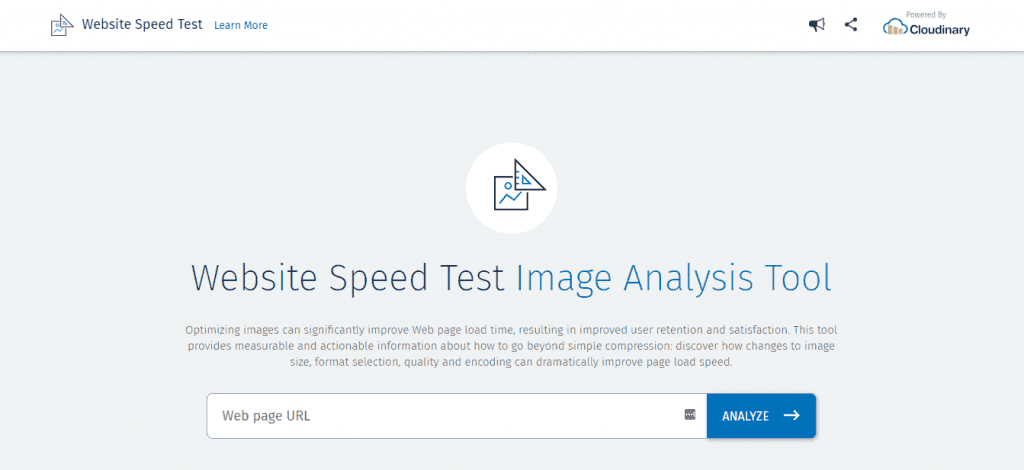
As mentioned above use of a lot of images, affects the loading speed badly. With this tool you can check for the image-related issues such as the format, size, quality, and encoding.

With this free speed test tool you can determine the load time of your website’s elements. Simultaneous testing is done from the US, Europe, and Asia.
Their paid plans allow you to conduct in depth monitoring of website, network, server, and application. Additionally, you can conduct custom monitoring on your system and business metrics using API.
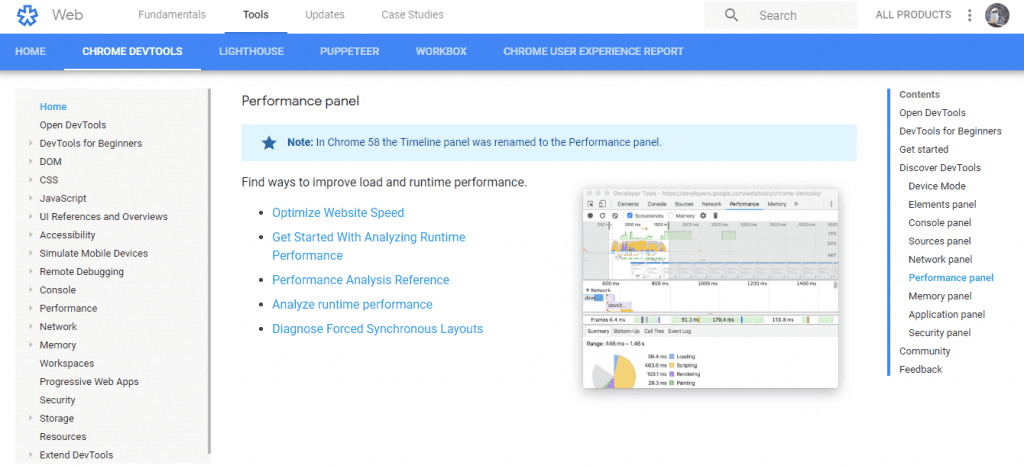
Another Google tool, Chrome DevTools help to improve your website’s load time. Keeping developers as their primary users, the tools offer page editing process on-the-fly and problem diagnostics.
It is built directly into the Chrome browser. Tutorials can be found on their official homepage for beginners who want to experiment with simple programming and tips for web optimization.
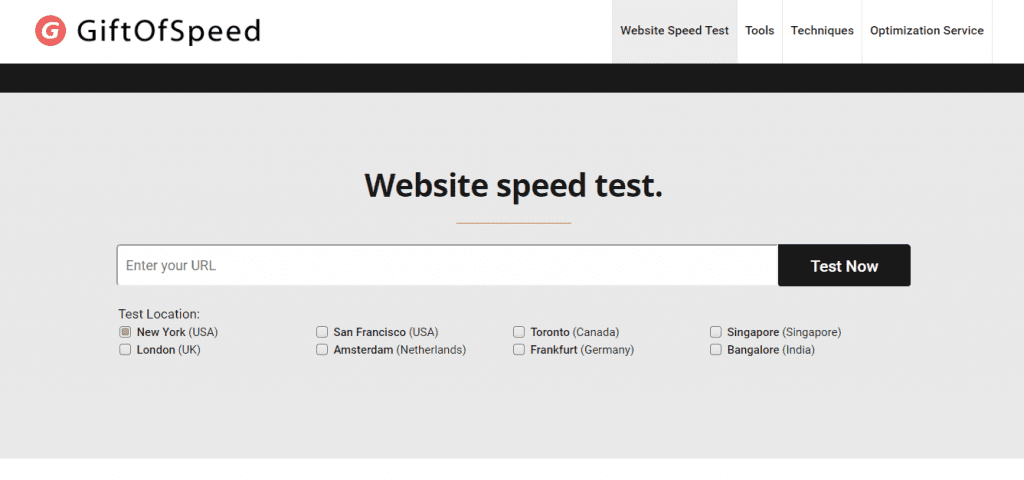
GiftOfSpeed allows you to check your website’s load time from eight different locations. Their other free tools such as CSS optimization test, broken requests test and JavaScript compressor help in directly improving your web performance.
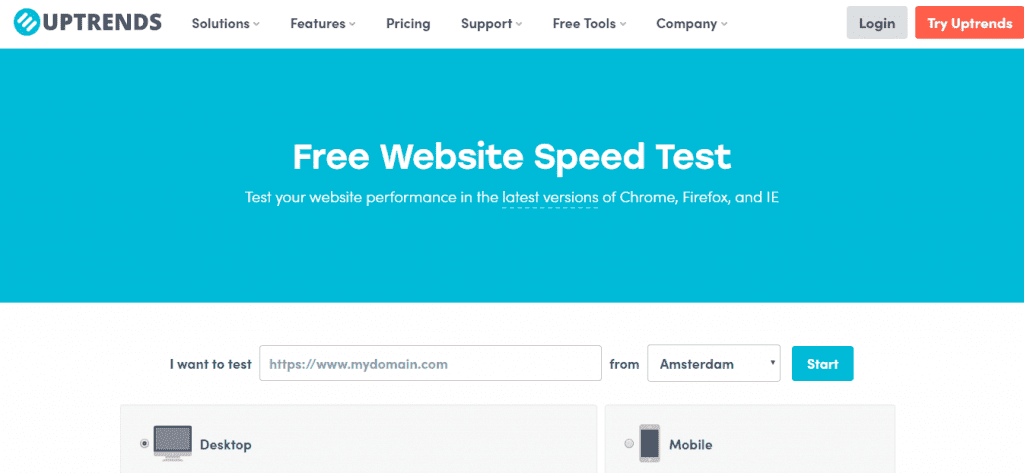
The free speed test tool, Uptrends helps in evaluating your website’s load time on desktop or mobile devices from ten different locations. It also allows you to set the bandwidth throttling and the web browser in which the test will be conducted.
You also get the website monitoring tool for free. The features include email alerting, broad scope of test location, and monitoring dashboards.

BatchSpeed’s tool features crawling websites, multiple URLs, and sitemap XML prior to conducting speed testing.
You can sort the results by size, speed, recommendations, or priority levels.
Why Speed Optimized Mobile Website is Trending?
You won’t disagree if I would say that optimizing an ecommerce website for better mobile experience is a significant boost to conversions. The fact is that mobile devices capture 65% of the total digital time, worldwide.
As per the BaseKit survey of 510 small businesses, 91% of the e-commerce websites aren’t mobile optimized.
As per Statista, the worldwide stats on the internet device usage revealed that mobile traffic reached to 51.89% of global traffic in 2018. This indicates that people will prefer to browse websites on their mobile devices rather than desktops and laptops in future.
So, to make most out of your online efforts, it is important to ensure that your website gets displayed perfectly on the mobile devices such as smartphones and tablets. For this, you will need to design your webpage with mobile optimization in mind.
Check the below reasons to optimize your website for mobile:
User Experience: Many times while browsing a website, you might have abandoned mobile web pages that take a long time to load. Even your customers do this.
As per a study, if a mobile site takes longer than 3 seconds to load, 53% of mobile visitors abandon it. Today, customers not only want but also demand a faster mobile user experience from brands and when they need to wait for more than 3 seconds for the page to load, they just abandon the page.
It is observed that 65% of the digital time is captured by mobile usage, keep the desktop usage at the last in the race.
People browse websites on their mobile devices and don’t have patience for the page to load.
AdWords Quality Score: Google says that page speed is an important element of your landing page conversions and affects your quality score badly.
It’s a sad truth that majority of businesses reckless of this. Therefore, they waste their precious time, money and efforts in creating landing page experiences that don’t bring conversions.
If it takes too long for your website to pull up when a visitor clicks on your advert then of course he is going to leave your site. Due to this, Google bots will think that your landing page is missing something and so can’t be ranked well.
Remember a fast page load will lead to better quality score. Quality score increases the CPC. It indicates that good page speed can help decrease your ad expense to a great extent.
If your page speed is better, your quality score will be good. Further, the better your quality score is, the lesser you will need to spend on ads. Then if your ad spending is efficient, the broader is the reach of your ads.
Related: How Do You Get More Out Of Your Google AdWords Campaign?
SERP Rankings: Site’s SERP ranking get badly affected due to page speed. You will see a very strong correlation between site speed and Google rankings, and the sites that load faster can rank higher in Google.
When two mobile sites rank with similar content quality, domain authority and backlink profile, Google assigns more weightage to the one with better page speed in organic rankings.
Now, the question is why does Google think much about the load time?
Let’s check the reason for this.
Google conducted a study for finding the relevance and significance of page loading time. Also, visitors were asked to give their view on if they wanted to see 10 or 30 results for Google searches. The 30 results per page received the highest response. Therefore, Google applied 30 results to some search results pages just for experimenting.
But the result was the traffic to pages with 30 results decreased by 20% even though the load time difference was just half a second.
So, think if half a second can affect the traffic to this extent, what would be the result if the page load time is reduced by a second or two.
Checking Your Mobile Site’s Load Time
The ranking in Google for mobile sites is based on the speed. Page Speed Score is used to rank a site on the scale of 0 to 100. If a site loads faster, the score gets better.
Google specifies that the sites with a score of equal or more than 85 perform well and so rank high.
Google provides a tool to check the page speed score. It offers a detailed report for optimizing the site for better speed as below:
Above-The-Fold Load Time: This is the time taken by your site to showcase the content placed above-the-fold after a request is submitted by the user.
Full Page Load Time: This is the time taken by a site to load the complete page in a browser after a request is submitted by the user.
Wrapping Up
Website speed is a key to customer satisfaction and conversion and so, you shouldn’t ignore it. No doubt, it can be challenging for you to get the desired page load time but if you make it, it will have a positive impact on your overall site performance.
Make sure you implement all the tips mentioned in this article immediately, to achieve your site speed goals.
Go through your site’s speed test results and check for the issues that have the maximum impact on your load times. Work on the important factors and take the essential steps for improving them.


