CyberPanel is basically a feature-rich and easy to use web hosting control panel which is powered by OpenLiteSpeed and LiteSpeed Enterprise. It lets users efficiently manage their websites and web hosting account.
So, if you are hosting any user’s website on your website, offering them CyberPanel can help them to make their management task simpler and efficient. Also, CyberPanel is one of the alternatives to cPanel.
In this article, we will cover how you can manage the CyberPanel users and user permissions.
Steps to Create Users in CyberPanel
Here we will cover how to create a reseller, admin or users account in CyberPanel.
Step 1: Initially, login to your CyberPanel by enter your username and password.

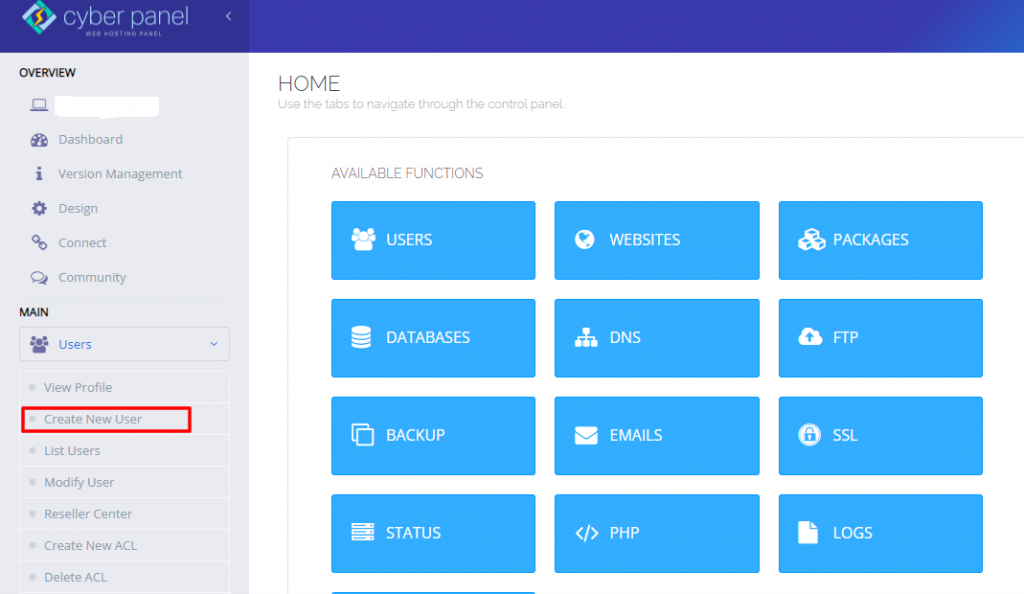
Step 2: Now on the left side of the pane, go to Users section > Create New User

Step 3: Enter the details in fields mentioned, the Firstname, Lastname, email. And while preseting the Access Control List (ACL), it will display three options: Admin, reseller, or user.

Step 4: Also, enter the website limit correctly. You can make the changes accorindly later.
Step 5: Enter the user name and password. Then, its recommended to keep the security level high.
Step 6: By filling all the above details. Now click on Create User.
Steps to List CyberPanel Users
You can view all the users created by clicking List Users. To do so, go to CyberPanel dashboard >Users>List Users.

Here you will get to know:
- List of Usernames
- Websites limit
- Disk Usage
- ACL
- State (If the account is active or not)
- Options to edit, activate, or delete the account
Steps to Modify the User Settings
If the number of users grows, sometimes you need to transfer the ownership to new owners. To do so, go to List Users. The Edit button lets you to change the user’s account:
- Change the owner to another user
- ACL between user, reseller, admin

To change the other user settings, select Users> Modify Users from the CyberPanel dashboard. To Save the Changes, click on the Modify User at the bottom.

Steps to Change the Websites Limit in Reseller Center
To change the websites limit in Reseller Center, in the CyberPanel dashboard, go to Users> Reseller Center.
Then select the user from the down-down list. After this, enter the new owner and set the website limit as per requirement.
At last, click on Save Changes

Steps to Manage the Access Control Lists (ACLs)
You cannot modify or delete the reseller, admin or user ACLs. But if you need customized privileges, you can create custom presets from:
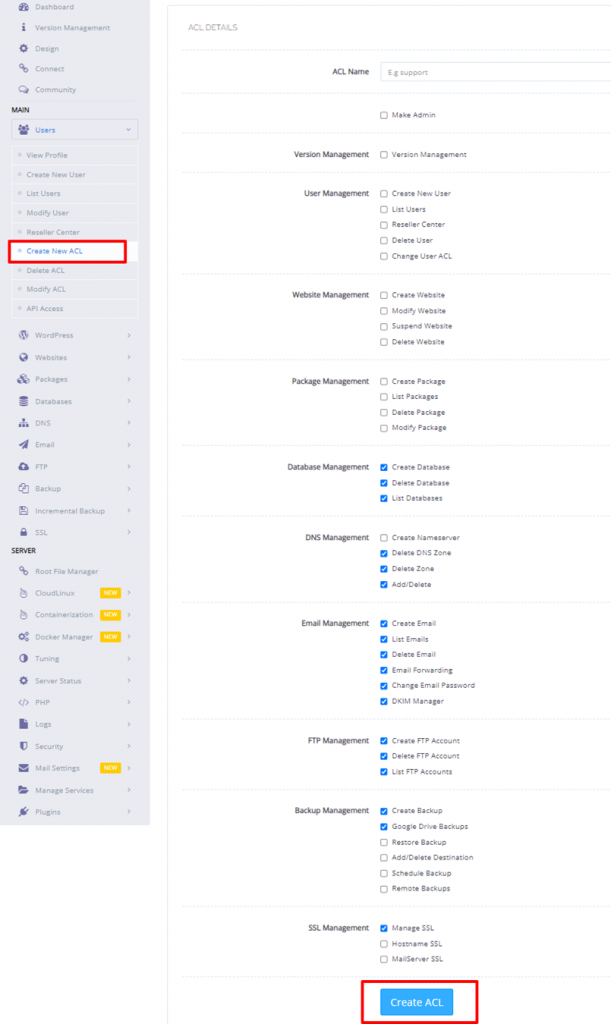
User> Create New ACL
First just type the ACL name, check boxes for the features you want and simply click on Create ACL.

Steps to Delete the ACLs
To delete a custom ACL, follow the below steps:
- Step 1: From the menu bar of CyberPanel, go to Users> Delete ACL
- Step 2: Choose ACL from the given drop-down list
- Step 3: Select Delete ACL and click on Are you sure?
Note: You cannot delete an ACL when it is been assigned to a user.
Steps to Modify the ACLs
To modify the custom ACL:
- Step 1: First go the menu bar, from there, select Users> then Modify ACL
- Step 2: Choose an ACL from the drop-down list
- Step 3: Make changes as required
- Step 4: Then click on Save Changes.
And that’s it!
This is how you can manage the CyberPanel users.


