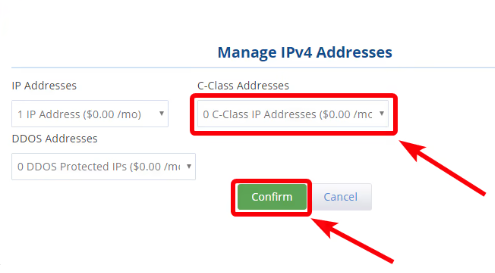
A C-Class IP belongs to the semi-static range of IP addresses used across the internet. An IPv4 address consists of four sections, also known as classes – A, B, C, and D.
Here is an example of an IP address – 192.168.1.2; in this number, 1 is the C Class IP. When you buy a C-Class IP, you will get an IP from a pool of the C-Class IPs available. Usually, when you buy 5 IPs, you get them in consecutive order, like 192.168.1.2,34,5,6. Buying a C-Class IP is different from buying a Standard IP. When you buy a C-Class IP, you will get an IP address like 192.184.15.124 that is not in the same sequence as your other IP addresses.
Adding C-Class IP Addresses To Your Server
To add the C-Class IP address to your server, you have to follow these steps:
Step 1: Log in to your portal and go to your Cloud Control management area. If you are unsure how to locate this, you can contact us through live chat, and we will help you.
Step 2: Left-click on the server’s nickname from the server list.
Step 3: Left-click on the “Manage IPs” section from the navigation bar.

Step 4: Click on the option – “Manage IPv4 Addresses”.

Step 5: You can select the number of IP addresses you want to add to your server through the drop-down menu. You can choose to add 0-250 IP addresses. The cost of the number of C-Class IP addresses you selected will also be displayed. Once you have made the selection click on “Confirm.”


