To cope up with the data loss situations like hardware failure, network intrusions, human errors, natural calamities, etc. you should always take a backup for your SQL database.
Microsoft Server Management Studio Express is a free and open source graphical management tool that can be used to manage your SQL database.
To back up your SQL database using Microsoft SQL server management Studio Express you should make sure that:
1) You must have direct access to the local server desktop.
2) You must have Microsoft SQL Server Management Studio Express installed and running on the server prior to the export.
The backup file that you download needs .bak file extension. If the database is stored on the shared servers, then the backups get generated on the server itself. You may contact your windows support team to get the copy of the backup.
Method 1 –
Steps to follow to take a backup of the SQL server database :
Step 1: First, of all, you will need to configure the Microsoft Server Management Studio on your local machine.
Step 2: Open your Microsoft SQL Server Management Studio, Standard or Express edition whatever you prefer.
Step 3: Enter your database Username and Password to login to your MS SQL server database.
Step 4: Expand the database.
Step 5: Right click on the database you want to take backup. Database -> Tasks -> Back Up
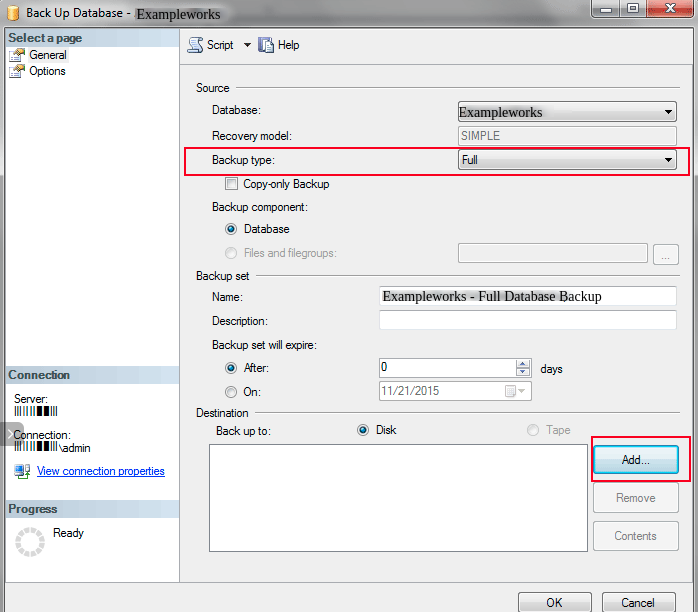
Step 6: The Back Up Database window will appear on your screen. Now select the following options on it :
- Backup type: Full
- Under Destination -> Backup to : Disk
Step 7: Click Add. Now you can see the following window that will appear on your screen. Select the desired path and file name for the database backup file.
Step 8: Select the destination folder where you like to store the backup. Enter the File name with .bak extension
Important: Make sure that you place your MS SQL database in the .bak file under the MSSQL backup folder.
Step 9: Click on OK to finish your backup. Once done with this, the message will appear showing your successful completion of database backup process. The confirmation window will show you the message that “ The backup of database ‘yourdatabasename’ completed successfully”.
Hurray!
Your backup is completed.
Related: A Complete Guide to SQL Injection
Method 2 –
The BACKUP DATABASE allows you to take the complete backup of your database and files, differential, etc. backups. This depends on the option that you like to use.
Let’s see the commands to be used to take a backup, and can be used in Windows Cloud VPS and Windows Dedicated Server.
To Create a full backup to disk
BACKUP DATABASE – Give the database name with this command.
TO DISK – It specifies that the backup would be written to the disk. Specify the location and file.
To Create a differential backup
In this command, you just need to add “WITH DIFFERENTIAL” option as shown below.
That’s it.
Taking backup is very easy by just using these two commands.


