SSH is basically a network protocol used to login to the system via the Secure channel. SSH allows you to securely exchange data between two devices. When you use SSH, all the login details, commands and texts are encrypted.
You can configure SSH an SSH key on your cPanel. This article explains the steps to configure and deploy SSH keys using cPanel.
Enabling SSH access permits for:
- Remote hosting control
- You can add, remove, edit, backup and even restore the hosting files and directories
- Gain an established connection between 2 different servers
- Import and export your database
Steps to Configure SSH Keys in cPanel
First, to configure SSH keys in cPanel, you can easily create a new key pair, or import the existing key.
There are different options to enable the SSH keys:
- Generating a new key
- Importing an existing key
Option 1: To Generate a New SSH Key
To generate a new SSH key for your account, follow the steps given below:
1. First step is, to login to cPanel account.
2. Then, open the SSH Access tool:

- If you are currently using the Jupiter theme, on the Tools page, in the Security section, click on SSH Access.
- And if you are using the Paper Lantern theme, click on SSH Access in the security section.
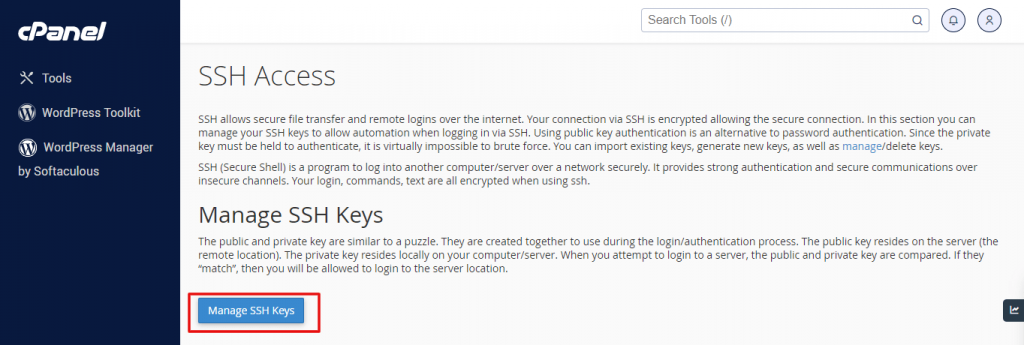
3. On the SSH Access page, click on Manage SSH Keys.
Related: How Do I Enable The SSH / Shell Access in cPanel On VPS?
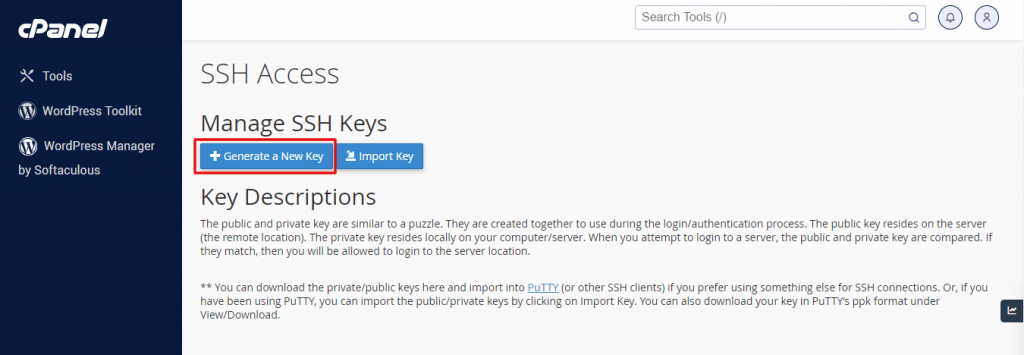
4. Now, click on the Generate New Key.
5. Confirm the key name which is set to id_rsa.
6. In the boxes, key password and Reenter Password, enter the password for the key.
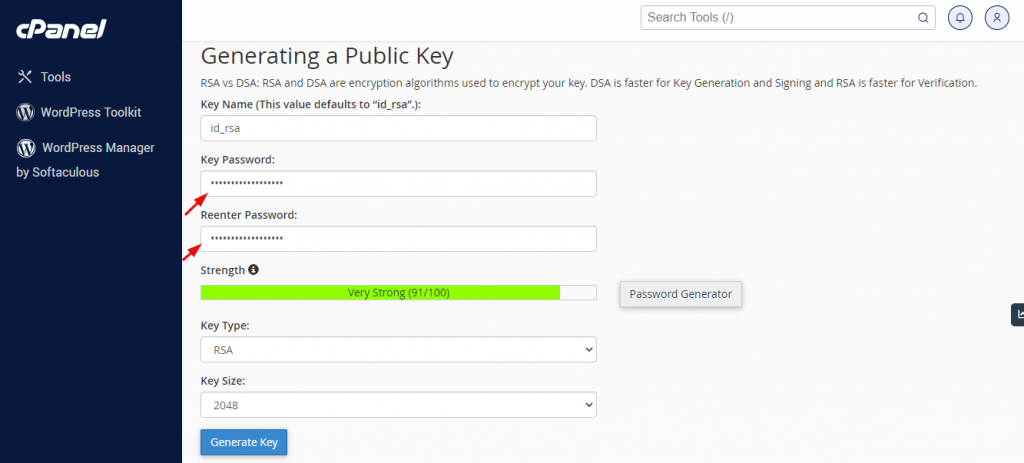
Note: You can click on the password generator, and create a strong password.
7. The key type is set to RSA.
8. The key size is set to 2048.
9. After completing all the steps, click on Generate Key.
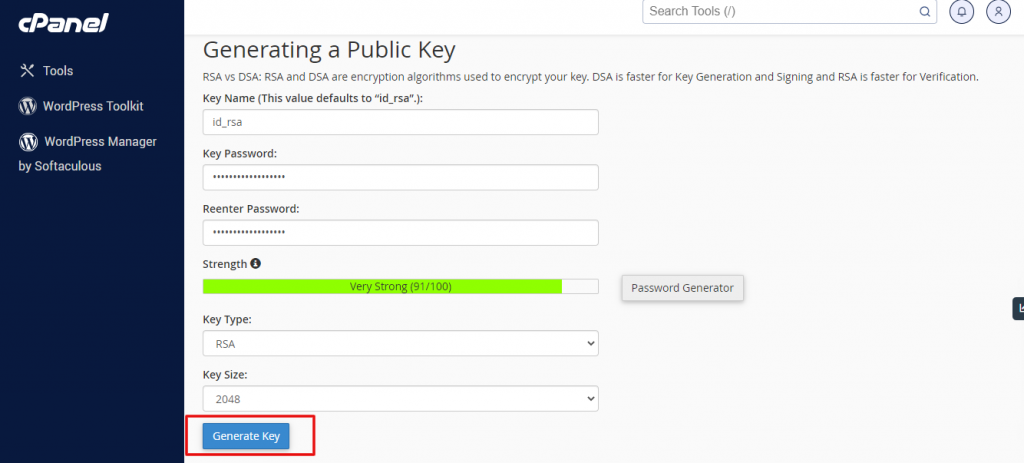
cPanel generates public and private keys and saves them all in /home/username /.ssh directory, where the username is your MilesWeb account.
10. Then, click on Go Back.
11. Under the Public Keys section, find the name of the key you have generated. Go to Actions > Manage.
12. Click on Authorize, then Go Back. Now, for connecting your hosting account with the newly generated key, keep reading below.
Option 2: By Importing an Existing Key
If you have generated SSH keys for your account and need to save them, you can use cPanel for importing them.
To do so, follow the steps given below:
1. Login to cPanel.
2. Then, go to Security section >> SSH Access

3. Then, on the SSH Access page, under the Manage SSH Keys, click on Manage SSH Keys.
4. Click on the Import Key.
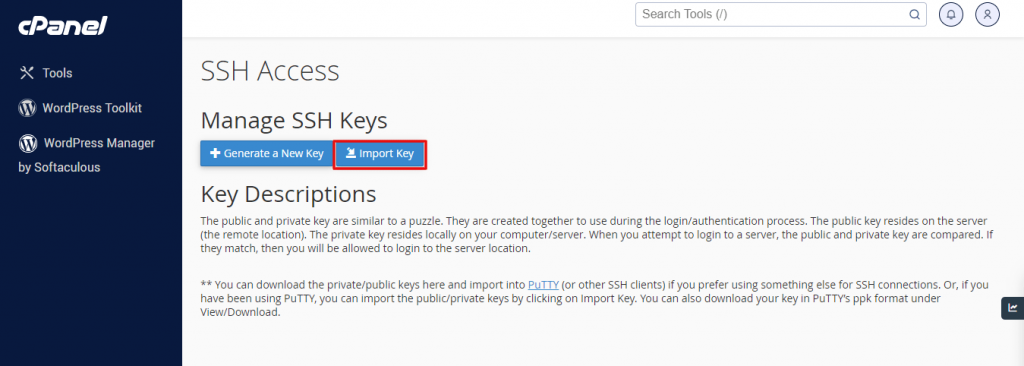
5. Now, in the Choose a name for this key (defaults to id_dsa) text box, just type the name for the key.
6. In the Paste the public key in the text box, paste the text of the public key into the text box.
7. And at last, click on Import. cPanel will then import the key.
8. Click on Back to Manage Keys.
9. Under the Public keys, find the key name imported.
10. In the Actions sections >> Manage.
11. Click on Authorize and then click on Go Back.
How to Connect to Your Account Using SSH Keys?
Use the correct procedure for the OS of your computer system.
Windows OS
If your computer runs on Microsoft Windows, you can make use of the PuTTY program to connect your account with the SSH keys. Another method is, Windows 10 has a native SSH client which you can use without need to installing and configuring an additional program.
With PuTTY:
Before you are trying to connect to your computer, you need to first deploy the private key to your local computer. To do so, follow the steps given below:
- First is, Login to your cPanel account.
- Under the security section, go to SSH Access tool.
- Now, on the SSH Access page, under the Manage SSH keys, click on Manage SSH keys.
- On the SSH Access page, under the Private Keys, find the key name you created and then click on View/Download.
- Under Convert the “id_rsa” key to PPK format, click Convert. cPanel will convert the key.
- Click on Download key, and then save the id_rsa.ppk on the local computer. You are all set to configure the PuTTY client for connecting to your SSH account using the private key.
For Configuring PuTTY to use
your private key, follow the steps given below:
- Start PuTTY.
- In the Category, expand the SSH and then click on Auth.
- Now, under the Authentication Parameters section, click on Browse.
- Find the id_rsa.ppk file which you had created in the above step.
- In the Category, click on Session.
- In the Host Name, text box, enter the username@test.com Then replace the username with your hosting account and replace test.com it with the domain name of your site.
- Next, in the Port text box, type 7822.
- Make sure that the Connection type button is set to SSH.
- Now, in the text box of Saved Sessions, enter the name for the connection.
- Click on Save.
- For connecting to your SSH account, double-click on the name of the connection in the list.
- PuTTY needs to connect without asking for the account password.
And this is how you can configure SSH using cPanel using different methods.
By Using the Native Windows SSH Client
For using the Windows SSH client to your hosting account using a key, follow the steps given below:
- The first step is, login to cPanel.
- Open the SSH Access tool.
- Now on the SSH Access page, click on Manage SSH Keys.
- On the SSH Access page, under the Private Keys, find the name of the keys you have created, and then click on the View/Download.
- Click on the Download Key, and then save the id_rsa file on your local computer. You can now start the SSH client and use the key. You should make a note you save the file on your computer. For making the key file the default key for SSH connections, you can save it in the \Users\username\ .ssh directory, where the username represents the Windows username.
- Now, open the Run dialog box, type Windows key + r.
- In the Run dialog box, type the cmd and then click on OK to open the command prompt window.
- At the command prompt, type the command. Replace, your username with your hosting account username, and replace test.com with your website’s domain name.
ssh -p 7822@test.com
9. If you have not saved the key file in the \Username\ssh directory in the step 5, you should also mention the key file location.
To do so, replace path with the path where you have saved the file.
Copyssh -p 7822 -i path username@test.com
If you are connecting to the server for the first time, you will get a message about the key fingerprint. Just type “Yes” and then press on “Enter”.
When you are connected to the remote server’s command line prompt will appear:
Copyusername@hostname [~]#
10. You can run the commands on the remote server. To see the list of current directories, type ls and then press Enter.
11. Now, to close the SSH connection, when you are done, just type exit and press “Enter”.
Conclusion
In this guide, we have seen the different ways to configure SSH using cPanel.


