In this guide, we will get to know the steps to restore backups in cPanel. But, first we will understand the concept of JetBackup.
What is JetBackup?
JetBackup is basically a tool available in the cPanel which offers a set of backup and recovery solutions. To put simply, JetBackup is an easy-to-use tool that you use whenever you wish to backup your website’s content, email, databases and other data.
JetBackup offers both remote and local incremental backups. We also take off-site backups of your data and store them up to a particular day, on the basis of your hosting plan.
Which are the Restore Options Available in JetBackup5?
JetBackup5 offers different options for creating backups in cPanel:
- Databases
- Cron Jobs
- SSL Certificates
- Email Accounts
- DNS Zones
- Files
Let’s review the most commonly used JetBackup options:
- Files
- Databases
- Email Accounts
How to Restore Files Using JetBackup 5?
Follow the steps given below to restore the website files using JetBackup 5:
1. The first step is to Login to the cPanel account.
2. After you have logged in to the cPanel, scroll down to the Files section, and then click on the JetBackup 5 option.

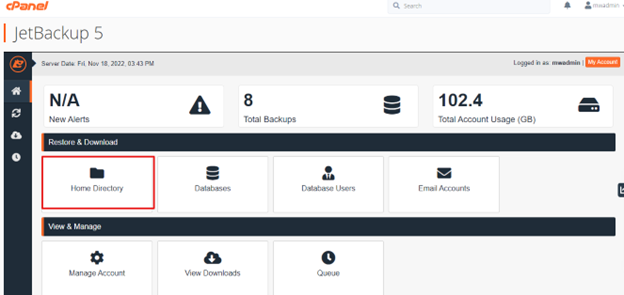
3. Once the JetBackup 5 opens, click on the Home Directory to open the file restoration tool.

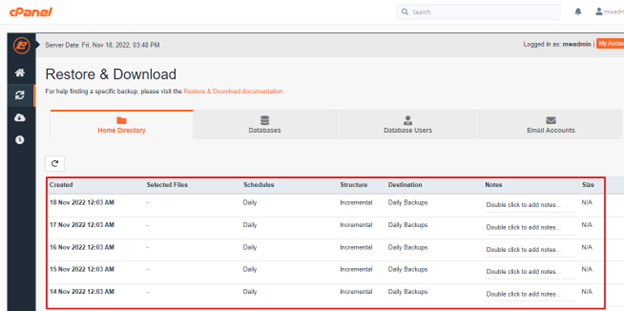
4. After clicking on the Home Directory, you will then get a list of backups.

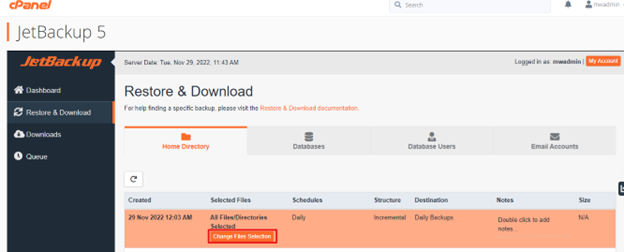
5. When you click on a particular file or folder, you will see that the selection turns orange. To select the particular file or folder, you want to restore, click on the Change File Selection button.

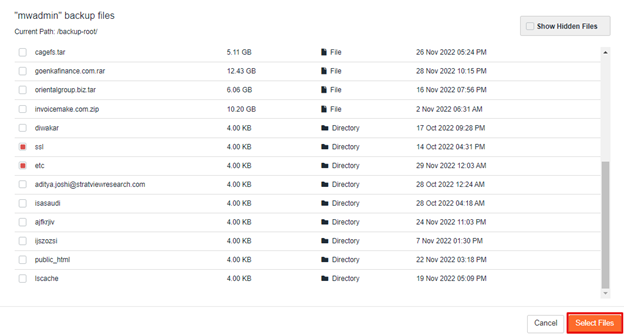
6. After you click on “Change File Selection” button, you will get to see a list of folders and files which is in your home directory.
Related: How to Take the Cron Job Backups using JetBackup?
7. Browse these folders until you find the files or folders you want to restore. Click Select Files at the bottom right of the modal.

8. After selecting files, the home directory will be opened. Scroll down to the bottom, select whether you want to download or restore the file.
9. You will be again asked for confirmation, whether you want to Restore. So then click on Restore Selected items button.

After all the steps are completed, you will see a message saying “Restore” has been added to the Queue successfully.
The restore which you have requested is listed and you will be see the progress of restore in the status column.
And that’s it! This is how you can restore your files using JetBackup 5 in cPanel.
How to Restore a Database Backup?
Wetback 5 keeps your database safe if in case you need to recover it.
Here are the steps to restore a database backup using JetBackup 5 in cPanel.
- Login to your cPanel account.
- Once the cPanel dashboard opens, scroll down and go to the Files section > JetBackup 5.
- Now, on the JetBackup5 dashboard, navigate to Databases.
- On the left-hand side of the pane, click on Restore & Download.
- For restoring the database, select the database from the list > Click on Restore.
- In the
- In the Restore Summary, you can see selective items which will be restored. Also, you can select/deselect Items → Click on Restore Selected Items.
Now, from the back-end restoration will begin and that you can monitor from the Jetbackup → Queue. Once the restoration has been complete, you can see the Complete message in the Status section.
- You can also download the database.
How to Restore Email Backups?
Here are the steps to take email backups in cPanel using Jetbackup 5. Whether you have deleted the emails having the address to the place, client files or those email with photos. There’s no need to worry, because, with the JetBackup 5, you can recover those all messages.
To do so,
- Login to your cPanel account.
- Scroll down, and go to the files section and then click on the JetBackup 5.
- On the left, select the Restore & Download> email accounts and then click on the Restore.
That’s it!
In this article, we have seen the steps to restore backups using JetBackup 5.


