G Suite is basically a collaborative productive app for your business and comes with features such as shared calendars, professional email, online document editing and more. Plus, it has an innovative feature of Split and Dual deliveries. It lets you use two different servers for delivering emails using only one single domain name.
Here’s a guide for you! We will get to know about the G Suite Split Delivery and Business Email.
What is Split Delivery?
Split delivering method means that emails will be delivered at the same time to two email systems on the same domain. In split delivery, based on the recipient, an incoming message will be delivered to a Gmail inbox or a legacy system inbox.
This method works the best if some of the users use Gmail and others use a different mailing system. Say for example, you require a special handling for a particular type of email, like the messages of the Legal department.
Also, this method can be used, if you are migrating to Gmail from a legacy mail server, and you want to run a test with a subset of users. Now, we will get to know the steps to get Split Delivery by keeping Google as the primary server.
G Suite & Business Email
The logic is that for the same domain, some IDs will run under Google as the primary server and some IDs will run under Microsoft as the secondary server.
All About the Host Settings
Now, we will get to know the steps to create a Split Delivery Configuration.
- The first step is, Login to the Admin Console
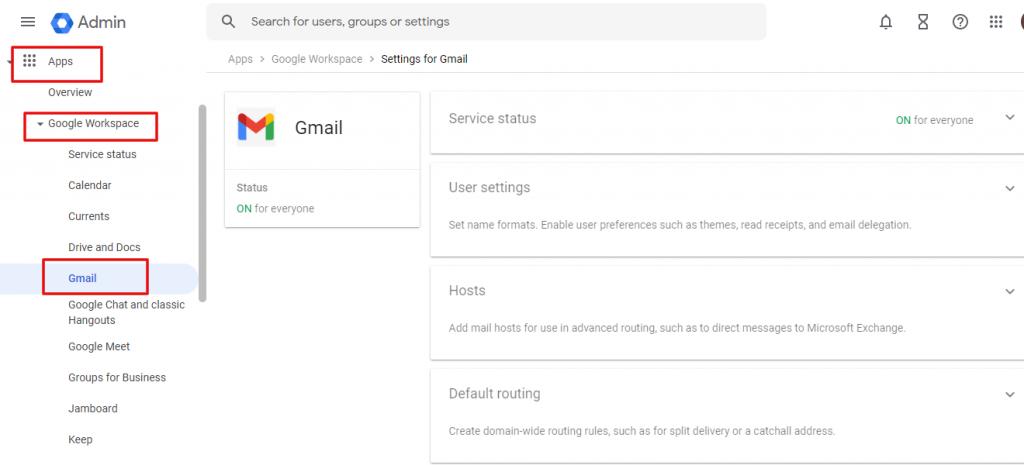
- Then click on Apps > G Suite > Gmail > Advanced Settings

- Now from the Admin Console dashboard, go to Hosts > Add route.
Related: Top 6 Reasons Why You Need G Suite
Here enter all the details, mailing route name. Also, mention the secondary servers MX servers.

- Now click on Save
Adding the Routing Settings
As soon as all the details of the host are saved successfully, we need to then add the routing settings.
For this, follow the below steps:
Click on Apps > Gsuite > Gmail.
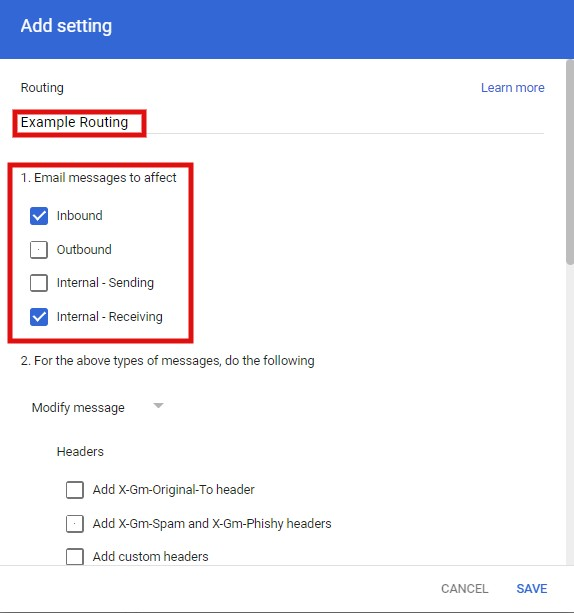
Now under the Gmail General settings > Scroll down and go to Routing> Besides Routing> Click on Configure

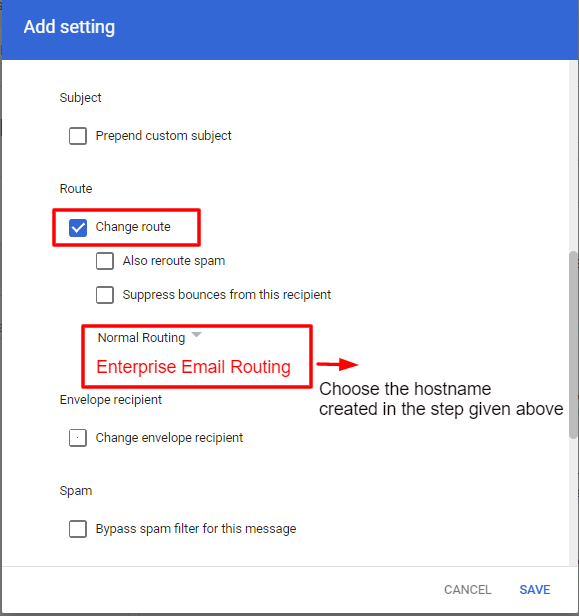
Enter the name of routing, and scroll down to the Route > Click on Change Route. After this, see the Hostname which was created in the step before. Here we have created the hostname here as ” Enterprise Email Routing”

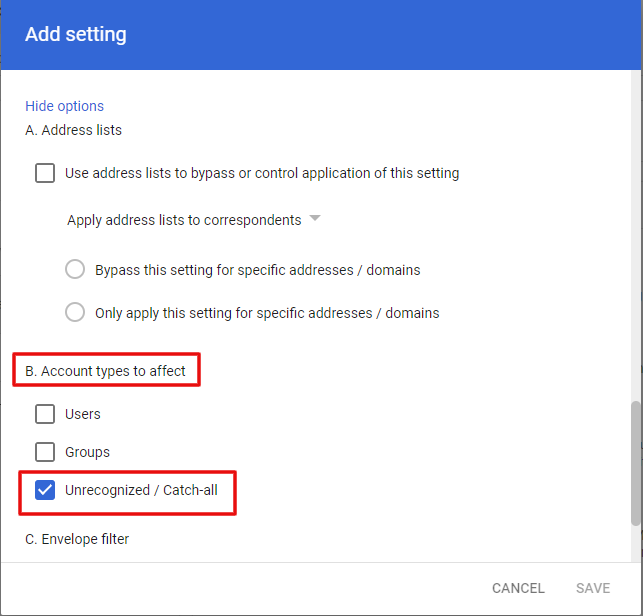
Now Scroll down again > Click on the show Options > Under the Account Types to affect option > From the checkbox, select Unrecognized/ Catch-all.

- And then simply click on Add Settings.
This is how you have completed the split delivery setup for your domain name. So now onwards, any email you send, the email will be routed first to your G Suite package.
If in case the email account does not exist, the email will be routed first to your Business/Enterprise email server. And, the message will be then delivered to the recipient!
About the DNS Records:
The point is, only one SPF record can be added to a domain name. As we are using different email servers, we need to set the SPF records together.
Find out the correct DNS Zone for the domain name and add the record which is mentioned in the current DNS zone.
Send Emails
● Whenever you are sending any emails there are times when emails get delivered to the Spam box of the recipient.
- To avoid this problem, add the SPF records for the email servers in the current dns on the domain. The SPF record basically identifies which email server is allowed to send emails on the behalf of your domain.
- SPF also helps in distinguishing the forgeries from the real mail. And with this, the email sender can say confidently that only I can send emails from these machines.
- If in any case other machines try sending emails from that domain, the mail server automatically knows that the “From” address is forged.
So this is all about split delivery and how you can build a split delivery configuration from a single domain.


