The article consists of the below pointers:
- Reasons to Update WordPress
- Before Updating
- Steps To Update The WordPress Core
- Steps To Update WordPress via the Admin Dashboard
- Steps To Update WordPress Manually Via FTP
- Steps To Update WordPress via WP-CLI
- Steps To Update WordPress Automatically
- Steps to Update WordPress Themes and Plugins
Are you in search of tips for updating your WordPress? You have landed at the right place. You won’t find it hard to update the WordPress core, themes or plugins.
In this post, we will help you to learn to update your WordPress site without disturbing anything.
You might think why to update when you have all the WordPress features required? You will get the answer to this question and also to other questions.
Reasons to Update WordPress
Is it necessary to update WordPress? Of course it is.
Thinking about why you should update your WordPress site even after having the functionality you need.
There are various advantages of updating WordPress such as:
- You get improved WordPress security as the bugs and security vulnerabilities get fixed due to updates.
- You get additional features and functionality that you shouldn’t miss.
- Get improved speed and performance that are included with each new version of WordPress
- Your WordPress becomes more compatible with modern themes, plugins and web technologies.
Before Updating
Prior to clicking on the update button or making any changes to your WordPress site, you should be prepared in advance for any eventualities.
You might get errors at the unexpected times and if you don’t have a reserved plan, you might get stuck with a broken site and a headache of booting.
Errors happen at the unlikeliest of times, and if you don’t have a fallback plan, you could be stuck with a broken site and headache of booting.
If you are beginner, make it a habit of creating full WordPress backups.
Take a note of it that WordPress asks you to deactivate all plugins prior to updating WordPress manually.
Generally, it isn’t much problematic when there is a plugin-update conflict, but when it occurs, it might leave your site unusable.
There are problems when new changes in WordPress conflicts with the plugins that you already have.
It becomes problematic when the new changes in WordPress conflict with the plugins that are already included.
After you upgrade, don’t forget to activate your plugins.
If you have taken the backup and plugins out of commission, let us learn about and update WordPress.
Let’s learn about the WordPress core and also about handling themes and plugins.
Steps To Update The WordPress Core
In this section, we will learn about updating WordPress:
- Via the WordPress admin dashboard
- Manually using FTP
- Using SSH and WP-CLI
- Automatically via the cPanel, wp-config.php and functions.php
Steps To Update WordPress via the Admin Dashboard
This is the easiest method for updating WordPress, as it’s just a matter of point and click.
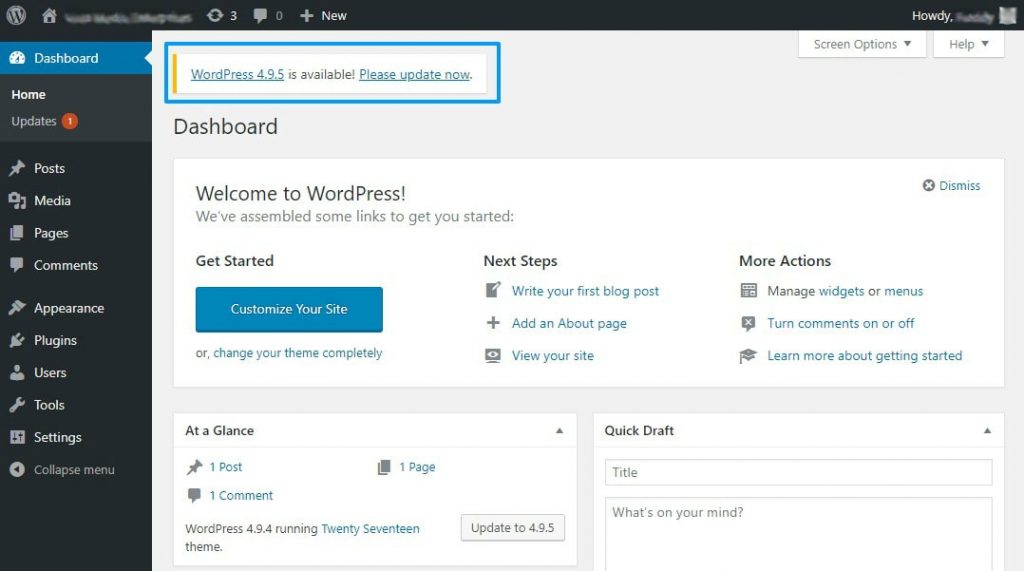
1. In case, you have any WordPress core updates available, you will a notification displayed at the top of your admin dashboard.
So, just hit the Please update now link for starting the update process.
After this, WordPress will take over and put your website in maintenance mode till the time update is complete.
In the process, you will need to deactivate and reactivate your plugins, download and install WordPress among other things.
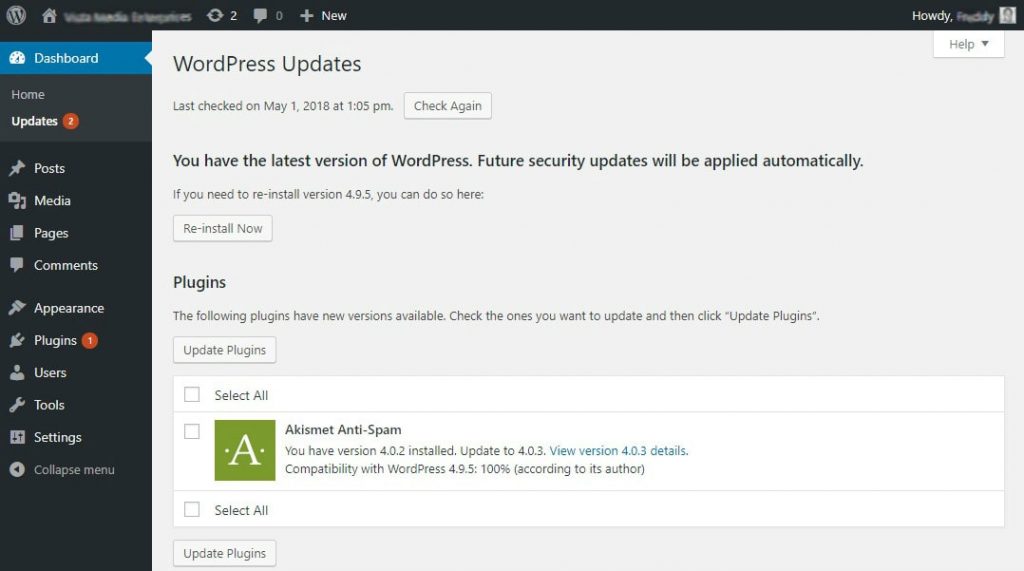
2. After the successful minor update, you will get redirected to the Updates screen, where it is possible to update your themes and plugins.
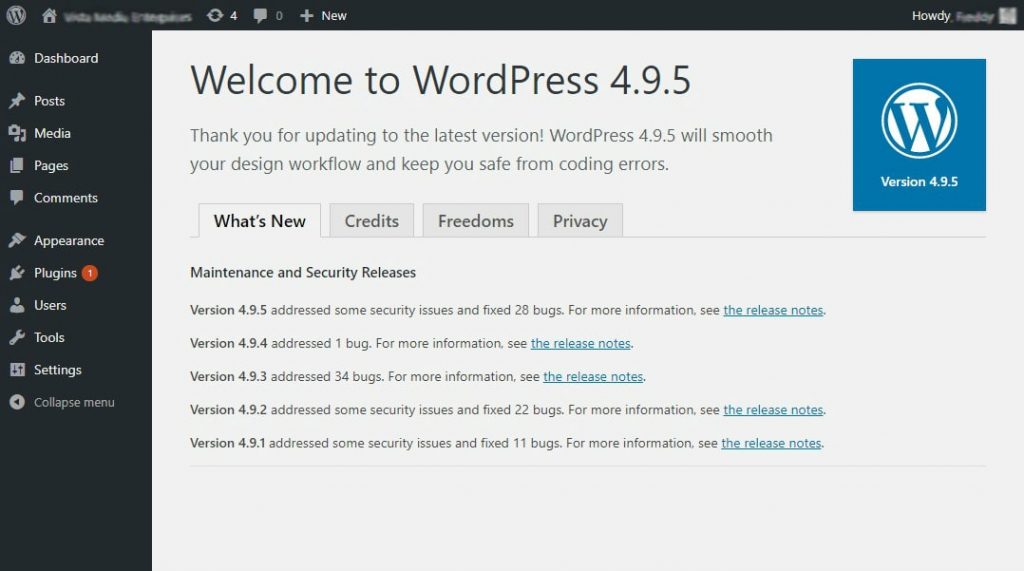
3. In case of a major WordPress release, for example if you are updating from version 4.8 to 4.9.5, after it gets successfully updated, you will get redirected to the WordPress welcome screen as shown below.
The image above shows the number of security issues and bugs every release has fixed.
This indicates that your WordPress platform is up to date. It’s the time to proceed and update your themes and plugins.
Now, let us see the process of updating WordPress manually via FTP.
The FTP program such as FileZilla makes it easy to update WordPress when you find it hard to update via the admin dashboard for some reason.
Steps To Update WordPress Manually Via FTP
It’s not a very challenging task to update WordPress manually as many think it to be. No doubt there are several steps involved, but it is as easy as pie.
Here we will use FileZilla.
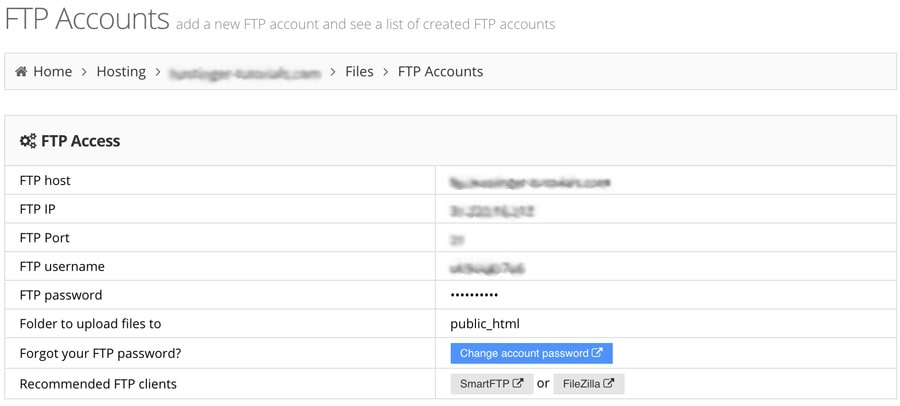
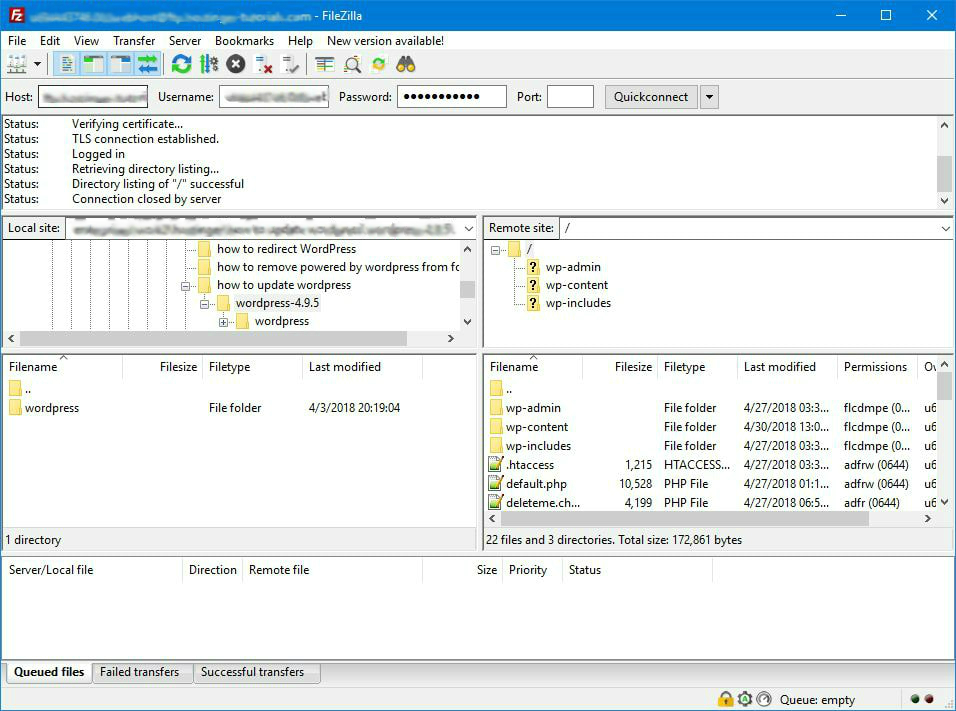
For using an FTP program, you will need to get the following details from your host: FTP username, password, host/hostname and port. If you are MilesWeb client, you will find them in Control Panel -> FTP accounts section.
After you have these details with you, we can then start the process of updating WordPress manually.
Let’s start with the preliminary preparations, i.e., taking the back up of your site and deactivating all plugins.
Step 1 – Find The Latest Version of WordPress and Download
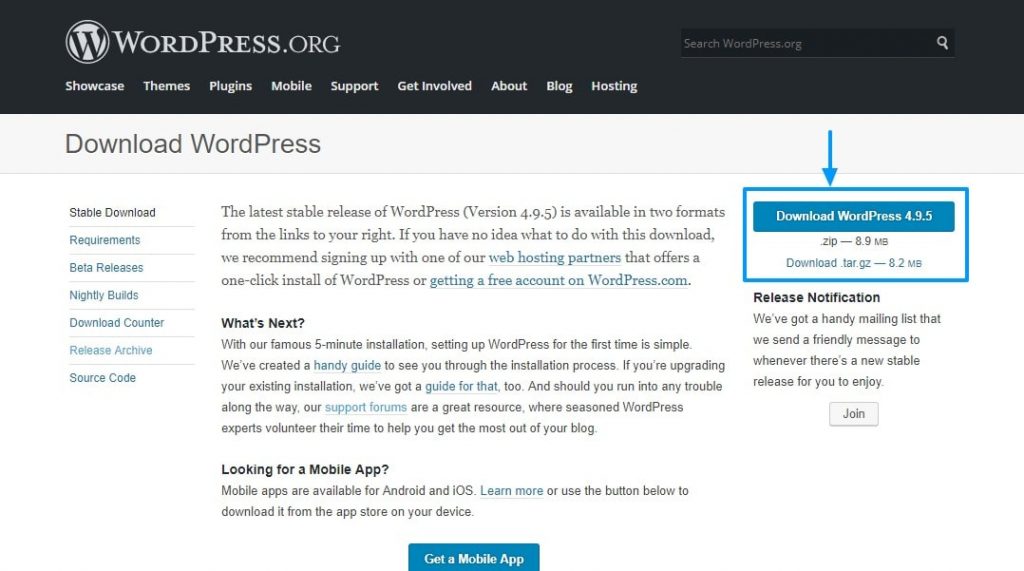
Firstly, go to WordPress.org and download the latest version of WordPress by clicking on the Download button.
Then, extract the WordPress archive on your computer with the WinRar or WinZip.
Enter the wordpress folder where you will find the sub-folders such as wp-admin, wp-includes, and wp-content and individual files such as index.php, wp-login.php, wp-config-sample.php and so on.
Step 2 – Access Your WordPress Root Directory
With your FTP details, enter your WordPress root directory.
After you enter the WordPress root directory, move the files from the latest version of WordPress on your computer to the WordPress root directory on your host.
In simple words, we will be replacing some files and folders on your web host with the corresponding files and folders from the WordPress package you extracted in the previous step.
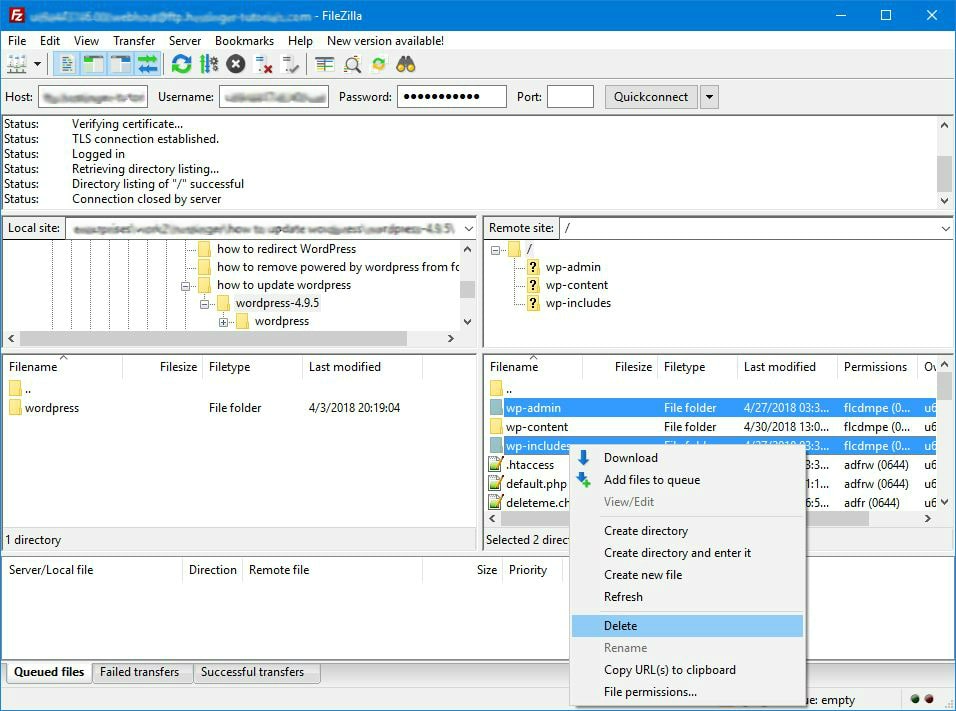
Remove the existing wp-admin and wp-includes folders on your web host by deleting them. In case you’re using FileZilla, simply select the folders, right-click and click on Delete:
Don’t move on to the wp-content folder immediately as your themes, plugins, and media are included inside the folder.
Step 3 – Upload New Versions
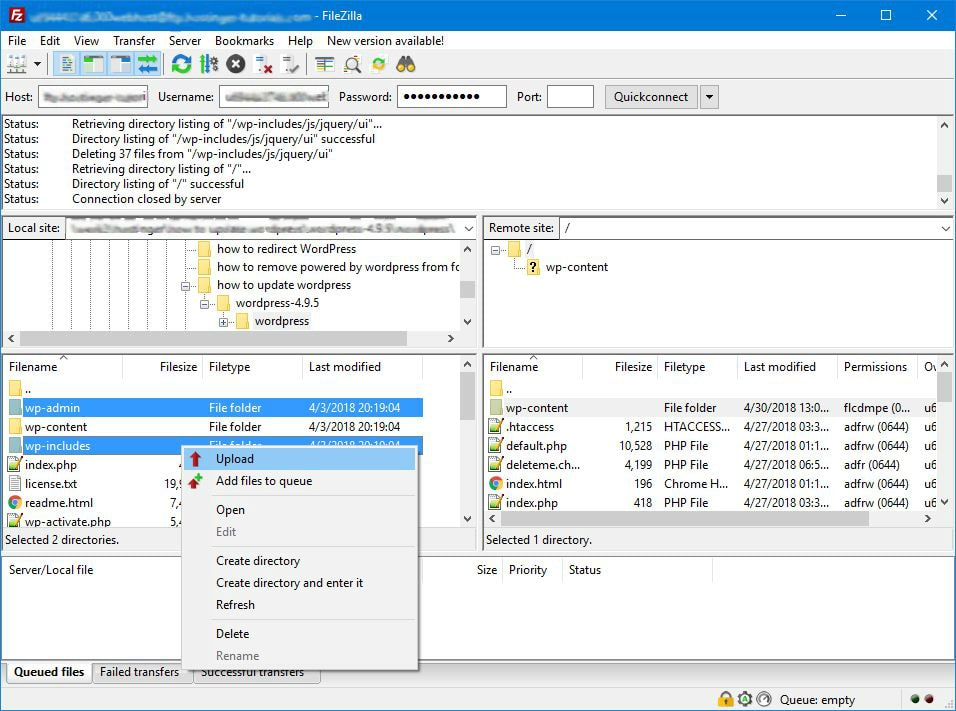
After deleting the wp-includes and wp-admin folders, you will need to upload the fresh versions from your computer.
Go to the WordPress folder on your computer from the left panel as shown below. Select the wp-includes and wp-admin folder, right-click and select Upload:
After uploading the new versions of wp-includes and wp-admin on your server, you will need to upload the other individual files inside the WordPress folder.
Here, you won’t need to delete any file on the server, instead just overwrite them.
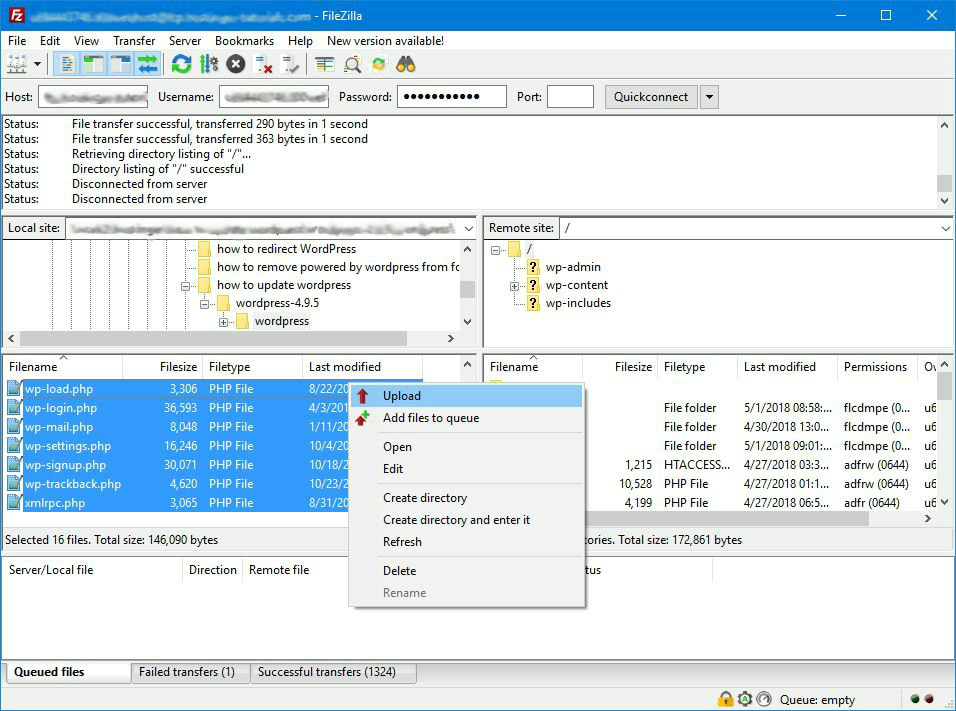
Go to your left panel and select all the single files as shown below, right-click and click on Upload.
You will get a confirmation dialog box, in that select Overwrite, and click the OK button.
Check the wp-config-sample.php to find if there are any lines of code you need to copy to the existing wp-config.php file on your web server.
At last, just go to your admin area (yoursite.com/wp-admin/upgrade.php/) and check if everything is working well and upgrade your database.
Steps To Update WordPress via WP-CLI
There are two different opinions when it comes to updating WordPress via WP-CLI as you need to update both the database as well as the WordPress files.
In case you have installed your WordPress site in a separate folder, example public_html/your-site, your WordPress root directory is your-site.
1. The first step is to use the cd command to switch to your WordPress root directory:
cd public_html
2. Next, see if there’s a new version of WordPress available:
wp core check-update
Example output:
+---------+-------------+---------------------------------------------------------------+
| version | update_type | package_url |
+---------+-------------+---------------------------------------------------------------+
| #.#.# | minor | https://downloads.wordpress.org/release/wordpress-#.#.#.zip |
| #.#.# | major | https://downloads.wordpress.org/release/wordpress-#.#.#.zip |
+---------+-------------+---------------------------------------------------------------+
If you don’t find any updates available, a message will be displayed as “Success: WordPress is at the latest version” instead.
3. Then, execute the below command to update WordPress:
wp core update
Example output:
Updating to version #.#.# (en_US)...
Downloading update from https://downloads.wordpress.org/release/wordpress-#.#.#-no-content.zip...
Unpacking the update...
Cleaning up files...
No files found that need cleaned up.
Success: WordPress updated successfully.
4. After this, you have learnt to update WordPress core via WP-CLI. Now, let us update your database, theme, and plugins. For this follow the below steps:
- database, run the command:
wp core update-db
- themes, run:
wp theme update --all
- plugins, use:
wp plugin update --all
Steps To Update WordPress Automatically
WordPress minor releases get updated automatically. But you can also set up major releases to update automatically.
If you aren’t a coder, you can set up auto updates with a plugin such as Easy Updates Manager.
Don’t want to auto-update via a plugin? Then enable automatic WP core updates by just adding the following line to your wp-config.php file:
define('WP_AUTO_UPDATE_CORE', true);
Steps to Update WordPress Themes and Plugins
You will destroy your website if you don’t update your themes and plugins while updating your WordPress core.
So, go to your WordPress admin dashboard, and click the Updates menu.
1. You will be lead to the updates screen where you can update the WordPress core, themes, and plugins.
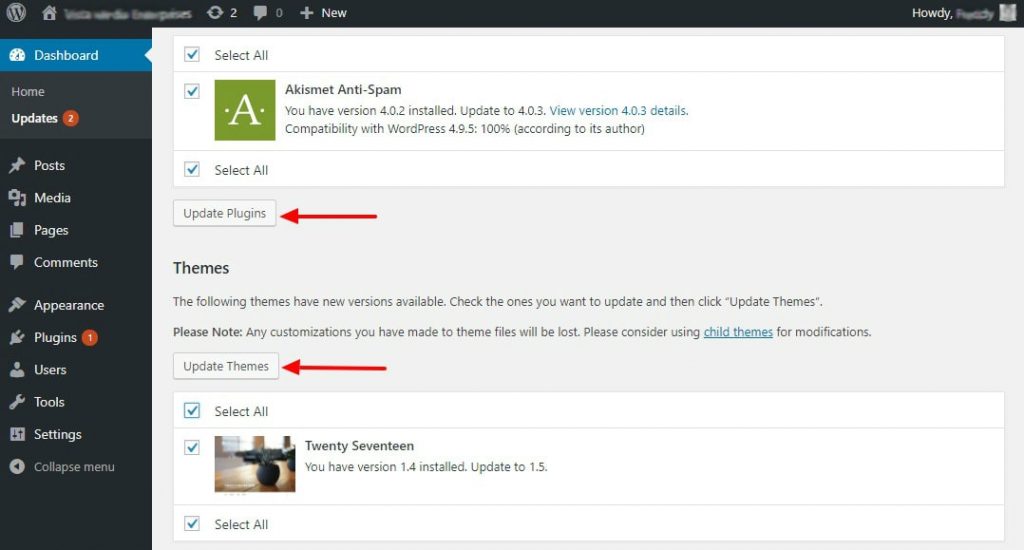
2. You don’t need to be given an explanation for updating your themes and plugins from this screen as it is self-explanatory. Tick on the Select All option and click either Update Plugins or Update Themes to update all plugins and themes respectively.
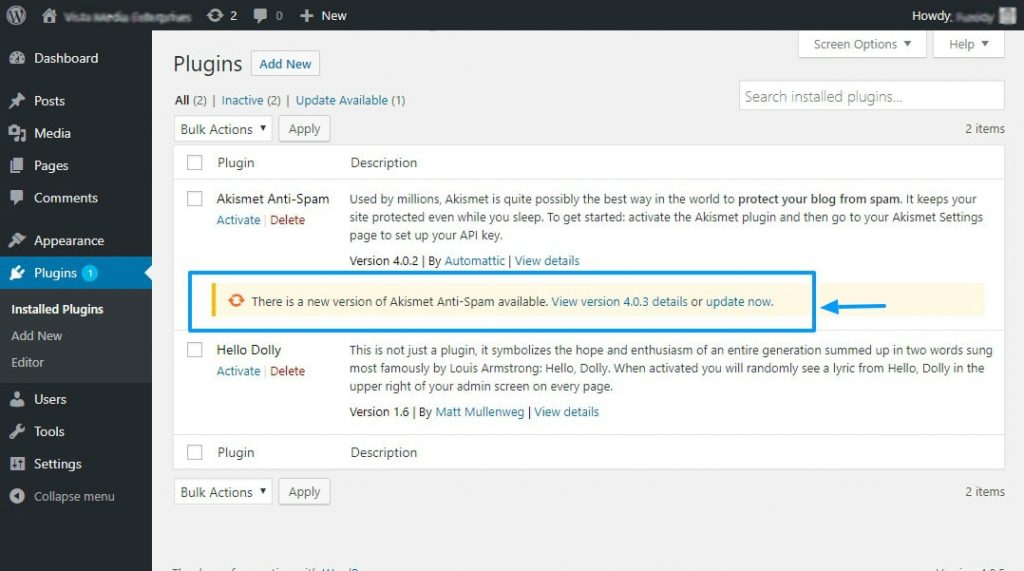
3. An alternate solution can be updating your plugins one by one with the help of Plugins -> Installed Plugins as shown below:
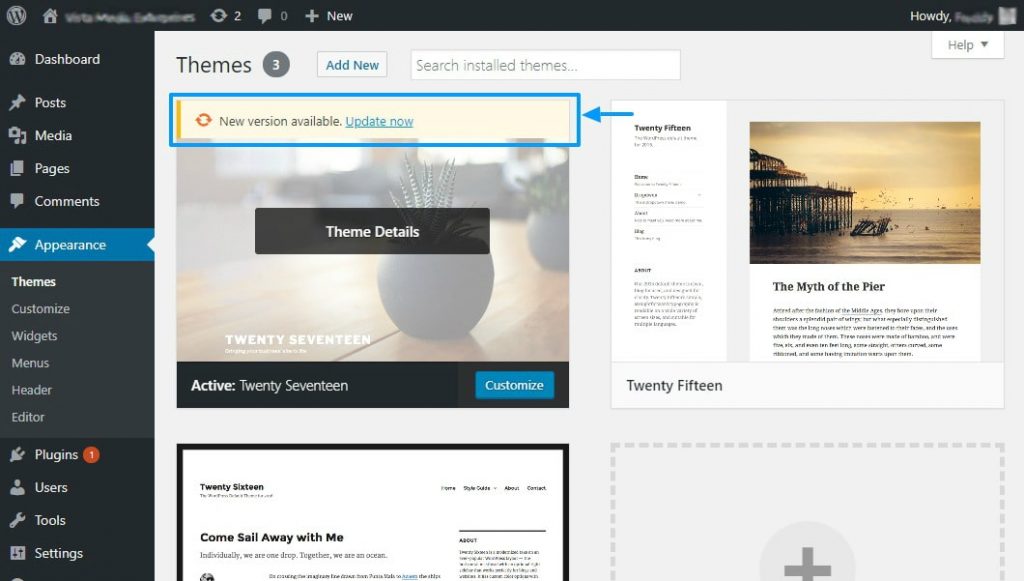
4. In the similar manner, you can update WordPress themes by going to Appearance -> Themes as below:
To avoid this, edit your child theme instead of your parent theme directly.
Final Word
After getting an idea about updating your WordPress you can upgrade it effortlessly without disturbing your site. We hope this post helps you in this process.
Prior to turning your attention on something else, there’s something important. Don’t miss to create complete backups of your WordPress site, even if you aren’t updating your website.
Additionally, don’t miss to start with a child theme so that you don’t lose the customization on your parent theme.
Always buy the WordPress themes and plugins from reputable developers who keep their products updated.

