When we code for a pragmatic actual environment, we confront many issues to refactor our code for a better understanding and to simply pinpoint the bugs. We primarily focus on reusability and try to shift as much code as possible to a common method so that development time and maintenance costs are minimized.
ASP.Net Core has a wide array of libraries that provide great assistance in development strategy. Using MVVM pattern and AutoMapper you can reduce your code lines and produce more reusable and efficient code.
What is MVVM pattern?
Design patterns are exceptionally useful, no matter which platform or language you develop for. MVVM means Model, View, and ViewModel. For a test-driven development process, you can use MVVM patterns so that you can achieve maximum code coverage.
- Model: Model holds the data and its related logic.
- View: It is used for the UI component that handles the user interaction.
- View Model: It is used to link Model and View. ViewModel is presenting the function, commands and methods to support the state of view.
Why is it important?
- Any application will be in the similar position as to where the end-user left it.
- Life Cycle state of the application will be preserved.
- UI Components and database operations would be kept away from Business Logic.
- Effortless to understand and read.
What is Automapper?
Automapper is a component that helps in developing a mapping between a source and destination model types. Once the mapping is originated then the source model object can be transfigured to a destination model object with simplicity and with less messed up code.
Auto mapper is an object to object mapper which allows us to map each and every property of the class within the same property of another class. Automapper was developed to resolve a tangled issue that most developers are facing in their day-to-day life, writing code that depicts one object type to another. The developers can get purge of the straightforward conversions as executed later in the following code.
Pros and Cons of Automapper
- Automapper should notably minimize the amount of code you have written, differentiated from LINQ as it uses protocols to regulate default mappings. Using LINQ, these default mappings would have to be outlined.
- In LINQ, it will be mandatory to define mappings in both the directions.
- Automapper should be capable of working this out impulsively when conventions are used.
Key Challenges
One of the substantial challenges for developers is to diminish the coding and to make code flexible to modify. Earlier, we have to manually map the properties from one table to another. If there are only a few properties, in that case it’s okay to perform manual mapping of property to other tables.
But assume if there are a large number of properties then accomplishing it manually becomes so tough to execute as we can overlook some properties to map, and hence it raises the error. The code will get so long and we will be unable to maintain the code reusability.
Why is Automapper important?
Imagine if there are one or two lines of code to map the properties of tables to another table. Then it will be simple to map big numbers of properties to another table. Therefore, we can achieve that with the help of Automapper in ASP.NET Core.
Use case
Let’s assume a simple example without using an Automapper.
We have a set of users in our local table and also in azure ad B2C which contains the same type of information or users. we need to convert azure B2C user object to application user object.
Without using Automapper
namespace AutomapperMvvmExample.Controllers
{
public class ApplicationUserController: Controller
{
private Context dbContext = new Context ();

ApplicationUser users = new ApplicationUser();

[HttpGet]
public ActionResult InsertById()
{
return View ();
}
[HttpPost]
public ActionResult InsertById(int id)
{
var userlist = dbContext.activeDirectoryUsers.Where(x => x.ObjectId == id).FirstOrDefault();

if (userlist! = null)
{
dbContext.applicationUsers.Add(new ApplicationUser
{
FirstName = userlist.FirstName,
LastName = userlist.LastName,
Email = userlist.Email,
DisplayName = userlist.DisplayName,
StreetAddress = userlist.StreetAddress
});
}
dbContext.SaveChanges();
return View ();
}
}
}
In the InsertById method, you can see there is the manual mapping of property to another table. This is the few properties but assumes that there is the 8 – 10 property and we have to map manually then it’s a very lengthy process. Hence, a new concept introduced called Automapper.
Let’s create the example with the help of Automapper.
We will be going to use a code-first approach and you can also use the DB.
Step 1: Create two models
Create the two models ActiveDirectoryUser and ApplicationUser for mapping the property of ActiveDirectoryUser to ApplicationUser.
using System;
using System.Collections.Generic;
using System.ComponentModel.DataAnnotations;
using System.Linq;
using System.Web;

namespace AutomapperMvvmExample.Models
{
public class ApplicationUser
{
[Key]
public int ObjectId { get; set; }
public string FirstName { get; set; }
public string LastName { get; set; }
public string Email { get; set; }
public string DisplayName { get; set; }
public string StreetAddress { get; set; }
}
}
We have created the model named ApplicationUser with properties ObjectId, First_name, Last_name, Email, DisplayName, StreetAddress where ObjectId is the primary key.
using System;
using System.Collections.Generic;
using System.ComponentModel.DataAnnotations;
using System.Linq;
using System.Web;
namespace AutomapperMvvmExample.Models
{
public class ActiveDirectoryUser
{
[Key]
public int ObjectId { get; set; }
public string FirstName { get; set; }
public string LastName { get; set; }
public string Email { get; set; }
public string DisplayName { get; set; }
public string StreetAddress { get; set; }
}
}
The second model is ActiveDirectoryUser with properties ObjectId, First_name, Last_name, Email, DisplayName, StreetAddress where ObjectId is the primary key. We will map the property of the ActiveDirectoryUser model into the ApplicationUser model with the help of Auto mapper.
Step 2: Add model to context file
The context file will look like this. Add two models into the context as shown below. After migration it will generate the table in the database as the model name.
namespace AutomapperMvvmExample.Models
{
public class Context : DbContext
{
public Context() : base("Context")
{

}
public DbSet activeDirectoryUsers { get; set; }
public DbSet applicationUsers { get; set; }
}
}
Step 3: Add controller
First controller to fill the ActiveDirectoryUser table in the database. In which we have to define the Index method for get and post as shown below:
using AutomapperMvvmExample.Models;

namespace AutomapperMvvmExample.Controllers
{
public class ActiveDirectoryUserController: Controller
{
private Context _context = new Context ();
ActiveDirectoryUserController user = new ActiveDirectoryUserController();

[HttpGet]
public ActionResult Insert ()
{
return View ();
}
[HttpPost]
public ActionResult Insert (ActiveDirectoryUser user)
{
if (ModelState.IsValid)
{
_context.activeDirectoryUsers.Add(user);
_context.SaveChanges();
}
return View ();
}
}
}
- It is a basic form to add values to the model. Define the context instance and values using add method as shown. After that save the context using the () method.
- Second contSaveChanges roller is to add values in the ApplicationUser table with the help of Automapper.
- First of all, install the Auto mapper from the nuget package.
using AutomapperMvvmExample.Models;
using AutoMapper;

namespace AutomapperMvvmExample.Controllers
{
public class ApplicationUserController : Controller
{
private Context dbContext = new Context();
ApplicationUser users = new ApplicationUser();

[HttpGet]
public ActionResult Index()
{
if (dbContext.applicationUsers.Any())
{
return View(dbContext.applicationUsers.ToList());
}
return View();
}

[HttpGet]
public ActionResult Insert()
{
var userlist = dbContext.activeDirectoryUsers.ToList();

var config = new MapperConfiguration(cfg => {
cfg.CreateMap<ActiveDirectoryUser, ApplicationUser>();
});

IMapper mapper = config.CreateMapper();

if (userlist != null)
{
var newuser = mapper.Map<List,List>(userlist);
foreach(var item in newuser)
{
var foundUser = dbContext.applicationUsers.Any(x=> x.Email == item.Email);
if (foundUser == false)
{
dbContext.applicationUsers.Add(item);
}
else
{
ViewData["message"] = "Some Data Already Exist";
}
}
}
dbContext.SaveChanges();
return View("Index",dbContext.applicationUsers.ToList());
}
}
}
Here we have used the Automapper version 10.1.1. So, we have used the mapper configuration for mapping the table.
In the previous version, we have to write only two lines to map the table but in the latest version, it is deprecated. To create the default mapping, call CreateMap<T1, T2> () where T1 is the source entity whereas T2 is the destination entity. So here we are mapping ActiveDirectoryUser table properties into ApplicationUser table properties. We do not need to work more; automapper do these things Seamlessly.
In the Index view, I’ve created the button Add so when we click on that button then Insert method will be called. And in the Insert method it will take the list of the data of the ActiveDirectoryUser table and place it in the user list variable. After that we have used that user list in the “mapper.map” where it will store the value from the ActiveDirectoryUser to the ApplicationUser.
Now make a view of the method and run the application.
Output:

Figure 1.0: ActiveDirectoryUser List

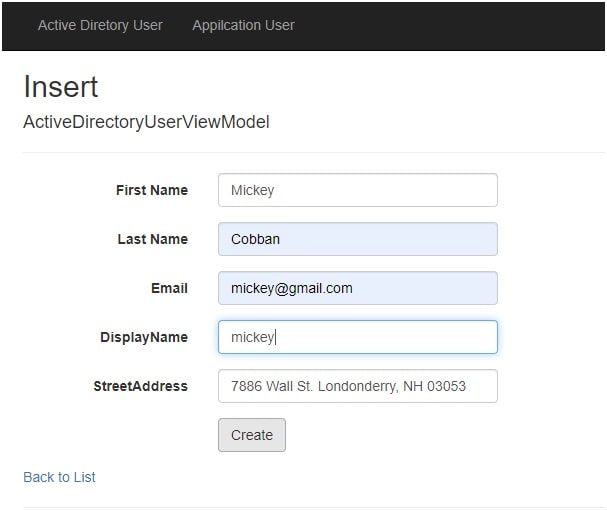
Figure 1.1 Insert into ActiveDirectoryUser
This is a simple insert method to fill the ActiveDirectoryUser table. After added the data the data list will be look like as:

Figure 1.2 ActiveDirectoryUser Table after adding data
Add this filled value into the ApplicationUser table as shown below snap.

Figure 2.0 ApplicationUser List
We can see here that there is a Get button, when we click on that then data from ActiveDirectoryUser table will be added to the Applicationuser table. And that ApplicationUser table data list looks like:

Figure 2.1 ApplicationUser Table after adding data
In map function, T, make sure that the first position is the source table from which we want to take the value and second position is for the destination table in which we want to map the value from the source table.
Create the View Model
A view model illustrates the data that you desire to display on your view/page, whether it be used for input values or static texts that can be adjoined to the database.
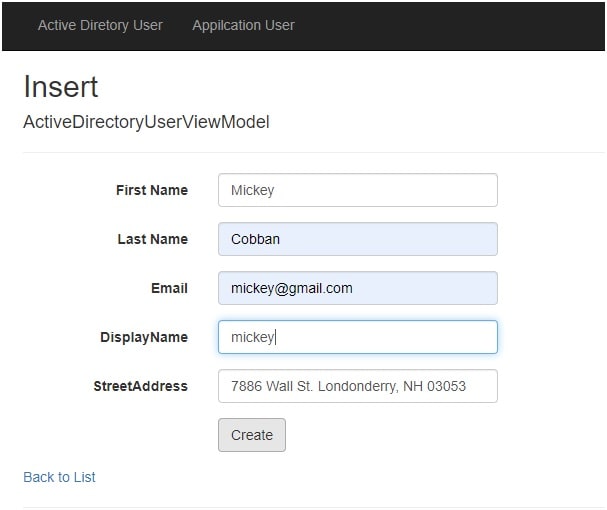
We have created the view model to add the data into the ActiveDirectoryUser table from the view model.
Step 1: Create a view model class
Create the view model as our above table properties. So we can create the view of this view model and after that we will store the value of the view model to ActiveDirectoryUser table using Automapper.
namespace AutomapperMvvmExample.ViewModel
{
public class ActiveDirectoryUserViewModel
{
[Key]
public int ObjectId { get; set; }
public string FirstName { get; set; }
public string LastName { get; set; }
public string Email { get; set; }
public string DisplayName { get; set; }
public string StreetAddress { get; set; }
}
}
We have taken the properties as same as ActiveDirectoryUser table and a primary key ObjectId.
Step 2: Create the controller
I have used the same controller but you can create another controller and insert the value that comes from the view model from the browser in the ActiveDirectoryUser table as shown below.
using AutoMapper;
using AutomapperMvvmExample.Models;
using AutomapperMvvmExample.ViewModel;

namespace AutomapperMvvmExample.Controllers
{
public class ActiveDirectoryUserController : Controller
{
private Context _context = new Context();
ActiveDirectoryUser user = new ActiveDirectoryUser();
public ActionResult Index()
{
if (_context.activeDirectoryUsers.Any())
{
return View(_context.activeDirectoryUsers.ToList());
}
return View();
}

[HttpGet]
public ActionResult Insert()
{
return View();
}
[HttpPost]
public ActionResult Insert(ActiveDirectoryUserViewModel user)
{
var config = new MapperConfiguration(cfg => {
cfg.CreateMap<ActiveDirectoryUserViewModel, ActiveDirectoryUser>();
});

IMapper mapper = config.CreateMapper();

if (user != null)
{
var newuser = mapper.Map<ActiveDirectoryUserViewModel, ActiveDirectoryUser>(user);

var foundUser = _context.activeDirectoryUsers.Any(x => x.Email == user.Email);
if (foundUser == false)
{
_context.activeDirectoryUsers.Add(newuser);
}
else
{
ViewData["message"] = "Data Already Exist";
}
_context.SaveChanges();
}
return View("Index",_context.activeDirectoryUsers.ToList());
}
}
}
Output:

Figure 3.0 Insert from View model to ActiveDirectoryUser

Figure 3.1 After inserting into ActiveDirectoryUser table
Using ForMember() Method:
- The auto mapper also contains the two main and useful methods named ForMember() and Ignore().
- Suppose we have two properties: First name and Last name and in view model there is the Full name property. We can use the ForMember() method for mapping these two properties into one property.
- If we have extra properties in the view model then use the ignore method.
Our two model ActiveDirectoryUser, and ApplicationUser will be same. We have to just change the view model and controller. Let’s see the code.
Step 1:- Change ActiveDirectoryUser Controller
In the Index method of ActiveDirectoryUser controller, just change the mapper configuration as follows.
var config = new MapperConfiguration(cfg => {
cfg.CreateMap<ActiveDirectoryUserViewModel, ActiveDirectoryUser>().ForMember(y => y.DisplayName, map => map.MapFrom(x => x.FirstName + " " + x.LastName)); ;
});
MapFrom() method is used to combine the two properties. Here we have combined the FirstName and LastName property to DisplayName property.
Now let’s see the ignore() method.
Step 2:- Change ApplicationUser Controller
In the Insert method of the ApplicationUser controller, change the mapper configuration as below.
var config = new MapperConfiguration(cfg => {
cfg.CreateMap<ActiveDirectoryUser, ApplicationUser>().ForMember(z => z.ObjectId, options => options.Ignore());
});
Ignore() method ignores the property that we don’t want to add to the mapper table.
Step 3:- Change the ViewModels
In both view model, we do not add the DisplayName property. Change both view model as below.
public class ApplicationUserViewModel
{
[Key]
public int ObjectId { get; set; }
[DisplayName("First Name")]
public string FirstName { get; set; }
[DisplayName("Last Name")]
public string LastName { get; set; }
public string Email { get; set; }
public string StreetAddress { get; set; }
}
Output:-

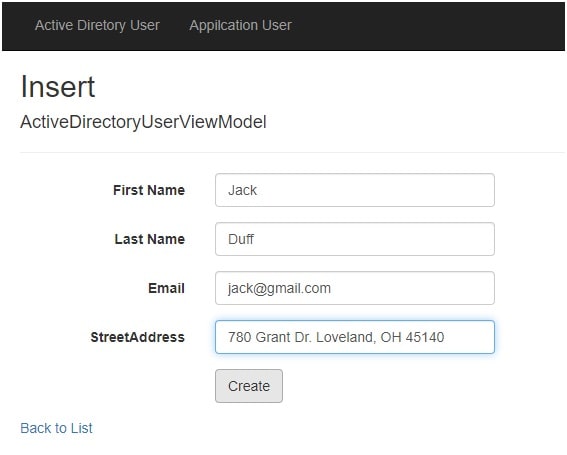
Figure 4.0 Insert into ActiveDirectoryUser

Figure 4.1 ActiveDirectoryUser table

Figure 4.2 ApplicationUser table
As we can see here DisplayName property appears with the full name which is a combination of two properties FirstName and LastName.
Conclusion
In this blog, we have learned about the view model with the auto mapper. That helps our code be easy to write, easy to understand, and easy to maintain. By using Auto mapper, code will be reduced and it provides the maintainability, extensibility, and stability of code. When you completely understand the code then try to make other two methods Edit and Delete.
This was a sample demonstration, it would really help you to get started with the perfect code practices and patterns for your new web application.
Hope you acquire a clear understanding on how to implement the mapping of models using Automapper.


